The audio shield takes care of the line level audio input. This audio input is then decoded. The decoding is done by libltc. The library runs as is on a Teensy without modification. The three elements are combined in a relatively simple teensy patch
To use the decoder connect the line level input left channel to an SMPTE source via e.g. an RCA plug.
For code, comments, pull requests please consult the Github repository for the Teensy SMPTELTC decoder
During an experiment which monitors a music performance it might be a requirement to record music, video and sensor data synchronously. Recording analog sensors (balance boards, accelerometers, light sensors, distance sensors) together with audio and video is often problematic. Ideally standard DAW software can be used to record both audio and sensor data. A system is presented here that makes it relatively straightforward to record sensor data together with audio/video.
The basic idea is simple: a microcontroller is programmed to appear as a class compliant MIDI device. Analog measurements on the micro-controller are translated to a specific MIDI protocol. The MIDI data, on the capturing side, can then be converted again into the original sensor data. This setup has several advantages:
It makes it easy to record sensor data together with audio data in a standard DAW software package. Recording a recording a midi track and audio track simultaneously in, e.g., Ableton Live, is easy.
Communication with the micro-controller is bi-directional. The micro-controller can be programmed to react to certain MIDI messages. A note-on can, for example, be used to start analog sensor recording. These MIDI commands can be send from any possible source that can ‘speak’ MIDI.
Thanks to the Web MIDIAPI this construct presents an easy way to let analog sensors and websites interact.
Real time sonification of the sensor-data is also supported. There are many ready to go options to sonify MIDI. Axoloti, Max/MSP, Zupiter are some of the environments that can be pugged into.
Fig: Visualization in html of analog sensor data, captured as MIDI
While the concept is relatively simple, there are many details to get right. Please consult the MIDImorphosis github page which details the system that consists of an analog sensor, a MIDI protocol and a clocking infrastructure.
At work we have a really nice piano and I wanted to be able to broadcast a live performance over the internet with low latency to potential live listeners. In all honesty, only my significant other gets moderately lukewarm about the idea of hearing me play live. Anyhow:
I did not find any practical tool to easily pump audio over the internet. I did find something that was very close called trx by Mark Hills: trx is a simple toolset for broadcasting live audio from Linux. It unfortunately only works with the ALSA audio system and is limited to Linux. I decided to extend it to support macOS and Pulse Audio. I also extended its name to form trix.
Audio Transmitter/Receiver over Ip eXchange (trix) is a simple toolset for broadcasting live audio from Linux or macOS. It sends and receives encoded audio over IP networks, via an audio interface. If audio interfaces are properly configured, a low-latency point-to-point or multicast broadband audio connection can be achieved. This could be used for networked music performances. The inclusion of the intermediate rtAudio library provides support for various audio input and outputs.
More information on trix can be found on the trix github page.
Latency
The system can be configured for low latency use. The whole chain is dependent several different components which each add to the total latency: audio input latency, encoder (algorithmic) delay, network latency and finally audio output latency.
Thanks to the use of RtAudio it should be possible to use low latency API’s to access audio devices (ASIO on windows or Jack on Unix). This means that audio input and output latencies can be as low as the hardware allows. The opus encoder/decoder that is used has a low algorithmic delay. By default it has a 25ms delay but it can be configured to only 2.5ms (see here). The network latency (and jitter) is very much dependent on the distance to cover. On a local network this can be kept low, when using wide area networks (the internet) control is lost and latencies can add up depending on the number of hops to take. Jitter can be problematic if the smallest possible buffers are used: then dropouts might occur and this might affect the audio in a noticeable way.
I have uploaded a small piece of software which allows users to find a specific audio marker in audio streams. It is mainly practical to synchronise a camera (audio/video) recording with other audio with the same marker. The marker is a set of three beeps. These three beeps are found with millisecond accurate precision within the audio streams under analysis. By comparing the timing of marker synchronization becomes possible. It can be regarded as an alternative for the movie clapper boards.
Recently I have published a small library on github called JGaborator. The library calculates fine grained constant-Q spectral representations of audio signals quickly from Java. The calculation of a Gabor transform is done by a C++ library named Gaborator. A Java native interface (JNI) bridge to the C++ Gaborator is provided. A combination of Gaborator and a fast FFT library (such as pfft) allows fine grained constant-Q transforms at a rate of about 200 times real-time on moderate hardware. It can serve as a front-end for several audio processing or MIR applications.
While the gaborator allows reversible transforms, only a forward transform (from time domain to the spectral domain) is currently supported from Java.A spectral visualization tool for sprectral information is part of this package. See below for a screenshot:
The active listening demo movie above should explain the aim system succinctly. It shows two different ways to provide ‘context’ to audio playing in the room. In the first instance beats information is used to synchronize smartphones and flash the screen, the second demo shows a tactile feedback device responding to beats. The device is a soundbrenner pulse tactile metronome and was kindly sponsored by the company that sells these.
The Mi Band is a bracelet with some sensors, three RGB leds and a vibration motor. It is marketed as an activity tracker and notifier. It is a neat little device that communicates via Bluetooth LE and has a battery life of around 30 days. It would be nice if it could be used for whatever purpose you want but alas, its API is not very open. This blog post gives pointers to useful resources and tips to make it work with your own code.
I would advise against installing the official Mi Band app, if you want to use it with custom code. The app upgrades the firmware to the latest version and it seems that Xiaomi is obfuscating the protocol more and more with each version. I was able to send vibrate and led commands to a Mi Band with firmware version 10.0.9.3. With the previously mentioned sources and the flow described to the right the device reacts to commands. I used an Android device. The flow:
Pair with the Mi Band in the Android Bluetooth setting.
In your code, connect to the paired device. Save the device address, you will need it later.
Send a pair command to the device. This is part of the Mi Band protocol and has nothing to do with the previous Bluetooth pairing. If all goes well it reacts with a 2. See here
Send user info. This step is crucial and not trivial. The user info needs to be encoded in a certain way and is CRC’d with the device address. The following is an example implementation of the Mi Band user info encoding
Now you can send vibrate or other commands.
Some notes: the self-test command works without the set user step. For Android the Mi Band protocol implementation in Java works well. To check the firmware version of the device, call the get device info characteristic. The last bytes, interpreted as an integer, define the version info. For my device it is 10.9.3.2:
Another note: the set user info needs to be called with a 1 as type the first time the band is used. This is done with new UserInfo(20111111, 1, 32, 180, 55, "NM", 1) with the Android sdk by GitHub user pangliang. This sets and overwrites the user info. The next times you do not want to overwrite the info and the type needs to be zero.
The article titled “Synchronizing Multimodal Recordings Using Audio-To-Audio Alignment” by Joren Six and Marc Leman has been accepted for publication in the Journal on Multimodal User Interfaces. The article will be published later this year. It describes and tests a method to synchronize data-streams. Below you can find the abstract, pointers to the software under discussion and an author version of the article itself.
Synchronizing Multimodal Recordings Using Audio-To-Audio Alignment An Application of Acoustic Fingerprinting to Facilitate Music Interaction Research
Abstract:Research on the interaction between movement and music often involves analysis of multi-track audio, video streams and sensor data. To facilitate such research a framework is presented here that allows synchronization of multimodal data. A low cost approach is proposed to synchronize streams by embedding ambient audio into each data-stream. This effectively reduces the synchronization problem to audio-to-audio alignment. As a part of the framework a robust, computationally efficient audio-to-audio alignment algorithm is presented for reliable synchronization of embedded audio streams of varying quality. The algorithm uses audio fingerprinting techniques to measure offsets. It also identifies drift and dropped samples, which makes it possible to find a synchronization solution under such circumstances as well. The framework is evaluated with synthetic signals and a case study, showing millisecond accurate synchronization.
The algorithm under discussion is included in Panako an audio fingerprinting system but is also available for download here. The SyncSink application has been packaged separately for ease of use.
To use the application start it with double click the downloaded SyncSink JAR-file. Subsequently add various audio or video files using drag and drop. If the same audio is found in the various media files a time-box plot appears, as in the screenshot below. To add corresponding data-files click one of the boxes on the timeline and choose a data file that is synchronized with the audio. The data-file should be a CSV-file. The separator should be ‘,’ and the first column should contain a time-stamp in fractional seconds. After pressing Sync a new CSV-file is created with the first column containing correctly shifted time stamps. If this is done for multiple files, a synchronized sensor-stream is created. Also, ffmpeg commands to synchronize the media files themselves are printed to the command line.
This work was supported by funding by a Methusalem grant from the Flemish Government, Belgium. Special thanks goes to Ivan Schepers for building the balance boards used in the case study. If you want to cite the article, use the following BiBTeX:
@article{six2015multimodal,
  author      = {Joren Six and Marc Leman},
  title       = {{Synchronizing Multimodal Recordings Using Audio-To-Audio Alignment}},
  issn        = {1783-7677},
  volume      = {9},
  number      = {3},
  pages       = {223-229},
  doi         = {10.1007/s12193-015-0196-1},
  journal     = {{Journal of Multimodal User Interfaces}},
  publisher   = {Springer Berlin Heidelberg},
  year        = 2015
}
The synchronized data from the two webcams, accelerometer and balanceboard in ELAN. From top to bottom the synchronized streams are two video-streams, balance-board data (red), accelerometer-data (green) and audio (black).
Conceptual drawing used as a basis for the SyncSync application. A reference stream (blue) can be synchronized with streams one and two. It allows a workflow where streams are started and stopped (red) or start before the reference stream (green).
A microcontroller fitted with an electret microphone and a microSD card slot. It can record audio in real-time together with sensor data.
SyncSink Synchronize media files. A user-friendly interface to synchronize media and data files. First a reference media-file is added using drag-and-drop. The audio steam of the reference is extracted and plotted on a timeline as the topmost box. Subsequently other media-files are added. The offsets with respect to the reference are calculated and plotted. CSV-files with timestamps and data recorded in sync with a stream can be attached to a respective audio stream. Finally, after pressing Sync!, the data and media files are modified to be exactly in sync with the reference.
Multimodal recording system diagram. Each webcam has a microphone and is connected to the pc via USB. The dashed arrows represent analog signals. The balance board has four analog sensors but these are simplified to one connection in the schematic. The analog output of the microphones is also recorded through the DAQ. An analog accelerometer is connected with a microcontroller which also records audio.
Two streams of audio with fingerprints marked. Some fingerprints are present in both streams (green, O) while others are not (red, x). Matching fingerprints have the same offset, indicated by the dotted lines.
Synchronized streams in Sonic Visualizer. Here you can see two channel audio synchronized with accelerometer data (top, green) and balanceboard data (bottom, purple).
This post explains how to do real-time pitch-shifting and audio time-stretching in Java. It uses two components. The first component is a high quality software C++ library for audio time-stretching and pitch-shifting C++ called Rubber Band. The second component is a Java audio library called TarsosDSP. To bridge the gap between the two JNI is used. Rubber Band provides a JNI interface and starting from the currently unreleased version 1.8.2, makefiles are provided that make compiling and subsequently using the JNI version of Rubber Band relatively straightforward.
However, it still requires some effort to control real-time pitch-shifting and audio time-stretching from java. To make it more easy some example code and documentation is available in a GitHub repository called RubberBandJNI. It documents some of the configuration steps needed to get things working. It also offers precompiled libraries and documents how to compile those for the following systems:
This post describes a tool to quickly visualize and record analog signals with a Teensy micro-controller and some custom software. It is mainly useful to quickly get an idea of how an analog sensor reacts to different stimuli. Since it is also able to capture and store analog input siginals it is also useful to generate test data recordings which then can be used for example to test a peak detection algorithm on. The tool is called TeensyDAQ hinting at the Data AcQuisition features and the micro-controller used.
Some of the features of the TeensyDAQ:
Visualize up to five analog signals simultaneously in real-time.
Capture analog input signals with sampling rates up to 8000Hz.
Record analog input to a CSV-file and, using drag-and-drop, previously recorded CSV-files can be visualized.
Works on Linux, Mac OS X and Windows.
While a capture session is in progress you can going back in time and zoom, pan and drag to get a detailed view on your data.
Allows you to listen to your input signal, this is especially practical with analog microphone input.
The system consists of two parts. A hardware and a software part. The hardware is a Teensy micro-controller running an Arduino sketch that ready analog input A0 to A4 at the requested sampling rate. A Teensy is used instead of a regular Arduino for two reasons. First the Teensy is capable of much higher data throughput, it is able to send five reading at 8000Hz, which is impossible on Arduino. The second reason is the 13bit analog read resolution. Classic Arduino only provides 10 bits.
The software part reads data from the serial port the Teensy is attached to. It interprets the data and stores it in an efficient data-structure. As quickly as possible the data is visualized. The software is written in Java. A recent Java runtime environment is needed to execute it.
This post describes how to get notifications from a Bluetooth LE or Bluetooth v4.0 device on a Linux machine. Since it took me a while to get it going it is perhaps of interest to others.
The hardware I used is an RFduino board and a Belikin mini Bluethooth v4.0 adapter. The RFduino was programmed to wait for an event with RFduino_pinWake(pni, HIGH). When the pin is HIGH a count is incremented and this number is send to any device that is listening. In my case a Linux machine. The code is essentially the same as the button example included in the RDduino software distribution.
To install the Bluetooth stack on Debian the following command is executed sudo apt-get install bluetooth bluez bluez-utils bluez-firmware. A blog post describes more about the Bluetooth tools. Some other interesting reads are Get started with Bluetooth Low Energy and this stackoverflow question. Once the stack is installed correctly the lescan utility should give an output like this:
Bluetooth LE works with the Generic Attribute Profile (GATT). A Bluetooth LE device can provide services by combining characteristics. These characteristics are the way to communicate with the device. Some characteristics are writable and are able to send notifications. To receive notifications one such characteristic (referred to with a hex handle) needs to be written. Write 0100 to get notifications, 0200 for indications (indications are notifications that are acknowledged), 0300 for both, or 0000 for nothing (default). With this in mind, the following command enables listening for notifications:
With those commands working, the process can be automated with a Ruby script to get Bluetooth LE notifications. The script essentially calls gatttool with the correct parameters and parses and reacts to its output. To make it work lescan needs to be called before starting the script:
This post describes how to connect music in your library with precomputed features. Say, for example, you are developing a DJ application and you want to facilitate mixing tracks. To provide a seamless mix you perhaps want information about beats and about the key the music in your library is in. Since vast databases of features are already available you probably want to access those, instead of using your own feature extractors and database. The problems that need to be addressed are:
Automatically identify the music in your library without relying on incomplete meta-data (tag information).
Connect the music with a data-base of meta-data. Preferably a large and well curated database.
Fetch pre-computed features for the music. The features should be extracted using algorithms that are currently state of the art or at least perform well. The features and the audio itself should be synchronized, otherwise beat information, for example, is not of much use.
To help with these task there are several open source tools and services available.
To identify music a condensed representation of musical audio is created. This process is known as acoustic fingerprinting. On the website AcoustID a tool is available to create such fingerprint. The library is called Chromaprint and the command line client is called fpcalc. Currently the latest version is Chromaprint version 1.2 and static binaries for fpcalc are available on the AcoustID website. A packages for Debian (and probably Ubuntu) can be installed by calling apt-get install libchromaprint-tools. Once this tool is correctly installed a fingerprint for a piece of music can be created:
A fingerprint by itself is not of much use. The AcoustID webservice translates a fingerprint into one or more MusicBrainz identifiers. One fingerprint can result in multiple identifiers because the same audio can be released on several albums. There is documentation for AcoustID webservice available. To use the webservice an API key is needed. Confusingly, the AcoustID service has two types of API keys. One for end-users and one for developers. The last type is needed to translate ID’s. To request a developer API key, log in on the AcoustID website and “add an application”, there you can find the correct API key. Substitute dev_api_key in the following URL. Also change the fingerprint and duration to match the information provided by the fpcalc application. The webservice should reply with a set of MusicBrainz identifiers:
AcousticBrainz provides features for a subset of music that has a MusicBrainz identifier. Currently about a million tracks are analyzed but more are added every day. The API for the webservice is straightforward:
GET http://acousticbrainz.org/96685213-a25c-4678-9a13-abd9ec81cf35/low-level
GET http://acousticbrainz.org/96685213-a25c-4678-9a13-abd9ec81cf35/high-level
The low-level features include beat positions and chroma information. For the hypothetical DJ-application this is the information that would be used.
If you find the services useful please consider contributing to MusicBrainz, AcoustID and AcousticBrainz.
A small Ruby script to automatically fetch features for audio can be downloaded here. It needs Ruby and a RubyGems to parse JSON. On Debian this can be installed with apt-get install ruby and rubygems install json. Once these dependencies are installed the script can be ran as follows:
ruby mbid_lookup.rb example.mp3
Found6 musicbrainz identifiers!
Not found inAcousticBrainz: 0afcd4a1-3709-499b-b76f-0d5491f839a5
Beat positions for3d49fab8-fd08-42be-b0d2-9f1dc884d902: 0.522448956966,1.05650794506,1.57895684242,2.10140585899,2.61224484444,3.13469386101Not found inAcousticBrainz: 448258f0-aa5a-4968-8efd-8c9348d5142e
Not found inAcousticBrainz: adcd7079-57d9-49bd-a36b-a20fa27b02b1
Beat positions for d1cd1321-0b66-4848-935e-f3afba6c7356: 0.441179126501,0.905578196049,1.369977355,1.83437633514,2.29877543449,2.76317453384Not found inAcousticBrainz: e1f433be-af6b-4b5d-a969-4b53f014c395
TarsosDSP is a real-time audio processing library written in Java. Since version 2.0 it is compatible with Android. Judging by the number of forks of the TarsosDSP GitHub repository Android compatibility increased the popularity of the library. Now the first Android application which uses TarsosDSP has found its way to the Google Play store. Download and play with SINGmaster to see an application of the pitch tracking capabilities within TarsosDSP. The SINGmaster description:
“SING master is a smart phone app that helps you to learn how to sing. SING master presents a collection of practical exercises (on the most important building blocks of melodies). Colours and sounds guide you in the exercise. After recording, SING master gives visual feedback : you can see and hear your voice. This is important so that you can identify where your mistakes are.”
Another application in the Play Store that uses TarsosDSP is CuePitcher.
This post explains how to receive OSC in a MatLab environment. It uses a platform independent Java library which should work on 64 and 32 bit versions of Windows, Unix and Mac OS X. Using Java makes installation relatively easy compared with other solutions.
The most used method to get OSC-messages in Matlab can be found here. This method uses a library called liblo which needs to be configured (compiled) correctly on your system. Especially on Windows this can be problematic. A brave soul documented his quest to get OSC working with Matlab on Windows here. Obviously not for the faint of heart.
An alternative way leverages the Matlab facilities to run Java. Since there is a Java OSC library available (JavaOSC on github) it is relatively easy to bridge the two. To make the connection, I have written some glue code and provide an easy to use Jar-library here. Using the bridge is done as follows:
Start Matlab, modify the client script to fit your needs. You probably need to change the OSC method to listen to and the OSC port. Also make sure that the cd command points to the directory with the downloaded jar-file.
Run the client script and receive your OSC messages.
Note that there are three ways to receive the payload of a message. They are returned by the Java code as either Object[], double[] or String[]. The last two are automatically understood by Matlab, so they are more easy to work with. Respectively to get the message data you need to call either osc_listener.getMessageArguments(), osc_listener.getMessageArgumentsAsDouble(), osc_listener.getMessageArgumentsAsString().
cd('C:/dir/with/jar/file/')
% Checkyour java version 1.6+ should be ok
version -java
% Loadthe jar file
javaaddpath('javaosctomatlab.jar');
% Importthe needed java packages
import com.illposed.osc.*;
import java.lang.String
% definesthe OSC port to listen to
receiver = OSCPortIn(4000);
% definesthe OSC method to listen to
osc_method = String('/ECG');
osc_listener = MatlabOSCListener();
receiver.addListener(osc_method,osc_listener);
receiver.startListening();
%infinite loop, receiving all non empty messages
while(1)
struct = osc_listener.getMessageArgumentsAsDouble();
if ~isempty(struct)
struct
endend
receiver.stopListening();
receiver=0;
This post explains how to measure audio output latency on Android devices. To measure audio latency USB-OTG and an Arduino is used. In the process it documents audio output latency on an LG Nexus 5 device running the most recent version of Android, which currently is Lollipop (5.0).
Audio latency is an important aspect of a system, especially if it is used for real-time sonification or for musical applications. Audio latency is the, preferably short, delay between audio entering a system and emerging from a system. Audio output latency is the time it takes between a signal (e.g. a button pressed) and when audio emerges. For sonification purposes audio output latency is more interesting than round-trip audio latency.
Android systems are often portable, generally available and relatively cheap. Android offers an attractive platform to develop sonifications or musical applications for. Unfortunately, audio latency on Android has not been a priority in the first versions. With Android 4.1 things started to change but due to hard- and software fragmentation it is still hard to find how much audio latency is expected. Even if the exact model (e.g. Nexus 5) and software version (stock Android 5.0) is known, exact numbers are, so it seems, nowhere to be found. For more information on the internal changes that make low latency audio on Android possible, watch the talk on High Performance Audio from the 2013 Google I/O conference. Also note the lack of exact latency numbers in that talk. It is a very enjoyable talk by two Google engineers going after the culprits of high latency in true Sherlock/dr. Watson style.
Since audio output latency is generally not documented and since it is an important factor to decide if Android is a viable platform for real-time sonification or musical applications it needs to be measured. One way of measuring audio output latency on Android is documented by the people of Google. Unfortunately, the approach is not easily reproducible since it needs a custom circuit board, an oscilloscope and there is no source code available. Below a reproducible way to measure audio output latency for Android is documented.
An Arduino, an Android device, an USB-OTG cable and a butchered mini-jack audio cable are needed together with the software provided here. Optionally, a data acquisition module can be used to visualize the signals. The measurement system works as follows:
An Arduino sends a signal over USB. The time at which the signal is send is stored for later use.
An Android device, connected to the Arduino via an USB-OTG-cable, receives the signal.
The Android device responds as quickly as possible, with the lowest latency as possible, by emitting a sound.
The sound is captured on an analog input port of the Arduino, via the mini-jack cable. The time the sound appears on the Arduino is stored.
By comparing the time when the signal was send with the time when the sound arrived, the audio output latency is measured and reported.
The previous steps are repeated every second to gain insights into the variability of the measurements. To generate microsecond accurate timing interrupts are used on the Arduino. For visualisation, a digital pin is toggled every time the Arduino sends a signal. The Arduino sketch is attached to this post, as is the source code for the Android application. An already compiled APK is also available. With some luck – a recent Android version is needed, your device should support USB-OTG – it might work on your device.
Results
Using the OpenSL ES native interface on a Nexus 5 with Lollipop installed the USB input to audio output latency is on average about 48 milliseconds. There is some variability but it is usually within 15 milliseconds. For music applications this latency is not great but, depending on the application, acceptable. For expert drummers latency should be in the range of 20ms but for many sonification tasks, 50ms suffices. It is clear that Android will never be able to compete with purpose built hardware running a real time operating system like Axoloti (Audio roundtrip latency 2ms, usb-audio 1.6ms) but for a general purpose device the measured latency is significantly better than what I expected (around 100ms).
The non-native audio interface is a lot slower. I have measured an average latency of about 85ms and a much larger variability (25ms).
With this post I hope others will report the latency for their devices as well, so that buyers that are interested in a low-latency Android devices can make an informed decision.
Result on Android.
Onsets and audio visualized using a DAC and a Java program.
TarsosLSH is a Java library implementing Locality-sensitive Hashing (LSH), a practical nearest neighbor search algorithm for high dimensional vectors that operates in sublinear time. The open source software package is authored by me and is available on GitHub: TarsosLSH on GitHub.
With TarsosLSH, Joseph Hwang and Nicholas Kwon from Rice University created an Image Mosaic web application. The application chops an uploaded photo into small blocks. For each block, a color histogram is created and compared with an index of color histograms of reference images. Subsequently each block is replaced with one of the top three nearest neighbors, creating a mosaic. Since high dimensional nearest neighbor search is needed, this is an ideal application for TarsosLSH. The application somewhat proves that TarsosLSH can be used in practical applications, which is comforting.
The Starry Night, by Van Ghogh in Mosaic as created by the mosaic webapplication.
Below some notes on installing and using the drivers for the Avandtech USB-4716 on Linux can be found. Since I was unable to find these instructions elsewhere and it took me some time to figure things out, it is perhaps of use to someone else. A similar approach should work for the following devices as well: pci1715, pci1724, pci1734, pci1752, pci1758, pcigpdc, usb4711a, usb4750, pci1711, pci1716, pci1727, pci1747, pci1753_mic3753_pcm3753i, pci1761_pcm3761i, pcm3810i, usb4716, usb4761, pci1714_pcie1744, pci1721, pci1730_pcm3730i, pci1750, pci1756, pci1762, usb4702_usb4704, usb4718
Download the linux driver for the Avandtech USB-4716 DAQ. If you are on a system that can install either deb or rpm use the driver_package. Unzip the package. The driver is split into two parts. A base driver biokernbase and a driver specific for the USB-4716 device, bio4716. The drivers are Linux kernel modules that need to installed. First the base driver needs to be installed, the order is important. After the base driver install the device specific deb kernel module. After a reboot or perhaps immediately this should be the result of executing lsmod | grep bio:
A library to interface with the hardware is provided as a deb package as well. Install this library on your system.
Next download the the examples for the Avandtech USB-4716 DAQ. With the kernel modules installed the system is ready to test the examples in the provided examples directory. If you are using the Java code, make sure to set the java.library.path correctly.
This post contains some info on how do some basic home automation: it shows how cheap remote controlled power sockets can be managed using a computer. The aim is to power on or power off lights, a stereo or other devices remotely from a command shell.
The solution here uses an Arduino connected to a 433.33MHz transmitter. Via a Ruby script installed on the computer a command is send over serial to the Arduino. Subsequently the Arduino sends the command over the air to the power socket(s). If all goes well the power socket reacts by switching the connecting device on or off.
In the video below the process is shown. The command line interface controls the light via the Arduino. It should show the general idea.
The following Ruby script simply sends the binary control codes to the Arduino. For this type of power socket the code consist of a five bit group code and five bit device code. The Arduino is connected to /dev/tty.usbmodem411.
The code below is the complete Arduino sketch. It uses the RCSwich library, which makes the implementation very simple. Essentially it waits for a complete command and transmits it through the connected transmitter. The transmitter connected is a tx433n
#include <RCSwitch.h>RCSwitch mySwitch = RCSwitch();
char command[12];//2x5 for device and group + command
int index = 0;
char currentChar = -1;
//the led pin in use
int ledPin = 12;
void setup() {
//start the serial communication
Serial.begin(9600);
//433MHZTransmitter is connected to ArduinoPin#10
mySwitch.enableTransmit(10);
//Led connected to led pin
pinMode(ledPin, OUTPUT);
Serial.println("Started the power command center! Mwoehahaha!");
}
void readCommand(){
//read a command
while (Serial.available() > 0){
if(index < 11){
currentChar = Serial.read(); //Read a character
command[index] = currentChar; //Store it
index++; //Increment where to write next
command[index] = '\0'; // append termination char
}
}
}
void loop() {
//read a command
readCommand();
//if a command is complete
if(index == 11){
Serial.print("Recieved command: ");
Serial.println(command);
char operation = command[0];
char* group = &command[1];
//group is 5 bits, as is device
char* device = &command[6];
//execute the operation
doSwitch(operation,group,device);
//reset the index to read a new command
index=0;
}
}
void doSwitch(char operation, char* group, char* device){
digitalWrite(ledPin, HIGH);
if(operation == '1'){
mySwitch.switchOn(group, device);
Serial.print("Switched on device ");
} else {
mySwitch.switchOff(group, device);
Serial.print("Switched off device ");
}
Serial.println(device);
digitalWrite(ledPin, LOW);
}
Cheap remote controlled power sockets.
Remote and power socket with DIP-switch.
Soldered 'Arduino shield' to control power sockets.
The DSP library for Taros, aptly named TarsosDSP, now includes an implementation of a Constant-Q Transform (as of version 1.6). The Constant-Q transform does essentially the same thing as an FFT, but has the advantage that each octave has the same amount of bins. This makes the Constant-Q transform practical for applications processing music. If, for example, 12 bins per octave are chosen, these can correspond with the western musical scale.
Also included in the newest release (version 1.7) is a way to visualize the transform, or other musical features. The visualization implementation is done together with Thomas Stubbe.
The example application below shows the Constant-Q transform with an overlay of pitch estimations. The corresponding waveform is also shown.
TarsosLSH is a Java library implementing Locality-sensitive Hashing (LSH), a practical nearest neighbour search algorithm for multidimensional vectors that operates in sublinear time. It supports several Locality Sensitive Hashing (LSH) families: the Euclidean hash family (L2), city block hash family (L1) and cosine hash family. The library tries to hit the sweet spot between being capable enough to get real tasks done, and compact enough to serve as a demonstration on how LSH works. It relates to the Tarsos project because it is a practical way to search for and compare musical features.
git clone https://JorenSix@github.com/JorenSix/TarsosLSH.git
cd TarsosLSH/build
ant  #Builds the core TarsosLSH library
ant javadoc #build the API documentation
When everything runs correctly you should be able to run the command line application, and have the latest version of the TarsosLSH library for inclusion in your projects. Also, the Javadoc documentation for the API should be available in TarsosLSH/doc. Drop me a line if you use TarsosLSH in your project. Always nice to hear how this software is used.
The fastest way to get something on your screen is executing this on your command line: java - jar TarsosLSH.jar this lets LSH run on a random data set. The full reference of the command line application is included below:
Name
	TarsosLSH: finds the nearest neighbours in a data set quickly, using LSH.
Synopsis
	java - jar TarsosLSH.jar [options] dataset.txt queries.txt
Description
	Tries to find nearest neighbours for each vector in the
	query file, using Euclidean (L2) distance by default.

	Both dataset.txt and queries.txt have a similar format:
	an optional identifier for the vector and a list of N
	coordinates (which should be doubles).

	[Identifier] coord1 coord2 ... coordN
	[Identifier] coord1 coord2 ... coordN

	For an example data set with two elements and 4 dimensions:

	Hans 12 24 18.5 -45.6
	Jane 13 19 -12.0 49.8

	Options are:

	-f cos|l1|l2
		Defines the hash family to use:
			l1	City block hash family (L1)
			l2	Euclidean hash family(L2)
			cos	Cosine distance hash family
	-r radius
		Defines the radius in which near neighbours should
		be found. Should be a double. By default a reasonable
		radius is determined automatically.
	-h n_hashes
		An integer that determines the number of hashes to
		use. By default 4, 32 for the cosine hash family.
	-t n_tables
		An integer that determines the number of hash tables,
		each with n_hashes, to use. By default 4.
	-n n_neighbours
		Number of neighbours in the neighbourhood, defaults to 3.
	-b
		Benchmark the settings.
	--help
		Prints this helpful message.
Examples
	Search for nearest neighbours using the l2 hash family with a radius of 500
	and utilizing 5 hash tables, each with 3 hashes.

	java - jar TarsosLSH.jar -f l2 -r 500 -h 3 -t 5 dataset.txt queries.txt
Source Code Organization
The source tree is divided in three directories:
src contains the source files of the core DSP libraries.
test contains unit tests for some of the DSP functionality.
build contains ANT build files. Either to build Java documentation or runnable JAR-files for the example applications.
Further Reading
This section includes a links to resources used to implement this library.
The LSH-page maintained by Alexandr Andoni contains pointers to good resources:
Locality-Sensitive Hashing Scheme Based on p-Stable Distributions a chapter by Alexandr Andoni, Mayur Datar, Nicole Immorlica, Piotr Indyk, and Vahab Mirrokni which appeared in the book Nearest Neighbor Methods in Learning and Vision: Theory and Practice, by T. Darrell and P. Indyk and G. Shakhnarovich (eds.), MIT Press, 2006.
The DSP library for Taros, aptly named TarsosDSP, now includes an example showing how to synthesize cat sounds. The inspration came from this youtube video
To hear what exactly it does, listen to the following audio example.
There is also a command line interface, the following command does
The DSP library for Taros, aptly named TarsosDSP, now includes an implementation of a pitch shifting algorithm (as of version 1.4). The goal of pitch shifting is to change the pitch of a piece of audio without affecting the duration. The algorithm implemented is a combination of resampling and time stretching. Resampling changes the pitch of the audio, but affects the total duration. Consecutively, the duration of the audio is stretched to the original (without affecting pitch) with time stretching. The result is very similar to phase vocoding.
The example application below shows how to pitch shift input from the microphone in real-time, or pitch shift a recorded track with the TarsosDSP library.
To test the application, download and execute the PitchShift.jar file and load an audio file. For the moment only 44.1kHz mono wav is allowed. To get started you can try this piece of audio.
There is also a command line interface, the following command lowers the pitch of in.wav by two semitones.
java -jar in.wav out.wav -200

----------------------------------------------------
 _______                       _____   _____ _____
|__   __|                     |  __ \ / ____|  __ \
   | | __ _ _ __ ___  ___  ___| |  | | (___ | |__) |
   | |/ _` | '__/ __|/ _ \/ __| |  | |\___ \|  ___/
   | | (_| | |  \__ \ (_) \__ \ |__| |____) | |
   |_|\__,_|_|  |___/\___/|___/_____/|_____/|_|

----------------------------------------------------
Name:
	TarsosDSP Pitch shifting utility.
----------------------------------------------------
Synopsis:
	java -jar PitchShift.jar source.wav target.wav cents
----------------------------------------------------
Description:
	Change the play back speed of audio without changing the pitch.

		source.wav	A readable, mono wav file.
		target.wav	Target location for the pitch shifted file.
		cents		Pitch shifting in cents: 100 means one semitone up,
				-100 one down, 0 is no change. 1200 is one octave up.
The resampling feature was implemented with libresample4j by Laszlo Systems. libresample4j is a Java port of Dominic Mazzoni’s libresample 0.1.3, which is in turn based on Julius Smith’s Resample 1.7 library.
After about a year of development and several revisions TarsosDSP has enough features and is stable enough to slap the 1.0 tag onto it. A ‘read me’, manual, API documentation, source and binaries can be found on the TarsosDSP release directory. The source is present in the
What follows below is the information that can be found in the read me file:
TarsosDSP is a collection of classes to do simple audio processing. It features an implementation of a percussion onset detector and two pitch detection algorithms: Yin and the Mcleod Pitch method. Also included is a Goertzel DTMF decoding algorithm and a time stretch algorithm (WSOLA).
Its aim is to provide a simple interface to some audio (signal) processing algorithms implemented in pure JAVA. Some TarsosDSP example applications are available.
The following example filters a band of frequencies of an input file testFile. It keeps the frequencies form startFrequency to stopFrequency.
git clone https://JorenSix@github.com/JorenSix/TarsosDSP.git
cd TarsosDSP/build
ant tarsos_dsp_library #Builds the core TarsosDSP library
ant build_examples #Builds all the TarsosDSP examples
ant javadoc #Creates the documentation in TarsosDSP/doc
When everything runs correctly you should be able to run all example applications and have the latest version of the TarsosDSP library for inclusion in your projects. Also the Javadoc documentation for the API should be available in TarsosDSP/doc. Drop me a line if you use TarsosDSP in your project. Always nice to hear how this software is used.
Source Code Organization and Examples of TarsosDSP
The source tree is divided in three directories:
src contains the source files of the core DSP libraries.
test contains unit tests for some of the DSP functionality.
build contains ANT build files. Either to build Java documentation or runnable JAR-files for the example applications.
examples contains a couple of example applications with a Java Swing user interface:
SoundDetector show how you loudness calculations can be done. When input sound is over a defined limit an event is fired.
PitchDetector this demo application shows real-time pitch detection. When pitch is detected the hertz value is printed together with a probability.
PercussionDetector show the percussion (onset) dectection. Clapping your hands causes an event. This demo application also shows the influence of the two parameters on the algorithm.
UtterAsterisk a game with the goal to sing as close to a melody a possible. Technically it shows real-time pitch detection with YIN or MPM.
Spectrogram in Java shows a spectrogram and detected pitch, either live or from an audio file. It is interesting to see which frequencies are picked as fundamentals.
Goertzel DTMF decoding an implementation of the Goertzel Algorithm. A fancy user interface shows what goes on under the hood.
Audio Time Stretching – Implementation in Pure Java Using WSOLA an implementation of a time stretching algorithm. WSOLA makes it possible to change the play back speed of audio without changing the pitch. The play back speed can be changed at any moment, even when there is audio playing.
The Amsterdam Music Hack Day is a full weekend of hacking in which participants will conceptualize, create and present their projects. Music + software + mobile + hardware + art + the web. Anything goes as long as it’s music related
The hackathon was organized at the NiMK(Nederlands instituut voor Media Kunst) the 25th and 24th of May. My hack tries to let a phone start a conversation on its own. It does this by speaking a text and listening to the spoken text with speech recognition. The speech recognition introduces all kinds of interesting permutations of the original text. The recognized text is spoken again and so a dreamlike, unique nonsensical discussion starts. It lets you hear what goes on in the mind of the phone.
The idea is based on Alvin Lucier’s I am Sitting in a Room form 1969 which is embedded below. He used analogue tapes to generate a similar recursive loop. It is a better implementation of something I did a couple of years ago.
The implementation is done with Android and its API’s. Both speech recognition and text to speech are available on android. Those API’s are used and a user interface shows the recognized text. An example of a session can be found below:
To install the application you can download Tryalogue.apk of use the QR-code below. You need Android 2.3 with Voice Recognition and TTS installed. Also needed is an internet connection. The source is also up for grabs.
The Dan Ellis implementation is nicely documented here: Robust Landmark-Based Audio Fingerprinting . To download, get info about and decode mp3’s some external binaries are needed:
#install octave if needed
sudo apt-get install octave3.2
#Install the required dependencies for the script
sudo apt-get install mp3info curl
#mpg123 is not present as a package, install from source:
wget http://www.mpg123.de/download/mpg123-1.13.5.tar.bz2
tar xvvf mpg123-1.13.5.tar.bz2
cd mpg123-1.13.5/
./configure
make
sudo make install
In mp3read.m the following code was changed (line 111 and 112):
mpg123 = 'mpg123'; % was fullfile(path,['mpg123.',ext]);
mp3info = 'mp3info'; % was fullfile(path,['mp3info.',ext]);
Then, the demo program runs flawlessly when executing octave -q demo_fingerprint.m.
Running the demo with the original code with GNU Octave, version 3.2.3 takes 152 seconds on a PC with a Q9650 @ 3GHz processor. A small tweak can make it run almost 8 times faster. When working with larger data sets (10k audio files) this makes a big difference. I do not know why but storing a hash in the large hash table was really slow (0.5s per hash, with 900 hashes per song…). Caching the hashes and adding them all at once makes it faster (at least in Octave, YMMV). The optimized version of record_hashes.m can be found attached. With this alteration the same demo ran in 20s. When caching the data locally the difference is 11.5s to 141s or 12 times faster. The code with all the changes can be found here: Robust Landmark-Based Audio Fingerprinting – optimized for Octave 3.2. Please note again that the implementation is done by Dan Ellis (2009) ( available on Robust Landmark-Based Audio Fingerprinting) and I did only some small tweaks.
The DSP library for Taros, aptly named TarsosDSP, now includes an implementation of an audio echo effect. An echo effect is very simple to implement digitally and can serve as a good example of a DSP operation.
The implementation of the effect can be seen below. As can be seen, to achieve an echo one simply needs to mix the current sample i with a delayed sample present in echoBuffer with a certain decay factor. The length of the buffer and the decay are the defining parameters for the sound of the echo. To fill the echo buffer the current sample is stored (line 4). Looping through the echo buffer is done by incrementing the position pointer and resetting it at the correct time (lines 6-9).
//output is the input added with the decayed echo
audioFloatBuffer[i] = audioFloatBuffer[i] + echoBuffer[position] * decay;
//store the sample in the buffer;
echoBuffer[position] = audioFloatBuffer[i];
//increment the echo buffer position
position++;
//loop in the echo bufferif(position == echoBuffer.length)
position = 0;
To test the application, download and execute the Delay.jar file and start singing in a microphone.
The source code of the Java implementation can be found on the TarsosDSP github page.
This is post presents a better version of the spectrogram implementation. Now it is included as an example in TarsosDSP, a small java audio processing library. The application show a live spectrogram, calculated using an FFT and the detected fundamental frequency (in red).
To test the application, download and execute the Spectrogram.jar file and start singing in a microphone.
There is also a command line interface, the following command shows the spectrum for in.wav:
java -jar Spectrogram.jar in.wav
The source code of the Java implementation can be found on the TarsosDSP github page.
Tarsos contains a couple of useful command line applications. They can be used to execute common tasks on lots of files. Dowload Tarsos and call the applications using the following format:
The first part java -jar tarsos.jar tells the Java Runtime to start the correct application. The first argument for Tarsos defines the command line application to execute. Depending on the command, required arguments and options can follow.
To get a list of available commands, type java -jar tarsos.jar -h. If you want more information about a command type java -jar tarsos.jar command -h
Detect Pitch
Detects pitch for one or more input audio files using a pitch detector. If a directory is given it traverses the directory recursively. It writes CSV data to standard out with five columns. The first is the start of the analyzed window (seconds), the second the estimated pitch, the third the saillence of the pitch. The name of the algorithm follows and the last column shows the original filename.
A small part of Tarsos has been turned into a audio fingerprinting application. The idea of audio fingerprinting is to create a condensed representation of an audio file. A perceptually similar audio file should generate similar fingerprints. To test how robust a fingerprinting technique is, a data set with audio files that are alike in some way is practical.
SoX – Sound eXchange is a command line utility for sound processing. It can apply audio effects to a sound. Using these effects and a set of unmodified songs an audio fingerprinting data set can be created. To generate such a data set SoX can be used to:
Trim the first x seconds of a file
Speed-up or slow-down the audio
Change the pitch of a file without modifying the tempo
#Trim the first 10 seconds
sox input.wav output.wav trim 10#speed-up of 10%
sox input.wav output.wav speed 1.10#change the pitch upwards 100 cents (one semitone)#without changing the tempo
sox input.wav output.wav pitch 100#generate white noise with the length of input.wav
sox input.wav noise.wav synth whitenoise
#mix the white noise with the input to generate noisy output#-v defines how loud the white noise is
sox -m input.wav -v 0.1 noise.wav output.wav
#reverse the audio
sox input.wav output.wav reverse
A ruby script to generate a lot of these files can be found attached.
The aim of acoustic fingerprinting is to generate a small representation of an audio signal that can be used to identify or recognize similar audio samples in a large audio set. A robust fingerprint generates similar fingerprints for perceptually similar audio signals. A piece of music with a bit of noise added should generate an almost identical fingerprint as the original. The use cases for audio fingerprinting or acoustic fingerprinting are myriad: detection of duplicates, identifying songs, recognizing copyrighted material,…
Using a pitch class histogram as a fingerprint seems like a good idea: it is unique for a song and it is reasonably robust to changes of the underlying audio (length, tempo, pitch, noise). The idea has probably been found a couple of times independently, but there is also a reference to it in the literature, by Tzanetakis, 2003: Pitch Histograms in Audio and Symbolic Music Information Retrieval:
Although mainly designed for genre classification it is possible that features derived from Pitch Histograms might also be applicable to the problem of content-based audio identification or audio fingerprinting (for an example of such a system see (Allamanche et al., 2001)). We are planning to explore this possibility in the future.
Unfortunately they never, as far as I know, did explore this possibility, and I also do not know if anybody else did. I found it worthwhile to implement a fingerprinting scheme on top of the Tarsos software foundation. Most elements are already available in the Tarsos API: a way to detect pitch, construct a pitch class histogram, correlate pitch class histograms with a pitch shift,… I created a GUI application which is presented here. It is, probably, the first open source acoustic / audio fingerprinting system based on pitch class histograms.
It works using drag and drop and the idea is to find a needle (an audio file) in a hay stack (a large amount of audio files). For every audio file in the haystack and for the needle pitch is detected using an optimized, for speed, Yin implementation. A pitch class histogram is created for each file, the histogram for the needle is compared with each histogram in the hay stack and, hopefully, the needle is found in the hay stack.
Unfortunately I do not have time for rigorous testing (by building a large acoustic fingerprinting data set, or an other decent test bench) but the idea seems to work. With the following modifications, done with audacity effects the needle was still found a hay stack of 836 files :
A 10% speedup
15 and 30 seconds removed form the needle (a song of 4 minutes 12 seconds)
White noise added
Reversed the audio (This is, I believe, a rather unique property of this fingerprinting technique)
GSM reencoded
The following modifications failed to identify the correct song:
A one semitone pitch shift
A two semitone pitch shift
60 seconds removed from the needle
The original was also found. No failure analysis was done. The hay stack consists of about 100 hours of western pop, the needle is also a western pop song. If somebody wants to pick up this work or has an acoustic fingerprinting data set or drop me a line at .
The DSP library of Tarsos, aptly named TarsosDSP, now contains an implementation of the Goertzel Algorithm. It is implemented using pure Java.
The Goertzel algorithm can be used to detect if one or more predefined frequencies are present in a signal and it does this very efficiently. One of the classic applications of the Goertzel algorithm is decoding the tones generated on by touch tone telephones. These use DTMF-signaling.
Playing music instruments can bring a lot of joy and satisfaction, but not all apsects of music practice are always enjoyable. In this contribution we are addressing two such sometimes unwelcome aspects: the solitude of practicing and the “dumbness” of instruments.
The process of practicing and mastering of music instruments often takes place behind closed doors. A student of piano spends most of her time alone with the piano. Sounds of her playing get lost, and she can’t always get feedback from friends, teachers, or, most importantly, random Internet users. Analysing her practicing sessions is also not easy. The technical possibility to record herself and put the recordings online is there, but the needed effort is relatively high, and so one does it only occasionally, if at all.
Instruments themselves usually do not exhibit any signs of intelligence. They are practically mechanic devices, even when implemented digitally. Usually they react only to direct actions of a player, and the player is solely responsible for the music coming out of the insturment and its quality. There is no middle ground between passive listening to music recordings and active music making for someone who is alone with an instrument.
We have built a prototype of a system that strives to offer a practical solution to the above problems for digital pianos. From ground up, we have built a system which is capable of transmitting MIDI data from a MIDI instrument to a web service and back, exposing it in real-time to the world and optionally enriching it.
A previous post about PeachNote Piano has more technical details together with a video showing the core functionality (quasi-instantaneous USB-BlueTooth-MIDI communication). Some photos can be found below.
While working on a Latex document with several collaborators some problems arise:
Who has the latest version of the TeX-files?
Which LaTeX distributions are in use (MiKTeX, LiveTex,…)
Are all LaTeX packages correctly installed on each computer?
Why is the bibliography, generated with BiBTeX, not included or incomplete?
How does the final PDF look like when it is build by one of the collaborators, with a different LaTeX distribution?
Especially installing and maintaining LaTeX distributions on different platforms (Mac OS X, Linux, Windows) in combination with a lot of LaTeX packages can be challenging. This blog post presents a way to deal with these problems.
Solution
The solution proposed here uses a build-server. The server is responsible for compiling the LaTeX source files and creating a PDF-file when the source files are modified. The source files should be available on the server should be in sync with the latest versions of the collaborators. Also the new PDF-file should be distributed. The syncing and distribution of files is done using a Dropbox install. Each author installs a Dropbox share (available on all platforms) which is also installed on the server. When an author modifies a file, this change is propagated to the server, which, in turn, builds a PDF and sends the resulting file back. This has the following advantages:
Everyone always has the latest version of files;
Only one LaTeX install needs to be maintained (on the server);
The PDF is the same for each collaborator;
You can modify files on every platform with Dropbox support (Linux, Mac OS X, Windows) and even smartphones;
Compiling a large LaTeX file can be computationally intensive, a good task for a potentially beefy server.
Implementation
The implementation of this is done with a couple of bash-scripts running on Ubuntu Linux. LaTeX compilation is handeled by the LiveTeX distribution. The first script compile.bash handles compilation in multiple stages: the cross referencing and BiBTeX bibliography need a couple of runs to get everything right.
#!/bin/bash#first iteration: generate aux file
pdflatex -interaction=nonstopmode --src-specials article.tex
#run bibtex on the aux file
bibtex article.aux
#second iteration: include bibliography
pdflatex -interaction=nonstopmode --src-specials article.tex
#third iteration: fix references
pdflatex -interaction=nonstopmode --src-specials article.tex
#remove unused files
rm article.aux article.bbl article.blg article.out
The second script watcher.bash is more interesting. It watches the Dropbox directory for changes (only in .tex-files) using the efficient inotify library. If a modification is detected the compile script (above) is executed.
#!/bin/bash
directory=/home/user/Dropbox/article/
#recursivly watch te directorywhile inotifywait -r $directory; do#find all files changed the last minute that match tex#if there are matches then do something...if find $directory -mmin -1 | grep tex; then#tex files changed => recompile
echo "Tex file changed... compiling"/bin/bash $directory/compile.bash
#sleep a minute to prevent recompilation loop
sleep 60
fi
done
To summarize: a user-friendly way of collaboration on LaTeX documents was presented. Some server side configuration needs to be done but the clients only need Dropbox and a simple text editor and can start working togheter.
The Pidato experiment demonstrates a rather straightforward method to handle vibrato on a digital piano. It solves the age-old problem on what to do with the enigmatic “vibrato” instructions on some piano solo scores of Franz Liszt. The figure on the right is an exerpt of sonetto 104 del Petrarca.
Since there is no way to perform vibrato on an analogue piano there are all kinds of different interpretations. Interpretations of the ‘vibrato’ instruction include: vibrating the pedal, vibrating the key, simply ignoring it, a vibrato like wiggling with a psychological sounding effect, … A pianist specialized in 19th century music, explains his embodied use of vibrato in a youtube video: Brian Ganz on piano vibrato. Those solutions all seem a bit halfhearted, so I created an alternative approach which resulted in the Pidato experiment.
Pidato is a portmanteau of piano and vibrato, the d, a and o hint to the use of an Arduino. Pidato is also Indonesian for speech, expression. To get a feel of what it actually does I created the video below. Please note that this is a technical demonstration, not an artistic performance… in any way.
The way it works is by translating movement (accelerometer data) to MIDI messages. The hardware consists of an Arduino, MIDI-ports and a three axis accelerometer. The MIDI-ports are provided by this MIDI IN & OUT Arduino shield. The accelerometer is a MMA7260Q from Sparkfun. Attaching the MMA7260Q and the arduino is done by following the instructions here. One change was made: by attaching the 3.3V output to AREF and executing analogReference(EXTERNAL); fluctuations in power supply cease to have an influence on accelerometer data readings. It is represented by the purple wire in the diagram below.
The software should know when a vibrato like movement is made and how to translate such movement to MIDI messages. The software therefore contains a periodicity estimator and frequency detector to detect how periodic a movement is and how fast the movement is repeated. This was done with the YIN algorithm (more commonly used in audio signal analysis). A periodicity threshold was determined experimentally so the system does not yield false positives when playing the piano in the usual way. Another interesting bit of code is the interrupt setup that samples the accelerometer at a fixed sample rate and sends MIDI messages, also at a fixed rate.
MIDI messaging is done over a serial connection. From the Arduino sending a MIDI message is as simple as calling Serial.print with the correct data. For the task at hand (sending vibrato) Pitch Bend messages were used. The standard Arduino UNO firmware is replaced with Arduino MIDI firmware. This makes the Arduino appear as a standard MIDI device when connected to a computer, which makes interfacing with it practical.
The YIN algorithm is encapsulated in a reusable Arduino library and can be used to detect periodicity and frequency for any signal. This guy used his implementation to create a chromatic tuner. The source code for both the Yin Arduino library and Pidato experiment can be found on github or here.
The Pidato experiment was done with the help the friendly hackers at Hackerspace Ghent.
Tarsos can be used to render MIDI files to audio (WAV) files using arbitrary tone scales. This functionallity can be used to (automatically) verify tone scale extraction from audio files. Since I could not find a dataset with audio and corresponding tone scales creating one using MIDI seemed a good idea.
MIDI files can be found in spades (for example on piano-midi.de or kunstderfuge.com), tone scales on the other hand are harder to find. Luckily there is one massive source, the Scala Tone Scale Archive: A large collection of over 3700 tone scales.
Using Scala tone scale files and a midi files a Tone Scale – Audio dataset can be generated. The quality of the audio depends on the (software) synthesizer and the SoundFont used. Tarsos currently uses the Gervill synthesizer. Gervill is a pure Java software synthesizer with support for 24bit SoundFonts and the MIDI tuning standard.
How To Render MIDI Using Arbitrary Tone Scales with Tarsos
A recent version of the JRE needs to be installed on your system if you want to use Tarsos. Tarsos itself can be downloaded in the form of the MIDI and Scala to Wav – JAR Package.
To test the program you can use a MIDI file and a Scala file and drag and drop those on the graphical interface.
The result should sound like this:
To summarize: by rendering audio with MIDI and Scala tone scale files a dataset with tone scale – audio information can be generated and tone scale extraction algorithms can be tested on the fly.
This is about PeachNote Piano, a project only tangentially related to Tarsos. PeachNote Piano aims to capture as many piano practice sessions as possible and offer useful services using this data. The system does this by capturing and redirecting MIDI events on a Bluetooth enabled smartphone. It is done together with Vladimir Viro and builds on the existing PeachNote infrastructure.
The schema – right – shows the components of the PeachNote Piano system. At the bottom you have a MIDI keyboard connected to the MIDI-Bluetooth-bridge. A smartphone (middle left) receives these MIDI events via Bluetooth and controls the communication to the server (top left). An alternative path goes through a standard computer (top right).
The Arduino based Bluetooth to MIDI bridge is an improvement on the work by Peter Brinkmann. The video below shows communication between USB-MIDI, Bluetooth MIDI and MIDI IN/OUT ports.
As an example application of the PeachNote Piano system we implemented a “Continue a Melody” service which works as follows: a user plays something on a keyboard, maybe just a few notes, and pauses for a few seconds. In the meantime, the server searches through a large database of MIDI piano recordings, finds the longest fuzzy match for the user’s most recent input, and, after a short silence on the users part, starts streaming the continuation of the best matched performance from the database to the user. This mechanism, in fact, is way of browsing a music collection. Users may play a known leitmotiv or just improvise something, and the system continues playing a high quality recording, “replying” to the musical proposition of the user.
More technical details
The melody matching is done on the server, which is implemented in Javascript in the Node.js framework. The whole dataset (about 350 hours of piano recordings) resides in memory in two representations: as a sequence of pitches, and as a sequence of “densities” at the corresponding places of the pitch sequence dataset. This second array is used to store the rough tempo information (number of notes per second) absent in the pitch sequence data.
By combining the two search criteria we can achieve reasonable approximation of the tempo-aware search without its computational complexity.
The implementation of the hardware is based on the open-source electronic prototyping platform Arduino. Optocoupled MIDI ports (IN/OUT) and the BlueSMiRF Bluetooth module were attached to the main board, as can be seen in the middle left block of the schema. The BlueTooth module is configured to use the Serial Port Profile (SPP) which emulates RS-232. The software on the Arduino manages bi-directional, low latency message passing between three serial ports: USB (through an FTDI chip), BlueTooth and the hardware MIDI-IN and OUT port.
The standard Arduino firmware has been replaced with firmware that implements the “Universal Serial Bus Device Class Definition for MIDI Devices”: when attached to a computer via USB, the Arduino shows up as a standard MIDI device, which makes it compatible with all available MIDI software. The software client currently works on the Android smartphone platform. It is represented using the middle right block in the schema. The client can send and receive MIDI events over its Bluetooth port. Pairing, connecting and communicating with the device is done using the Amarino software library. The client communicates with the Peachnote Piano server using TCP sockets implemented on the Dalvik Java runtime.
This article describes how to do makam recognition with a script that uses the Tarsos API.
The task we want to do is to find the tone scales most similar to the one used in recorded music. To complete this task you need a small set of theoretical scales and a large set of music, each brought in one of the scales. To make it more concrete, an example of Turkish classical music is used.
In an article by Bozkurt pitch histograms are used for – amongst other tasks – makam recognition. A maqam defines rules for a composition or performance of classical Turkish music. It specifies melodic shapes and pitch intervals, the scale. The task is to identify which of nine makams is used in a specific song. A simplified, generalized implementation of this task is shown here. In our implementation there is no tonic detection step. Also here we use only theoretical descriptions of the tone scales as a template and do not construct a template using the audio itself, as is done by Bozkurt. Ioannidis Leonidas wrote an interesting master thesis about makam recognition. Since no knowledge of the music itself is used the approach is generally applicable.
The following is an implementation in Scala a general purpose programming language that is interoperable with Jave . The first step is to write the Scala header. This is just some boilerplate code to be able to run the script from the command line – it assumes a UNIX-like environment and tarsos.jar in the same directory:
The second step constructs the templates the capability of Tarsos to create
theoretical tone scale templates using Gaussian kernels is used, line 8. See the attached images for some examples.
val makams = List( "hicaz","huseyni","huzzam","kurdili_hicazar",
"nihavend","rast","saba","segah","ussak")
var theoreticKDEs = Map[java.lang.String,KernelDensityEstimate]()
makams.foreach{ makam =>
val scalaFile = makam + ".scl"
val scalaObject = new ScalaFile(scalaFile);
val kde = HistogramFactory.createPichClassKDE(scalaObject,35)
kde.normalize
theoreticKDEs = theoreticKDEs + (makam -> kde)
}
The third and last step is matching. First a list of audio
files is created by recursively iterating a directory and matching each file to
a regular expression. Next, starting from line 4, each audio file is processed.
The internal implementation of the YIN pitch detection
algorithm is used on the audio file and a pitch class histogram is created
(line 6,7). On line 10 normalization of the histogram is done, to
make the correlation calculation meaningful. Line 11 until 15 compare the
created histogram from the audio file with the templates calculated beforehand.
The results are stored, ordered and eventually printed on line 19.
val directory = "/home/joren/turkish_makams/"
val audio_pattern = ".*.(mp3|wav|ogg|flac)"
val audioFiles = FileUtils.glob(directory,audio_pattern,true).toList
audioFiles.foreach{ file =>
val audioFile = new AudioFile(file)
val detectorYin = PitchDetectionMode.TARSOS_YIN.getPitchDetector(audioFile)
val annotations = detectorYin.executePitchDetection()
val actualKDE = HistogramFactory.createPichClassKDE(annotations,15);
actualKDE.normalize
var resultList = List[Tuple2[java.lang.String,Double]]()
for ((name, theoreticKDE) <- theoreticKDEs){
val shift = actualKDE.shiftForOptimalCorrelation(theoreticKDE)
val currentCorrelation = actualKDE.correlation(theoreticKDE,shift)
resultList = (name -> currentCorrelation) :: resultList
}
//order by correlation
resultList = resultList.sortBy{_._2}.reverse
Console.println(file + " is brought in tone scale " + resultList(0)._1)
}
An oral presentation about Tarsos is going to take place Tuesday, the 25 of October during the afternoon, as can be seen on the ISMIR preliminary program schedule.
If you want to cite our work, please use the following data:
@inproceedings{six2011tarsos,
author = {JorenSixandOlmoCornelis},
title = {Tarsos - a Platform to ExplorePitchScalesinNon-WesternandWesternMusic},
booktitle = {Proceedings of the 12th InternationalSocietyforMusicInformationRetrievalConference,
ISMIR2011},
year = {2011},
publisher = {InternationalSocietyforMusicInformationRetrieval}
}
Tarsos, a software package to analyse pitch organization in music, contains a new output modality. Now it is possible to export resynthesized pitch annotations, detected by a pitch detection algorithm and compare those with the original sound. This can be interesting to see which errors a pitch detection algorithm makes.
Below you can listen to an example of synthesized pitch detection results compared with the original flute piece. The file starts with only the original flute sound (on the right channel) and gradually changes so only the synthesized annotations (on the left channel) can be heard.
This article describes how to make sun-java6 play nice with the PulseAudio sound sytem on Ubuntu with an x64 processor architecture. With some changes the method should also work with other operating systems and other platforms.
The default way sun-java6 operates with respect to sound on Ubuntu is, well unrespectfull. When playing audio it claims an audio device, which then can not be used any more by other applications trying to access the same device. This is far from ideal. Also changing audio interfaces (by e.g. plugging in a USB audio interface) goes wrong most of the time.
These problems are addressed by PulseAudio and there is a way to make sun-java6 aware of PulseAudio on Ubuntu. The OpenJDK does this automatically but it has some other, unrelated, issues. If you want to use PulseAudio with java6 on Ubuntu x64 you need copy pulse-java.jar and platform dependent libpulse-java.so file to correct JVM directories. To make it easy you can execute these commands:
From this moment on the “PulseAudio Mixer” is available for Java applications. Sharing, switching and assigning audio devices to Java programs is as a result smooth. To use the PulseAudio Mixer by default you need to change sound.properties which can be found at /usr/lib/jvm/java-6-sun/jre/lib/sound.properties. Details can be found here.
Vorige zaterdag werd Apps For Ghent georganiseerd: een activiteit om het belang van open data te onderstrepen in navolging van onder meer Apps For Amsterdam en New York City Big App. Tijdens de voormiddag kwamen er verschillende organisaties hun open gestelde data voorstellen de namiddag werd gereserveerd voor een wedstrijd. Het doel van de wedstrijd was om in enkele uren een concept uit te werken en meteen voor te stellen. Het uitgewerkte prototype moest gedeeltelijk functioneren en gebruik maken van (Gentse) open data.
Luk Verhelst en ikzelf hebben er TwinSeats voorgesteld.
TwinSeats is een website / online initiatief om nieuwe mensen te leren kennen. Met hen deel je dezelfde culturele interesse en ga je vervolgens samen naar deze of gene voorstelling. Door events centraal te stellen kan TwinSeats uitzonderlijke cultuurburen zoeken. Leden vinden die cultuurburen dankzij een gezamenlijke voorliefde voor een artiest of attractie of eender welke bezigheid in de vrijetijdssfeer.
Het prototype is ondertussen terug te vinden op TwinSeats.be. Let wel dit is in enkele uren in elkaar geflanst en is verre van ‘af’, het achterliggende concept is belangrijker.
TarsosDSP is a collection of classes to do simple audio processing. It features an implementation of a percussion onset detector and two pitch detection algorithms: Yin and the Mcleod Pitch method.
Its aim is to provide a simple interface to some audio (signal) processing algorithms implemented in JAVA.
To make some of the possibilities clear I coded some examples.
With this post I would like to draw attention to the fact that remote port forwarding with OpenSSH 4.7 on Ubuntu 8.04.1 does not work as expected.
If you follow the instructions of a SSH remote port forwarding tutorial everything goes well until you want to allow everyone to access the forwarded port (not just localhost). The problem arises when binding the forwarded port to an interface. Even with GatewayPorts yes present in /etc/ssh/sshd_config the following command shows that it went wrong:
It listens only via IPv6 and only on localhost an not on every interface (as per request by defining GatewayPorts yes). The netstat command should yield this output:
in /etc/ssh/sshd_config remote port forwarding works fine but you lose IPv6 connectivity (this due to the AddressFamily setting). Another solution is to use more up to date software: the bug is not present in Ubuntu 10.04 with OpenSSH 5.3 (I don’t know if it is an Ubuntu or OpenSSH bug, or even a configuration issue.
I have been struggling with this issue for a couple of hours and, with this blog post, I hope I can prevent someone else from doing the same.
ssh-copy-id is a practical bash script, installed by default on Ubuntu. The script is used to distribute public keys. The following oneliner makes it available on Mac OS X:
It copies ssh-copy-id from this website to /bin/ssh-copy-id.
It makes sure that ssh-copy-id is executable, using chmod.
There is no three
The install procedure needs superuser rights because it writes in the /bin folder. Executing scripts from untrusted sources with superuser rights is actually really, really, extremely dangerous. But in this case it is rather innocent.
The ssh-copy-id script is the one provided with Ubuntu and Debian, I assume it is GPL’ed. I have not modified it for Mac OS X but it seems to behave as expected. I have only tested the install script and behavior on 10.6.5, YMMV.
There is more to Tarsos then meets te eye. The graphical user interface only exposes some functionality; the API exposes all of Tarsos’ capabilities.
Tarsos is programmed in Java so the API is accessible trough Java and other programming languages targeting the JVM like JRuby, Scala and Groovy. The following examples use the Groovy programming language because I find it the most aesthetically pleasing with regards to interoperability and it gets the job done without getting in your way.
To run the examples a copy of the Tarsos JAR-file needs to be added to the Classpath and the Groovy runtime must be installed correctly. I’ll leave this as an exercise for the reader: godspeed to you, brave soul. Quick protip: placing a copy of the jar in the extensions directory seems to work best, e.g. see important java directories on mac OS X.
The first example extracts pitch class histograms from a bunch of files and saves them as EPS-files. It iterates a directory recursively and handles each file that matches a given regular expression. In this example the regular expression matches all WAV-files. Batch processing is one of those things scripting is ideal for, doing the same thing with the user interface would be tedious or even mind-numbingly boring, not groovy at all indeed.
import be.hogent.tarsos.*
import be.hogent.tarsos.util.*
import be.hogent.tarsos.util.histogram.ToneScaleHistogram
import be.hogent.tarsos.sampled.pitch.Annotation
import be.hogent.tarsos.sampled.pitch.PitchDetectionMode
dir = "/home/joren/audio"FileUtils.glob(dir,".*.wav",true).each { file ->
audioFile = new AudioFile(file)
pitchDetector = PitchDetectionMode.TARSOS_YIN.getPitchDetector(audioFile)
pitchDetector.executePitchDetection()
//get some annotations
annotations = pitchDetector.getAnnotations()
//create an ambitus and tone scale histogram
ambitusHistogram = Annotation.ambitusHistogram(annotations)
toneScaleHisto = ambitusHistogram.toneScaleHistogram()
//plot a smoothed version of the histogram
p = new SimplePlot()
p.addData 0, toneScaleHisto.gaussianSmooth(0.2)
p.save FileUtils.basename( file) + ".eps"
}
The second example uses functionality that is currently only available trough the API. It takes a MIDI-file and synthesizes it to a wave file using an arbitrary scale. In this case 10-TET. The heavy-work is done by the Gervill synthesizer. The resulting file is available for download, micro—macro?—tonal Bach is great: BWV 1013 in 10-TET. The result of an analysis with Tarsos on the synthesized audio clearly shows an interval of 120 cents with some deviations.
import java.io.File
import be.hogent.tarsos.midi.MidiToWavRenderer
import be.hogent.tarsos.util.ScalaFile
midiFile = new File("BWV_1013.mid")
outFile = new File("out.wav")
tuning = [0,120,240,360,480,600,720,840,960,1080] as double []
MidiToWavRenderer renderer
renderer = new MidiToWavRenderer()
renderer.setTuning(tuning)
renderer.createWavFile(midiFile, outFile)
An extended version of this second example script could be used to generate a dataset with audio and corresponding tone scale information on the fly. The dataset could then be used as a baseline.
The API is not yet well documented and is still in flux or more correctly: superflux. Note to self: I will provide documentation and a number of useful examples when the dust settles down. I’m not even sure if I will stick with Groovy. Scala has a nice Lispy feel to it and seems more developed. Groovy has a less steep learning curve, especially if you have some experience with Ruby. JRuby is also nice but the interoperability with legacy Java looks like an ugly hack.
This post describes a crucial aspect of how to connect an android phone, the LG GT540 Optimus, to an Ubunu Linux computer. The method is probably similar on different UNIX like platforms with different phones.
To recognize the phone when it is connected via usb you need to create an UDEV rule. Create the file /etc/udev/rules.d/29.lg545.rules with following contents:
On the phone you need to enable debugging using the settings and (this is rather important) make sure that the “mass storage only” setting is disabled.
Rooting the device makes sure you have superuser rights. Installing the android SDK is well documented.
This post is about the tools I use to keep the source code of Tarsos reasonably clean, consistent and readable. Static code analysis can be of great help if you want to maintain strict coding standards and follow language idioms. Some of the patterns they can detect for you:
Dead code – unused variables, parameters, methods
Suboptimal code – wasteful resource usage
Overcomplicated expressions – unnecessary if statements, for loops that could be while loops
Duplicate code – copied/pasted code is a code smell.
Formatting inconsistencies, e.g. variable modifier order
And even more subtle, but equally important:
Resource management: is a resource handled (closed) correctly on all possible code paths?
Abstraction level: is it needed to expose the concrete type of an object or could an (abstract) supertype or even an interface be used instead?
…
In a previous life I used .NET and the static code analysis tools FxCop & StyleCop. FxCop operates on bytecode (or intermediate language in .NET parlance) level, StyleCop analyses the source code itself. Tarsos uses JAVA so I looked for JAVA alternatives and found a few.
PMD & Checkstyle both operate on source code level.
FindBugs operates on bytecode level.
On freesoftwaremagazine.com there is an article series on JAVA static code analysis software. It covers PMD and FixBugs and integration in Eclipse. It does not cover Checkstyle. Checkstyle is essentialy the same as PMD but it is better integrated in eclipse: it checks code on save and uses the standard ‘Problems’ interface, PMD does not.
Continuous testing is also a really nice thing to have: detecting unexpected behavior while refactoring/programming can prevent unnecessary bug hunts. A video about immediate feedback using continuous testing makes this clear.
Another tip is a more philosophical one: making your code and code revisions publicly available makes you think twice before implementing (and subsequently publishing) a quick and dirty hack. Tarsos is available on github.
The problem: There is a group of people that want access to Hackerspace Ghent but there is only one remote to open the gate.
The solution: Build a system that reacts to a phone call by opening the gate if the number of the caller is whitelisted.
What you need:
A BeagleBoard or some BeagleBoard alternative with a Linux distribution running on it. Any server running a unix like operating system should be usable.
A Huaweii e220 or an alternative GSM that supports (a subset of) AT commands and has a USB port.
A team of hackers that know how to solder something togeher. E.g. The hardware guys of hackerspace Ghent.
The Hack: First of all try to get caller id working by following the Caller ID with Linux and Huawei e220 tutorial. If this works you can listen to the serial communication using pySerial and react to a call. The following python code shows the wait for call method:
The second thing that is needed is a way to send a signal from the beagle board to the remote. Sending a signal from the beagle board using Linux is really simple. The following bash commands initialize, activate and deactivate a pin.
Today I created a spectrogram application using Tarsos. The application listens to an audio input, computes an FFT and at the same time calculates pitch. The expected pitch is overlaid on the spectrogram. All this happens real-time and is implemented using JAVA.
This is the scenario: you have a Huawei e220, a linux computer and you want to react to a call from a set of predefined numbers. E.g. ordering a pizza when you receive a call from a certain number.
The Huawei e220 supports a subset of the AT commands, which subset is an enterprise secret of te Huawei company. So there is no documentation available for the device I bought, thanks Huawei. Anyhow when you attach the e220 to a Linux machine you should get two serial ports:
To connect to the devices you can use a serial client. GNU Screen can be used as a serial client like this: screen /dev/ttyUSB0 115200. The first device, ttyUSB0 is used to control ttyUSB1, so to enable caller ID on te Huawei e220 you need to send this message to ttyUSB0:
The RING and CLIP messages are the most interesting. The RING signifies an incoming call, the CLIP is the caller ID. The BOOT and RSSI are some kind of ping messages. The following Python script demonstrates a complete session that enables caller ID, waits for a phone call and prints the number of the caller.
To make Tarsos more portable I wrote a pitch tracker in pure JAVA using the YIN algorithm based on the implementation in C of aubio. The implementation also uses some code written by Karl Helgasson and Teun de Lange of the Jazzperiments project.
It can be used to perform real time pitch detection or to analyse files. To use it as a real time pitch detector just start the JAR-file by double clicking. To analyse a file execute one of the following. The first results in a list of annotations (text), the second shows the annotations graphically.
The JAVA software program we are developing is called Tarsos and can now be found on GitHub. GitHub is a web-based hosting service for projects that use the Git version control system.
Currently Tarsos is a collection of Java classes to create, compare and process pitch-frequency data using histograms. In it’s current state it is not usable for end-users.
Recently I bought a big shiny red USB-button. It is big, red and shiny. Initially I planned to use it to deploy new versions of websites to a server but I found a much better use: ordering pizza. Graphically the use case translates to something akin to:
If you would like to enhance your life quality leveraging the power of a USB pizza-button: you can! This is what you need:
A PC running Linux. This tutorial is specifically geared towards Debian-based distos. YMMV.
A big, shiny red USB button. Just google “USB panic button” if you want one.
A location where you can order pizzas via a website. I live in Ghent, Belgium and use just-eat.be. Other websites can be supported by modifying a Ruby script.
Technically we need a driver to check when the button was pushed, a way to communicate the fact that the button was pushed and lastly we need to be able to react to the request.
The driver: on the internets I found a driver for the button. Another modification was done to make the driver process a daemon.
The communication: The original Python script executed another script on the local pc. A more flexible approach is possible using sockets. With sockets it is possible to notify any computer on a network.
if PanicButton().pressed():
# create a TCP socket
s = socket.socket(socket.AF_INET, socket.SOCK_STREAM)
# connect to server on the port
s.connect((SERVER, SERVER_TCP_PORT))
# send the order (margherita at restaurant mario)
s.send("mario: [margherita_big]\n")
The reaction: a ruby TCP server waits for message from the driver. When it does it automates a HTTP session on a website. It executes a series of HTTP-GET’s and POST’s. It uses the mechanize library.
login_url = "http://www.just-eat.be/pages/member/login.aspx"
a = WWW::Mechanize.new
a.get(login_url) do |login_page|
#post login_form
login_form = login_page.forms.first
login_form.txtUser = "username"
login_form.txtPass = "password"
a.submit(login_form, login_form.buttons[1])
end
Some libraries are needed. For python you need the usb library, the python deamons lib needs to be installed seperatly. Setuptools are needed to install the deamons package.
Ruby needs rubygems to install the needed mechanize and daemons library. Mechanize needs the libxslt-dev package. You also need the build-essential package to build mechanize.
This blog post is about how to use the TouchatagRFID reader hardware on Ubuntu Linux without using the Touchatag web service.
An RFID reader with tags can used to fire events. With a bit of scripting the events can be handled to do practically any task.
Normally a Touchatag reader is used together with the Touchatag web service but for some RFID applications the web service is just not practical. E.g. for embedded Linux devices without an Internet connection. In this tutorial I wil document how I got the Touchatag hardware working under Ubuntu Linux.
To follow this tutorial you will need:
Touchatag hardware: the USB reader and some tags
A Ubuntu Linux computer (I tested 9.10 Karmic Koala and 8.04 )
SVN to download source code from a repository
The touchatag USB reader works at 13.56MHz (High Frequency RFID) and has a readout distance of about 4 cm (1.5 inch) when used with the touchatag RFID tags. Internally it uses an ACS ACR122U reader with a SAM card. A Linux driver is readily available so when you plug it in lsusb you should get something like this:
lsusb recognizes the device incorrectly but that’s not a problem. To read RFID-tags and respond to events additional software is needed: tagEventor is a software library that does just that. It can be downloaded using an svn command:
To compile tagEventor a couple of other software packages or header files should be available on your system. Te tagEventor software dependencies are described on the tagEventor wiki. On Ubuntu (and possibly other Debian based distro’s the installation is simple:
sudo aptitude install build-essential libpcsclite-dev build-essential pcscd libccid
#if you need gnome support#sudo aptitude install libgtk2.0-dev
Now the tricky part. Two header files of the pcsclite package need to be modified (update: this bug is fixed see here). tagEventor builds and can be installed:
cd tageventor
make
...
tagEventor BUILT (./bin/Release/tagEventor)
sudo ./install.sh
...
When tagEventor is correctly installed the only thing left is … to build your application. When an event is fired tagEventor executes the /etc/tageventor/generic script with three parameters (see below). Using some kind of IPC an application can react to events. A simple and flexible way to propagate events (inter-processes, over a network, platform and programming language independent) uses sockets. The code below is the /etc/tageventor/generic script (make sure it is executable), it communicates with the server: the second script. To run the server execute ruby /name/of/server.rb
#!/usr/bin/ruby# $1 = SAM (unique ID of the SAM chip in the smart card reader if exists, "NoSAM" otherwise# $2 = UID (unique ID of the tag, as later we may use wildcard naming)# $3 = Event Type (IN for new tag placed on reader, OUT for tag removed from reader)
require 'socket'
data = ARGV.join('|')
puts data
streamSock = TCPSocket.new( "127.0.0.1", 20000 )
streamSock.send(data, 0)
streamSock.close
The tagEventor software is made by the Autelic Association a Non-Profit association dedicated to making technology easier to use for all. I would like to thank Andrew Mackenzie, the founder and president of the association for creating the software and the support.
Ik heb in opdracht van scholengroep Sperregem een website gemaakt die het vinden van kandidaten voor korte vervangingen vlotter doet verlopen. Mensen met interesse voor vacatures in het onderwijs in West-Vlaanderen kunnen zich er op inschrijven.
De website heeft enkele voordelen voor verschillende scholen in de scholengroep:
Het zoeken van kandidaten is erg eenvoudig: na het invoeren van een vacature komt er een lijst met kandidaten met een geschikt profiel die tijdens de vacature beschikbaar zijn.
Er kunnen e-mail of SMS-berichten verstuurd worden om kandidaten op de hoogte te brengen van een vacature.
Profielen van kandidaten zijn altijd up-to-date: de kandidaten zijn er zelf verantwoordelijk voor en kandidaten lange tijd niets van zich laten horen worden automatisch op non-actief gezet.
De historiek van kandidaten wordt automatisch bijgehouden en kan opgezocht worden.
Ook voor de aspirant onderwijzers is de website handig:
De vacatures zijn publiek zichtbaar, kandidaten kunnen dus actief solliciteren.
Ze kunnen zelf hun profiel beheren en bijvoorbeeld een vernieuwde versie van hun C.V. uploaden.
Voor elke kandidaat is een gepersonaliseerde lijst met vacatures beschikbaar (ook via RSS), afgestemd op hun profiel.
Daarnaast is het ook voor de personeelsdienst een handige tool: die kan nu een beter overzicht bewaren over de vacatures en de invulling ervan in de verschillende scholen.
Vandaag is de vernieuwde vooruitwebsite gelanceerd:
We bieden je nog meer video’s, foto’s, audiotracks en tekstmateriaal en hebben ook jouw persoonlijke voordelen uitgebreid. Wanneer je lid wordt van www.vooruit.be, kan je nog steeds je kalender aanvullen, vrienden maken en reacties posten, maar daarnaast krijg je ook aanbevelingen op maat, kan je voorstellingen tippen en kan je berichten sturen naar vrienden *.
Waarschijnlijk heb je het al gemerkt: deze site gaat nu heel wat sneller. Dit is te danken aan een verhuis. 0110.be wordt nu gehost op een VPS.
De virtuele server heeft Ubuntu 8.04 LTS Server als besturingssysteem en draait op een Xen hypervisor. De fysieke server zelf bevat een achttal Intel® Xeon® E5440 @ 2.83GHz CPU’s.
De server staat in Amsterdam en is rechtstreeks verbonden met het grootste internetknooppunt ter wereld: AMS-IX.
Uit de lijst van postcodes van alle Belgische steden heb ik een SQL-bestand samengesteld. De gegevens bevatten de postcode zelf, de naam van de stad, de naam van de stad in hoofdletters en een veld “structure” waaruit de gemeente-deelgemeente relatie gehaald kan worden als er op gesorteerd wordt. Dit zijn bijvoorbeeld de deelgemeentes van Chimay.
Het sorteren kan in PostgreSQL met deze SQL instructie: order by translate(structure, ' ', 'z'). Het SQL-script zelf is een lijst van INSERT INTOSQL-Statements.
insert into cities(zipcode,name,up,structure)  VALUES ('1790','Affligem','AFFLIGEM','1790   AFFLIGEM');
insert into cities(zipcode,name,up,structure)  VALUES ('9051','Afsnee','AFSNEE','9051        Afsnee');
insert into cities(zipcode,name,up,structure)  VALUES ('5544','Agimont','AGIMONT','5544        Agimont');
...
While working at the Vooruit Arts Centre I got the assignment to create a tool to query an Oracle database with ticketing data. There were a few requirements for the Query Tool, in the current version all of these are met:
First of all it had to be easy to execute complex queries, no knowledge of SQL should be required for the end user.
The results of the queries should be exportable to an easy to analyse format. * Editing queries or adding new ones should be doable, by someone knowledgeable with SQL.
The Query Tool should be easy to configure and database independent.
Should work on Windows, Mac OS X and Linux.
By publishing the Query Tool on my website I hope that the fruits of my labour can be enjoyed by a wider audience. To see it in action you can give it a spin. A recent version, version 6, of the JRE is needed.
How Do I Use The Query Tool?
The program supports two ways to query a database:
A number of predefined queries can be selected and executed. Depending on the selected query, zero or more parameters are required. E.g. the screen shot below depicts a query with one parameter: a product category. When the query is executed all the products in the selected category are fetched.
The tab “SQL” can be used to execute arbitrary SQL-instructions.
The two buttons below are self explanatory. When the button “CVS Export” is hit a CVS file is created in a configured directory.
Depending on the complexity of a query it can take a long time before results are returned. Because the application is multithreaded the user interface remains responsive and the query can be stopped at any time.
The contents of the tab “log” gives you an idea what the application does. When something goes awry while executing a query a message appears in this tab.
The tab “Config” can be used to set configuration parameters. The tab “Help” contains… helpful information.
How Do I Add My Own Queries?
The list of predefined queries is constructed by iterating over SQL-files in a configured directory. Adding additional queries to the program is easy, just add an extra SQL-file to the directory. An SQL-file should have the following format, otherwise it is ignored:
TITEL
----
DESCRIPTION
----
SQL-INSTRUCTION with zero or more !{PARAMETERS}!
In the screen shot above this query is visible:
Select products in category
----
Select all the products in a category.
----
SELECT * FROM
products WHERE categoryid = !{category}!
To make the queries dynamic the Query Tool supports different kinds of parameters. A parameter has this form: !{type name}!, the name is optional. If there is a name specified it is used as a label in the interface, otherwise type is used. There are three types of parameters:
Parameters that define a type. For each type a corresponding user interface is rendered. E.g. for the type string a text field is rendered. The supported types are:
!{string}!
!{boolean}!
!{double}!
!{date}!
!{integer}!
Parameters for raw SQL. A textfield is rendered, the contents is directly injected in the SQL-query. It has this format: !{sql}!
Parameters for lists. In the example above a list parameter is used. These lists are fetched from the database. E.g. a list of categories. The SQL-instruction and name of the list parameters can be configured.
If you want to use your own database you need to configure the database connection string. The program uses JDBC to connect to the database. It uses metadata provided by the JDBC layer. If your database has a JDBC driver with support for metadata the Query Tool will work correctly. The JDBC driver must be included in the classpath.
Na het bekijken van het onderstaande filmpje van een zwerm spreeuwen vroeg ik mij af of die bewegingen zich aan een bepaald algoritme houden en of ik een programma kon schrijven die dit gedrag simuleerde. Na wat onderzoek bleek dat zowat alle dieren die zich in kudde voortbewegen dit doen volgens gelijkaardige, relatief eenvoudige processen.
Er zijn drie basisregels waaraan onder andere scholen vissen, zwermen vogels en kuddes gnoes zich houden:
Voorkom botsingen met de dichtste buren door de andere kant op te gaan.
Beweeg ongeveer in de zelfde richting en even snel als het gemiddelde van de buren.
Beweeg naar het midden van de groep.
De paper Flocks, Herds, and Schools:
A Distributed Behavioral Model – 1987 van Craig W. Reynolds was de eerste die deze regels formeel omschreef. Aan de hand van die documentatie en een praktische omschrijving kon ik aan een implementatie beginnen. De boids implementatie in Python gebruikt pygame om een groep creaturen voor te stellen met een gekleurd vierkantje. De creaturen bewegen zich volgens de drie bovenstaande regels. Daarnaast proberen ze om binnen het zichtbare kader te blijven en begeven ze zich naar het midden van het kader. Om de boel wat interactiever te maken wordt de muisaanwijzer gezien als een gevaarlijk roofdier die niets liever lust dan vierkantjes. De vierkantjes proberen de roof-muis dus te ontlopen. De zesde en laatste regel legt een maximum snelheid op, zodat de bewegingen realistisch blijven.
De huidige implementatie is O(n²), terwijl het O(nk) zou moeten zijn, met k de grootte van de burenlijst. Een vloeiende simulatie van een zwerm van duizenden is dus momenteel niet mogelijk. De berekeningen voor een extra dimensie zijn erg eenvoudig te implementeren, helaas is de visualisatie van de resultaten dat niet. Ik heb geprobeerd om met de OpenGL bindingen voor Python te werken maar veel resultaat heeft dat niet opgeleverd. Dit is de 3D-versie, maar dan met een 2D visualsatie.
Ik heb een B-Tree en een Red-Black tree geschreven in Ruby. Om die datastructuren te testen heb ik een programma geschreven dat alle woorden uit een grote tekst inleest in een b-tree met het woord als sleutel en de frequentie als waarde en daarna een red black tree gebruikt als priority queue met als sleutel de frequentie en als waarde het woord. Op die manier kunnen de meest voorkomende woorden bepaald worden. De broncode is hier neer te laden.
Het programma is een ideale test voor Ruby VM’s: het is redelijk intensief en gevarieerd. IronRuby, JRuby, Ruby 1.8 en Ruby 1.9 werden getest op een Intel Core 2 Duo E6660 en dit zijn de resultaten:
De verschillen zijn dus erg groot. Zowel in geheugengebruik als in duur. Ruby 1.8 is blijkbaar erg traag maar gebruikt relatief weinig geheugen. JRuby is in deze test drie keer sneller maar gebruikt meer geheugen. Ook IronRuby is sneller dan de standaard Ruby VM maar gebruikt net niet het dubbele aan geheugen. Hierbij moet wel verteld worden dat IronRuby een alfa build is, de resultaten kunnen dus nog veel veranderen.
Ruby 1.9 werd later getest op Mac OS X, met dezelfde pc. De nieuwe Ruby lijkt toch enkele beloften in te lossen. Ter vergelijking werd de voor Mac OS X geoptimaliseerde Ruby 1.8 VM die standaard met het besturingssysteem meegeleverd wordt ook nog getest.
I have modified a bash-script to backup PostgreSQL databases, this is the original script. The modified version can be used to backup databases on a remote or local database server. Also this script does not need a trust relationship but uses a login and password. To get started you need to:
Modify the directory and database variables to suit your needs.
Add an entry to crontab to perform the backups nightly or whenever you wish.
Have fun.
The script empties ~/.pgpass and writes login info for the system databases. Then it logs in and fetches an up-to-date list of databases. For every database an entry is made in ~/.pgpass and every database is backed up. The results are logged to $logfile.
Gisteren werd de laatste hand gelegd aan de thesis over collaborative filtering (CF) waar Greet Dolvelde en ikzelf een jaar mee bezig zijn geweest. Als je hier meer over wilt weten dan kan je het werk Collaborative Filtering: Onderzoek & implementatie [pdf] downloaden. De intiemste details van verschillende CF-benaderingen worden er in geuren en kleuren uit de doeken gedaan. Uit de poster zou moeten duidelijk zijn waarover de thesis eigenlijk gaat:
Maandag heb ik een examen over A.I. Dat gaat onder ander over genetische algoritmen. Om dat principe in werking te zien heb ik een eenvoudig programmatje geschreven in Python: er zitten enkele beestjes (vierkantjes) in een omgeving. Als de beestjes opvallen, witte beestjes zie je goed zitten op een zwarte achtergrond, worden ze verslonden. De beestjes die minder opvallen overleven, muteren of planten zich voort. Overlevenden gaan een generatie langer mee. Bij het muteren verandert de huidskleur willekeurig. Bij voortplanten wordt er een kind gemaakt die het gemiddelde van de huidskleuren van zijn ouders als kleur heeft. Als het meerendeel van de beestjes uiteindelijk een goeie schutkleur aangenomen hebben kan de achtergrond veranderd worden en begint alles van voor af aan.
Om Python wat te leren kennen heb ik een “Text To Speech Recognition” programma geschreven. Het roept SAPI 5.1 aan om een tekst voor te laten lezen door Microsoft Sam. Het voorgelezen stuk tekst wordt daarna meteen via microfoon opgenomen en Sam probeert het zelf, via Speech Recognition, te verstaan. Het resultaat van de speech recognition wordt dan gelezen door Sam enzovoort… Dit is een voorbeeld van Sam in dialoog met zichzelf:
I am sitting in a room different from the one you are in now. I am recording the sound of my speaking voice and I am going to play it back into the room again.
I’m sitting in a room different from the one U.N. NA I’m recording the sound of my speak English and I’m going to play it back into the room against
I’m sitting in a room different from the one you could in a LAN recording the sound of my speak English and I’m going to clamp back into the room against
I’m sitting in a room different from the one you put in a LAN recording the sound and I speak English and I’m going to clamp back into the room against
I’m sitting in a room different from the one you put in a LAN recording the sound and I speak a Mac into ghent
I’m sitting in a room different from the one you put in a LAN recording the sound and I speak a match into ghent
Kunstencentrum Vooruit heeft sinds kort een nieuwe site opgericht. Aan de site is een community luik gekoppeld waarop gebruikers een profiel kunnen aanmaken en evenementen op een persoonlijke wishlist kunnen plaatsen. Daarnaast kunnen ze er ook tickets voor voorstellingen kopen. Ook kunnen de gebruikers relaties tussen zichzelf en vrienden leggen.
Aan de hand van die gegevens en de gegevens van in het back-office systeem zou het mogelijk moeten zijn om een cultureel profiel op te stellen van de gebruikers en ze gepersonaliseerde, relevante tips geven. De voordelen van zo’n Customer Intelligence systeem zijn legio:
Kunstencentrum Vooruit leert zijn klanten beter kennen
De klanten krijgen gepersonaliseerde tips en hierdoor wordt hun culturele interesse geprikkeld
Trends kunnen makkelijker ontdekt worden
Er kan gerichter reclame gevoerd worden
…
En dat C.I. systeem gaan wij volgend jaar ontwikkelen. Er zal een uitgebreid onderzoek gebeuren naar de manier waarop en daarna wordt een implementatie gekoppeld met de in Ruby on Rails ontwikkelde website.
Voor het vak algoritmen hebben we enkele sorteeralgoritmes besproken en in c++ geïmplementeerd. Dit is mijn versie van de algoritmes het gebruikt een interface SortAlgorithm en het Strategy design pattern om zijn werk te doen.
In principe kan om het even wat gesorteerd worden maar sommige sorteeralgoritmes (Counting Sort) werken enkel met int’s. Om strings te sorteren kan gebruik gemaakt worden van de Nstring klasse.
Elk sorteeralgoritme kan getest en gemeten worden, dit is de uitvoor voor het shell sort algoritme met de Sedgewick incrementen:
Ik werk momenteel bij Encima. Encima maakt websites en andere toepassingen in Java. Mijn eerste week zit er al op en ik heb me bezig gehouden met een module voor www.weekendesk.com. Maandag wordt de module, samen met de nieuwe versie van de site, in gebruik genomen. Weekenddesk doet het volgende:
Weekendesk.com is een B2C e-commerce site die weekend- en dagtrips on line verkoopt en zich hierbij in eerste instantie op de Belgische en Nederlandse markt richt.
Weekendesk fungeert hierbij als tussenpersoon tussen de consument en de organisator van de vrijetijdsactiviteit.
De website biedt de klant op een frisse en overzichtelijke manier alle nodige informatie over de vrijetijdsactiviteiten.
De activiteiten zijn onderverdeeld in twee types: cadeaubonnen en weekendideeën. De prijs en beschikbaarheid van elke activiteit is steeds up-to-date. On line boeken is snel, eenvoudig en veilig. Betalen kan via creditcard of per overschrijving.
Via een on line content management module kan Weekendesk alle activiteiten en de gerelateerde informatie (beschrijving, fotoboek, prijzen, beschikbaarheid, promotie, ...) beheren. Een order management module laat hen toe de bestellingen on line op te volgen.
Ook de leveranciers (organisatoren) van de activiteiten kunnen via een private on line module de beschikbaarheid, prijzen en promoties inbrengen.
En net die module voor de leveranciers, organisatoren (meestal hotels) heb ik in elkaar gestoken.
Code and 0110.be
Mel en ik zijn bezig aan een systeem om war games te ondersteunen. War games zijn
grootschalige ramp-oefeningen.
Bijvoorbeeld een aanval van terroristen op een kerncentrale. Er wordt een bepaald scenario opgesteld: terroristen
gijzelen werknemers en dreigen de boel op te blazen. Er wordt op deze situatie gereageerd door iedereen die daar
in het echt ook mee zou te maken hebben: politie, swat teams, er worden fake nieuwsberichten gemaakt door de media,
de werknemers van de centrale zelf,....
Tijdens die simulatie wordt adhv vragenlijsten gepolst hoe goed (of slecht)
alles verloopt. Die vragenlijsten komen op een beveiligde website die wij aan het programmeren zijn.
Die data is dan de basis voor een rapport met de bevindingen: wat verliep er goed en wat kan beter.
We gebruiken het ASP.NET 2.0 platform in samenwerking met een sql express 2005 database én een object database: db4o. Daarmee zijn we aan het experimenteren. Daarbij horen unit tests en load tests. Daaruit blijkt dat Db4o zijn beloftes waar maakt:
Embed db4o's native Java and .NET open source object database engine into your product and store even the most complex object structures with only one line of code.
db4o slashes development cost and time, provides superior performance, and requires no DBA.
blijkbaar zijn we verplicht een access database te gebruiken, hoe 1994, zucht.


 The
The 

, accelerometer-data (green) and audio (black).")
 can be synchronized with streams one and two. It allows a workflow where streams are started and stopped (red) or start before the reference stream (green).")


 while others are not (red, x). Matching fingerprints have the same offset, indicated by the dotted lines.")
 and balanceboard data (bottom, purple).")


 This post describes how to get notifications from a Bluetooth

 This post explains how to receive
  This post explains how to measure audio output latency on Android devices. To measure audio latency


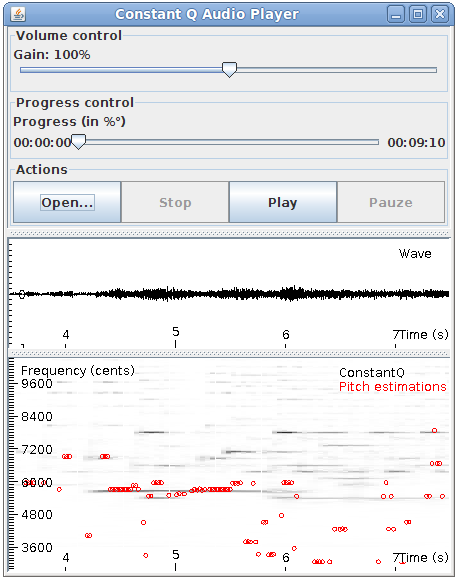

 This post is about a hack I did for the 2012


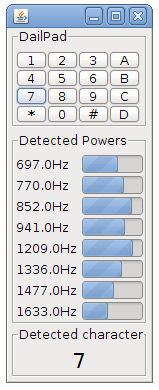


 The extended abstract about PeachNote Piano has been accepted as a demonstration presentation to appear at the


 While working on a Latex document with several collaborators some problems arise:
 The Pidato experiment demonstrates a rather straightforward method to handle vibrato on a digital piano. It solves the age-old problem on what to do with the enigmatic “vibrato” instructions on some piano solo scores of Franz Liszt. The figure on the right is an exerpt of


 TwinSeats is een website / online initiatief om nieuwe mensen te leren kennen. Met hen deel je dezelfde culturele interesse en ga je vervolgens samen naar deze of gene voorstelling. Door events centraal te stellen kan TwinSeats uitzonderlijke cultuurburen zoeken. Leden vinden die cultuurburen dankzij een gezamenlijke voorliefde voor een artiest of attractie of eender welke bezigheid in de vrijetijdssfeer.


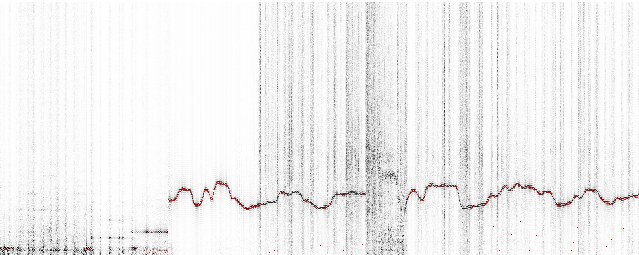
 This is the scenario: you have a Huawei e220, a linux computer and you want to react to a call from a set of predefined numbers. E.g.


