Recently in Halloween Category
A Fluttery Flower Petal Skirt
July 6, 2014
 While I may be the only one, I love the sweltering heat of summer. (I know, it's weird, but I live in the South for a reason.) The only downfall of summer's heat is that I miss all the blooming that happens in springtime. While we still have blooming plants in our yard now, it's nothing compared to the explosion of color that we enjoy earlier in the year.
So, I decided to make a wearable flower to fill the gap a little bit. I wanted to make something that wouldn't need a lot of finishing, so I used knits for the whole thing to avoid finishing edges. For my petals, I used a pink interlock, and for the waistband and sepal bud leaves, I used a rayon blend knit.
This is a project that would be great to make in a kid's size for a dress-up trunk or a Halloween costume piece, or for an adult that likes to play dress up too! (That's me.)
I didn't use a pattern for this one; I just cut pieces and then overlapped them together to mimic a the way a flower's petals unfurl from a bud. The petals get overlapped as much or as little as needed to match the waistband, so there's a lot of wiggle room here.
To start, I drew a simple petal shape on posterboard, thinking about the length I wanted the finished skirt. My petal is 15 inches long, and 8.5 inches wide at it's widest point. Once I had drawn a shape I liked, I cut it out, making a negative space stencil, which I used to add a bit of blush to the edges of my petals. I diluted craft paint and put it in a spray bottle to create my color, and sprayed it right onto the fabric using the stencil as a guide. I also sprayed plain water over the color spray to help keep the edges soft and breakup any blobby paint drips. (I still had a few but let them go.)

Once my pigment had dried, I used the paint as a guide to cut out my petals. I cut 11 petals total, but that was a completely random number based on the amound of fabric I had. This project could involve fewer or more petals, to your design taste! I also added little white pearlescent dots of paint around the edges of the petals.

Next, I cut fabric sepals for my flower out of the green rayon blend. I used the flat edge at the top of my petals as a guide for the size, and then just freehanded the rest of the shape.
Once I had all my petals and sepals cut, I first overlapped the petals to be a little longer than the length of my waist measurement, and then I laid the sepals over those, similarly overlapped. I safety pinned everything in place.

Then I basted all layers together along the top edge, being careful of all the fabric layers as I went to avoid unwanted bunching or folding on the underside. I also left a bit unbasted at each end so I could overlap them all properly to close up my circle with the same layering I used on the rest of the petals.

Next, I cut a rectangle of the rayon blend about 1.5 inches longer than my waist measurement and 6.5 inches high. I stitched it into a closed loop, then folded it over to create a 3.25-inch waistband. Then I stitched that waistband to the petal and sepal pieces.
I started stitching leaving a little bit of the basted petal pieces free, and then as I approached the end of the loop, I layered the ends of my skirting pieces together to finish the circle and stitched the waistband almost closed. I left about a 2-inch opening to run my eleastic through.

I cut a piece of elastic the length of my waist and ran it through the waistband. I zig-zagged the ends of the elastic together, and then I stitched the remaining 2 inches of waistband to the petal skirting to close up the casing.

After the waistband was in place. I tried the skirt on to see where the petals fell naturally. I pinned them into position and then top-stitched the edges that overlapped one petal over another. I then did the same thing with the green sepal pieces.

I couldn't resist adding a few hot-fix rhinestones scattered around on the petals like dew.

I'm not 100 percent happy with how the sepals sit on mine; if I do another version of this skirt, I might stitch them to one another, but not to the petal layer to avoid pulling. But even so, I love the fairy-like vibe of it! It will probably take all my will to not add more hot-fix crystals to it.


Last Minute Halloween Bags -- For Kids and Grownups!
October 21, 2013
Time is running out -- we're down to single-digit countdown days for Halloween. Whether you need a fun trick-or-treat bag for the kids or a quickie clutch for a grown-up party, we've got you covered.
Halloween style shouldn't be reserved just for trick-or-treaters, but candy bags can be stylish, too! To serve the spooky needs of kids and their adult escorts, and get things done in a hurry, I decided to play with appliqués.
I am sort of obsessed with sugar skulls at the moment. (The same way the sun is sort of a ball of fire.) So I knew I wanted a fun, slightly cartoony take on the look for a little bag for me. I also have a ceaseless adoration for bats. So I wanted to incorporate that shape into a couple of projects as well.
To start with, I sketched out designs for my motifs in the simplest outlines. I put a 1-inch grid on top so they can be scaled.
 I traced my basic pattern pieces onto Heat'n Bond, fused it to my applique fabric, and then used the traced image to cut my fabric before peeling away the paper.
 Then, I fused my design -- the basic white skull out of Deer Suede velour -- onto black twill.
I used a coaster to trace the circles for the outer eyes onto my Heat'n Bond, and then drew in the scalloped edges. I used a pink satin scrap fused to the Heat'n Bond to create my eye base appliques, then used a smaller circle to trace and create the interior black area out of velveteen. For the nose, I cut an elogated heart out of velveteen that already had fusible backing on it, then cut a divot out of the point of the heart. I fused all my facial pieces down, then I drew in additional details with a water-soluble marking pen. I stitched over my marker lines with a satin stitch on my machine, and added some hotfix crystals to sparkle things up.
 Once my rhinestones were in place, I cut around the entire applique, leaving about 5/8 inch all around. I then used that as my pattern piece to cut a back piece for my bag and two lining pieces.

To set in the zipper, I placed one of the lining pieces onto the back of the bag, right sides together, and stitched a small, narrow rectangle. I cilpped the rectangle along its length and then into each of the four corners, and turned it right side out. After a good pressing, I positioned the zipper under my opening and stitched it into place just inside the folded edge of the rectangular opening. I also basted two ribbon loops to the top edge of the bag. (I use those loops to clip an existing bag strap with swivel clips onto the bag.)
 With the zipper opened up, I stitched my appliqued bag front to my bag bag with lining in place, then stitched around the entire skull shape. I finished mine with an overlock stitch to prevent fraying.
 For the trick-or-treat version of this bag, I put a smaller version of my skull onto a plain black bag (more details on how I make mine below), and kept it simpler. Instead of all the detailing, I fused the eye and nose pieces into place, drew in my mouth with a permanent marker, and hot glued a few faux flowers into place on top of the skull. Simple, but still an unmistakeable nod to the Day of the Dead. The handles for the bag are made from a double layer of grosgrain ribbon stitched together.
 For my bat bags, things are even simpler. For the trick or treat bag, I cut three colorful bats out of small scraps of satin and taffeta, and lined them up along the front of the bag piece. To make my bag, I start with a piece of twill 24x17 inches and fold it in half so it's 12 inches wide and 17 inches tall (unstitched).

Depending on how much time you have, you might want to stitch your appliques in place. I usually just use the standard zig-zag stitch on my machine, but I always test first and adjust to what looks best for the fabric I'm using at any given time.
 After my bats were in place, I put the bag together by folding it in half so the apllique is on the inside, then stitching along the non-fold side and across the bottom. To make sure no precious candy cargo is lost, I run a line of reinforcement zig-zag stitching around the whole thing.
 To square off the bottom of the bag, I collapse the corners so that the bottom seam sits at the center of a triangle and run a quick stitch about an inch and a half from the tip of the triangle. After that, I just fold over the top and stitch, add some grosgrain handles, and we're ready to receive candy!

To make a little bat clutch, I appliqued a black velveteen bat onto a square of some pink corduroy I had on hand. I cut a matching piece for the back and two lining pieces, then set in the zipper using the same method I detailed in my Scrap-o-Licious shaving kit projects.

After adding a small strap made from the same corduroy, I sewed my bag closed (leave the zipper open!) and was ready for a Halloween soiree.
 Heat'n Bond appliques can help you ensure you have a unique custom Halloween accessory. While my projects feature skulls and bats, you can easily search online for other fun shapes -- spiders, witches, pumpkins, cats, the Grim Reaper, ghosts -- whatever your favorite thing is! So don't fret if you haven't put anything together yet. Just grab your scraps and something to draw with, and don't forget to have fun!
Burlap Halloween Part 2: Ghost
October 2, 2013
This one is super easy and lots of fun for kids. When my oldest came home from preschool the other day and I told her there was a ghost in the yard her eyes grew large and filled with curiousity. She carefully crept up behind it and tenativiely touched it. As it swung around to face her in the breeze she held her breathe and gasped when the haunted face turned to her direction. It was perfect and she loves it. It is just the right blend of spooky and chic. This ghost is easily tailored to match your style or decor. I paired a silvery burlap with grey chevron twill trim because I prefer a classic/modern style to my decor. You can amp it up with fall themed fabric trim, halloween trim, purple burlap with orange trim or even the classic black burlap with silver or orange trim.
To make each ghost you will need 1 yd of burlap and 1/2 yd of trim fabric. With a large zig zag stitch, stitch along each raw edge to prevent fraying.
Cut 2 pieces 9'' by the width of the fabric (approx 56'', if you use quilting cotton you will need to piece the trim to match the width of the burlap). With wrong sides together press each piece in along the length, matching up the raw edges. Pin to the selvedges of burlap and sew with 1/2'' seam. Press seam towards burlap and topstitch in place. Repeat for second trim piece.
To create the head, I used an old stuffed animal that would not be missed for a few weeks. So I would not damage it I used safety pins to attach it to the inside of my ghost. This created just the right shape underneath. If you don't want to use a plush animal you can use an old pillow, stuff a sack with newspaper, plastic bags or rags. Then hand stitch a long ribbon (3 ft or more depending on where you will hang your ghost) to the top.
Cut 2 eyes and a screaming, howling mouth from black felt and glue in place with a glue gun (I traced a spool for the eyes and just free handed the mouth). Adding the head first allows you to place the face in the right position. Finally hang your ghost in a tree outside, off the stairs inside, from the deck or a doorway. Anywhere you need to scare.
Burlap Halloween
September 27, 2013
A few years ago I decorated my porch in burlap for Halloween. I started with this burlap banner and went from there. This year I plan to do even more Halloween decorating with burlap. I'm thinking of a more historical, rustic inspired Halloween with less emphasis on scary and more on the seasonal aspect and that is where the burlap comes in. Burlap is so rustic and a great medium for fall/halloween decorating. Its natural, unkempt appearance makes is easy to work with. I do love decorating for halloween but with so much going on I hate to put up decorations for only one month when I can get several months out of them by decorating for the seasons and not so much the holidays. This way while others are storing Halloween decorations and breaking out the goods for thanksgiving, I can be kicking back with a glass of wine and reading a good book or knitting a new sweater. Here are some of my favorite ideas that can span the holidays:

Burlap Halloween Treat Bags from Craft Unleashed. You can use them as name cards at thanksgiving.

Handpainted Halloween Burlap Table Runner (complete with tutorial to paint your own) from Knockoff Decor. Paint it with a fall scene on the other side.

Lil Luna has 50 Wreath Ideas. I really love the burlap spider wreath by Annalily Design. This is just too cute to pass up. Attach the spiders with pins for velcro and change it up for fall.

This Ella Claire Burlap Buntingis so lovely and perfect for sofisticated spooky decor.

U Create has the most adorable Ghost Halloween Lights I have ever seen.

Finally, Fall/Halloween Decor would not be complete without a pumpkin. I love Adelyn Stone's version here. Perfect for hall tables, tablescapes and niches.
View our selection of burlap here.
Hot Patterns Halloween Free Pattern Download: Voodoo Chile Skirt
September 24, 2013
 I have been not-so-patiently waiting for this year's Halloween freebie pattern from Hot Patterns. When it landed in my inbox, I'm pretty sure I squealed aloud. What makes me love this one so very much? It can work its wiles long after the holiday has passed! You can make it up in sparkly, costumey fabrics, but it's also completely able to blend into your year-round wardrobe when you make it out of versatile wardrobe fabrics. And it's made for knits (loooove!). AND it involves no hemming (double looove!).
The first thing you'll notice when you assemble your pattern is that there's a lot more curve to the skirt pieces than you're probably used to. This is where the magic is -- it sets this one apart from the pack. Even though it's a fairly simple pattern -- just these pieces and a rectangular waistband -- the curves and assymetry of it mean that cutting may take a little while. (Since construction goes quickly, it's a fair trade-off.)
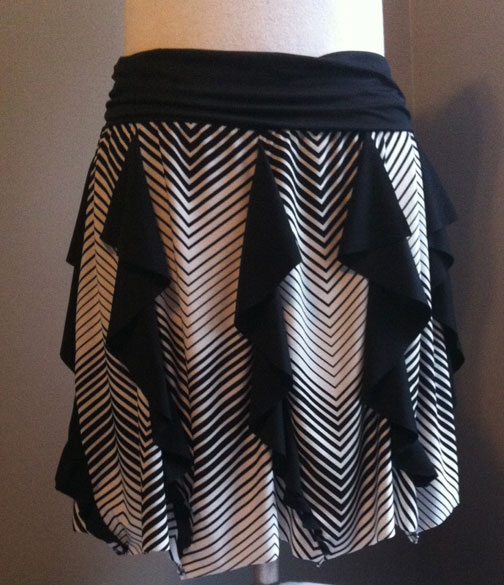
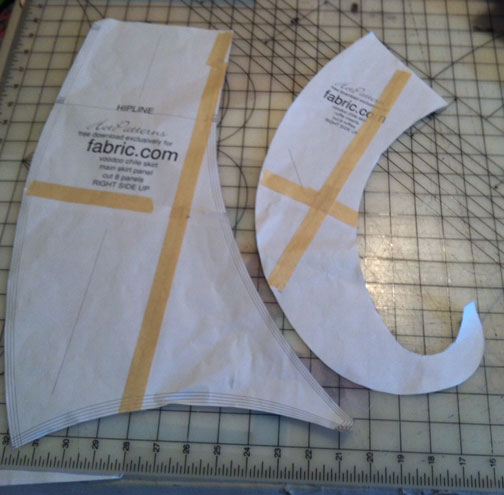 I made several versions of this skirt in different fabrics to give you an idea of what you might expect from different textile choices.
The first version I made was in a very inexpensive sparkly knit from my stash. (Seriously, I think I paid less than a dollar a yard for it -- it's a bargain bin find.) Because the fabric is so flimsy, it wouldn't be a great choice for repeated wearings in your wardrobe, but it's perfect for a modern take on a witch or fortune-teller costume.

For my second version, I used a spandex knit that would normally be used for swim or activewear. This one has great body and drape, though you might be surprised at how quickly the weight adds up with this fabric.
 When I first selected a plisse knit for version number three, part of me was trepidatious. I wasn't sure how it would come out, but I really, really love this version! The springiness of the fabric gives it a really nice body. I love the plum color so much that I didn't want to use a different knit for the waistband, so I cut a narrower version of the waistband piece out of the plisse and inserted elastic to make up for the lack of recovery in the knit. This one can easily do double duty as a costume element or a wardrobe piece.
 Next I wanted to play with contrast a little bit, so I used a gray and black striped knit paired with a solid black for the draped pieces. The striped fabric is a polyester knit I had in my stash, but it's not very stretchy -- it stays crisp compared to the poly lycra jersey I used for the ruffles. I wore this one while tootling around town yesterday and got a compliment on it from a stranger on the train, so I call that a win! (Has it become abundantly obvious that this is a year-round style in my book?)
 Spurred by the success of the first contrast experiment, I forged ahead with a higher-contrast chevron knit combined again with black. My chevron is an ITY, so it's very, very fluid. The black is the same poly lycra I used in the previous skirt. This has great swing and movement.
 My last version is out of a simple poly/lycra blend knit with tiny stars printed on it. I love how the solid black of the non-printed side peeks out here and there in the cascading drape of the ruffle inserts. I have a feeling this one will be a repeat performer in my fall wardrobe, because it's beyond comfy and will pair perfectly with T-shirts and sneakers for weekend wear.
 So, after six, I had to restrain myself. But there are so many other combinations I would love to try! Color mixes, different prints, using sheers for the ruffles, reversing the curve of the lower edge -- there are so many ways to make this skirt uniquely your own. That's some good voodoo.
Get your free pattern here, and have fun creating!
Costume Corner: Kid's Costume
September 20, 2013
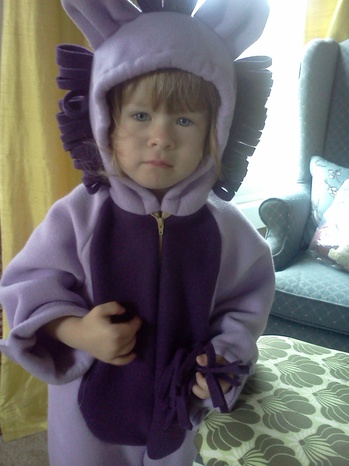 Remember my purple lion costume? Well, I made it with the intention it would be worn for at least a year and it is going on 2 and its still hanging in. I love it and so does my daughter. My only issue is that she insists on wearing it everyday, in Georiga, in summer. It gets hot. Very hot. She will sweat buckets and not admit its too hot. She's a lion and will not break character. So I knew we needed a summer time costume change. I decided a t-shirt rehab would do the trick. I used a combination of the original pattern and a little out-of-the box experimentation to get the job done. The finished product turned out to be a short sleeved jersey lion jacket, complete with tail. It is a success and my daughter enjoys it but she is still anxious for it to cool down so she can get back into her fleece original (insert eye roll here).
I started with 3 t-shirts, 2 body color (turquoise) and 1 coordinating (light blue). One of the turquoise shirts was a youth-small size and it would be the jacket and the other 2 tshirts were the largest I could find since they would be cut up for pieces. From the giant turquoise shirt I cut the hood, ears and tail and from the giant coordinating shirt I cut the mane, belly and tail fringe. I cut the youth small shirt right down the middle and added a separating plastic zipper. I choose plastic because the teeth and the pull were bigger and easier for her little fingers. When adding the belly piece the top of the belly and the neckline of the tshirt did not exactly meet up so I just recut the top of the belly piece to line up with the shirt neckline and when I sewed on the hood it covered any other discrepancies. This worked out well since altering the neckline of the belly piece shortened the belly piece a bit and it fit on the shirt better too. I just sewed the tail right to the hem stitching of the shirt in the back. I re-enforced it by first sewing the it on with the tail flipped up toward the neckline then I flipped it down and top stitched it. I stuffed it again just like I did with my fleece version.
What I would do different is I would make the mane, ears and tail from interlock instead of jersey knit. This would make it stand up more and curl less. I would also make matching pants and mittens from jersey or interlock. It sound like a lot of layers but my daughter's only complaint with this outfit is that she didn't feel complete. She continued to ask for her claws and pants.
I am planning to make another version of the original Kwik Sew Pattern only the dinosaur from french terry as another warm weather alternative. For that version I am planning on interfacing the ears to make them stand up and using fleece for the mane and fringe as it adds just the right fluffy and cuteness. This is a great quick version or play version. If you remove the tail or make it shorter you can use this hoody everyday. You can easily layer under this if you aren't sure of the weather or if you live in a warmer climate like the South. If you live in a cooler climate substitute the t-shirt for a sweatshirt.
Costume Corner: Baby Shrek the Ogre
September 11, 2013
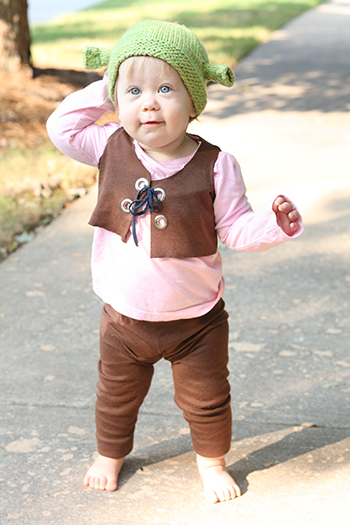
Well, I have a baby so you must have seen this one coming. For the most part I'm a pretty laid back mom but I always, always like for my girls to look good. This is especially true for halloween since I love Halloween. I really love it. In fact I was planning hallween costume a few minutes after I found out I was pregnant. When it comes to babies though I don't let anything irritate, distract or inhibit them- it just makes my job easier. So I set out to make a super cute costume for my youngest that would not distract her from her job-walking, crawling and getting into trouble- but would make for some memorable photos. It is amazing how well some key clothing items can be configured into great costumes for little ones.
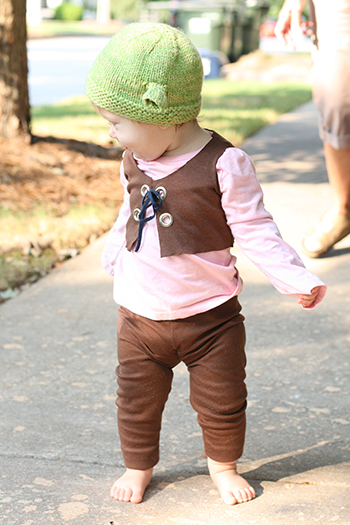
For my daughter, we decided it would be funny for her to be Shrek the Ogre for Halloween. You see, when we told my oldest daughter that we were having a baby she named her soon-to-be sister "Baby Shrek" until even after we found out "shrek" was a girl. To make this costume all that is needed is a tiny vest, leggings, a t-shirt or onesie and a knit hat. Since the weather in Georiga is tempermental and I never know if it will be warm or cold on the big day I like to keep my options open to make sure my kids are comfy. For this costume I can use a long sleeve shirt or short sleeve. I have also decided to use a pink shirt instead of Shrek's white just to show she's a girl (people like to know). To create your own baby Shrek costume try these tutorials to make your pieces.
Vest: I modified this baby shirt pattern to be an open vest just sewn at the shoulders and sides. I cut the back piece on the fold but not the front to create the open vest. I left off the sleeves. I used some brown interlock knit fabric to prevent curling and because it is thicker and will hold up to the grommets better. I added 4 grommets just like Shrek. I didn't hem or bind arm holes to give it the haphazard, worn look Shrek rocks.
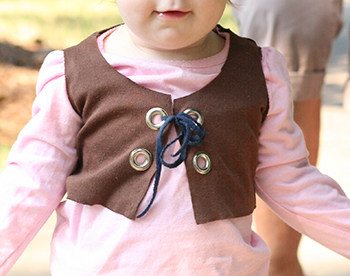
Leggings: This is a a great pattern to use to make all kinds of leggings or knit pants for your kids. I used the same brown interlock just in case it is chilly that night. I know Shrek wears tartan leggings but I wanted to be able to use the leggings for everyday use and I'm not sure if I have too many outfits that will match Shrek's particular tartan.

For the hat I knit this pattern using 2 strands held together, one of cotton (Lion Brand Cotton Ease Lime) and one of wool (Lion Brand Wool Ease Sage).
This costume idea can be adapted for other characters as well. For animals you only need change the hat and keep the t-shirt and leggings the same color to coordinate with the animals. Try searching Ravelry for the hat pattern. Here's a great Despicable Me minion crochet hat pattern. For Princess Leia, try this pattern. If you want to sew an animal hat, check out this collection on Pinterest.
This Year's Witch -- 1920s-inspired!
September 8, 2013
 As is my tradition, I make a new witch costume every year as Halloween approaches. You can see previous witchy projects here and here. But this year, with all the Gatbsy buzz, I wanted something that borrowed a little bit of 1920s style. I didn't want to go full-out hsitorical with it, because I don't have time in the schedule for that this year, so I settled on a Simplicity pattern by LeAnn Marshall that had the feel I was looking for.
The dress itself is cut primarily on the bias, but even so, it's not a fabric hog. I used 3 yards of chiffon, 3 yards of stretch charmeuse, and 1.5 yards of Jacqueline lace so I could add a little texture to my draped overskirts. I ended up with a chunk of the charmeuse leftover. The trickiest bit about the dress is dealing with bias-cut chiffon. It can be a little finnicky. But with a little patience, it can totally be handled.
Here is the basic dress, sans embellishment.
 To add a little sparkle to my witch, I first used some leftover scraps of the rhinestone-dotted net from my ballgown witch two years ago; I cut them into roughly 6-inch wide strips and gathered them all in one continuous ruffle at the center. My second salvage operation involved overdying the blue appliques from my De La Renta Snow White to a black color, and layering those with the gathered net.
While my dress was on my dressform, I did a little test draping of the trim along the neckline and down the side of the overskirt.
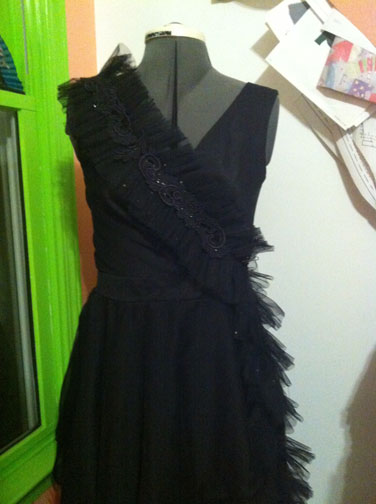 I liked the results, so I ploughed ahead. I ended up additing additional clear and black rhinestone crystals using my hotfix applicator, and added additional appliques along the waistband and at the pleating of the overskirts.

I hand-stitched the ruffled trim along the neckline, but the waist appliques are machine-stitched into place.
 Now I just need to find a handsome warlock to Charleston and shimmy with! (Oh, my ... now I want to make my husband a 1920s warlock ensemble ... )

A De La Renta Fairy Tale
August 25, 2013
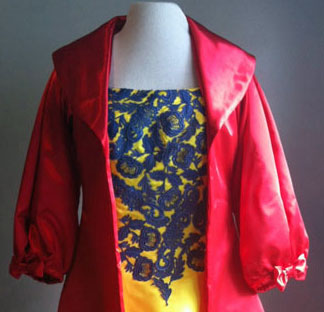 Last year, Harrod's holiday window display featured Disney princesses wearing dresses created by famous designers. It was such a revelation to see how different fashion houses interpreted the classic tales into modern couture looks. Snow White fan that I am, I was completely enraptured when I saw the De La Renta version. (Side note: I never was really into De La Renta in years past. I always recognized the quality of the design -- it just wasn't my taste. But lately, there's something in each of his collections that I just fall in love with. I'm not sure if I'm evolving or Oscar is -- or a little bit of both -- but it's a new sensation for me to like the brand so much!)
After looking at the sketch and some photos of the window display, I set out a plot to make my own versions of the two pieces involved -- the gown and the duster -- and set to work.

For the gown, I started, as I often do, with a pattern from my collection. This one is near and dear to my heart -- it's the same one I used to create my wedding gown 17 years ago! (I had to cut it a little bigger this time around.)
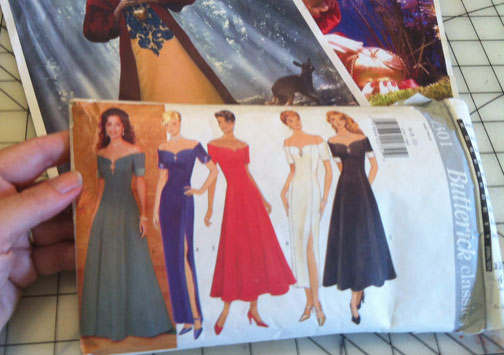
It's a basic princess-seam dress; there are plenty of similar patterns on the market all the time. I made a slight alteration to the neck line and made a plan to change up the sleeve, but otherwise cut the pattern as-is using a yellow Mi Amor Duchess Satin.
For the blue lace overlay, I started with an assortment of white Venise lace appliques. I pick these up anytime I find them in my travels, in bulk if I can. Specialty sewing shops sometimes carry them, and online suppliers often do as well. Sometimes you can even find bags of them at flea markets. Knowing since last Christmas that I wanted to make this one, I've had an eye out all year for suitable components.
I started with white appliques, and then dyed them blue using iDye.

I did my dye work on the stove and then ran the appliqués through the wash in a lingerie bag to remove remaining dye residue.
Once I had the front of my dress assembled, I started arranging the appliqués. I would place a few at a time and then stitch them down, and worked my way through the placement of the design that way until I was done. I machine stitched mine, though you can bet the couture gown was done by hand! Here's a shot of just the front of the dress clipped to my dress form (sloppily) as the applique layout is in process.
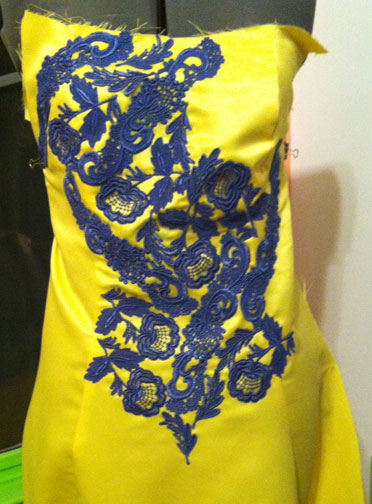
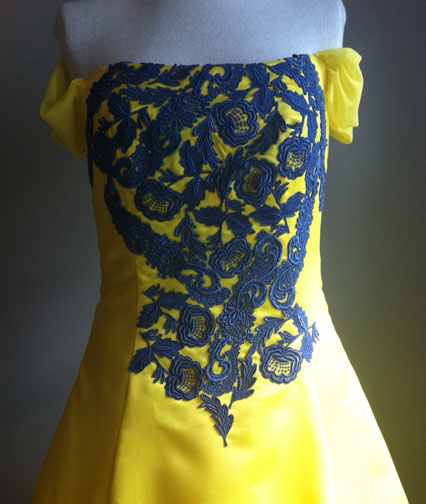
After the appliqués were all in place, I finished the dress as normal, substituting a knit chiffon drape sleeve for the cuffed sleeve in the pattern.

The pins at the top of the bodice are keeping things in place on the form -- on me, it stays up just fine. :)
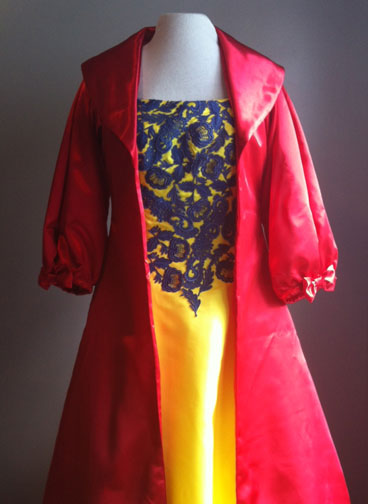
For the duster, I once again turned to the pattern stash. BUT, because this satin evening coat doesn't appear to fully wrap or close at the front, I knew I'd have to alter a pattern for the narrower fit. I went with a long, fitted coat pattern, and I only used the side front, back and side back pieces when cutting. I widened the side front piece a little bit to make sure the shoulder seam would match up with the back and allow a little more coverage than just the side front alone.
 I also drafted an alternate collar -- it sort of mimics the shape of the iconic white collar that Snow White wears in the movie. The blue area in the image below is the center of the collar, which is cut on the fold. I'm not sure why I had that point in there at the center initially -- it got clipped off into a smooth line.
 Here is the collar assembled before it was attached to the duster. I used slipper satin for the duster, and a remnant of taffeta for an interfacing on the collar.
 For the voluminous sleeves, I cut simple rectangles about 22 x 30 inches, sewed them into tubes along the long edges, and then pleated them to the right size at the shoulder seam to fit. I gathered the bottom edge, then added small pleats to mirror the pleating at the shoulder. I added small bow details at the outside of the sleeve just to bring a little more Snow White flavor to the duster.
 I like that this feels Snow White but is different from a standard costume. It's got a grown-up vibe, but the colors and inspiration are still there.
 Do you get inspired to recreate pieces you see in magazines or online for your own use? I have a mile-long list of such projects. Of course, it's tempting to make more designer-style princess dresses, too!
A New Twist on the Queen of Hearts
August 21, 2013
 It's costume season! Between conventions like DragonCon and an assortment of Halloween events on the horizon, I am officially in full-on costume stitching mode for the year.
Last year, when Disney teased a new line of dolls based around the concept of villains transformed Into couture-style gowns, I swooned. The design sketches captured me instantly, and I fell head-over-heels in love with the re imagined version of the Queen of Hearts from "Alice in Wonderland." It had all the ingredients to bake me an obsession cake: ruffles! red! a crazy collar!
So, needless to say, it went on the project list.
Here are the reference items I started with:

Skirt:
So, the skirt was straightforward, but time consuming. I used a combo of mirror organza cut into 6-inch strips and tulle spools in black (I used 4 spools for this project) to create the alternating ruffles. The base for the skirt was actually a skirt left over from another project that I no longer wear -- I just altered it to have a leaner line, going from a gathered waist to a flat one, and narrowing the skirt by taking in all seams. Then, I ruffled the organza (the edges are just serged) and the tulle, and applied the rows one by one, about 1.75 inches apart from one another.
 This is the phase of the skirt I liked to call "The Ruffle Monster." At this stage, it was like wrestling with an organza and tulle alligator.

Bodice:
The bodice started out with a plain corset-style bodice top from an old McCall's Moulin Rouge pattern that I've used many times.

I used red Toscana velveteen for the fabric, it's underlined with twill, lined with satin, and I used spring steel boning when constructing the bodice -- I love this stuff! I buy mine from Farthingales -- they specialize in corsetry supplies.

To add the peplum on the bottom of the bodice, I cut two shallow half circles, lined them, then tested their placement on the completed bodice.
Here's a peplum piece, cut on the fold:

I ended up altering the shape a bit so they ended up more cigar shaped before I gathered them into place.
Collar:
The collar was a bit challenging. I wanted the heart backing to stand and not droop, so I used wire to give it a bit of lift -- I salvaged mine from two wire hangers. It's inserted to a channel in the seam allowance of the two heart shapes stitched right sides together.

Turning it right side out with the wire involved was a little tricky. Once I had the heart shape squared away, I attached it to a simple strap that sits halter-style and snaps into the side fronts of the bodice.
Here's the quick test I did of the outfit at this stage:

For the white tulle netting on the collar, I gathered 4 wide layers of tulle together (25-30 inches wide) along the center of the stacked layers, folded along the stitch line, hand stitched it to the collar and strap, and then gave it a haircut to create the tapered shape at the front and even out the edges of my layers.

Bow:
For the big bow at the back of the dress, I just layered rectangles of fabric together (each layer is actually two pieces of fabric stitched right sides together and then turned out), with the shortest piece on top and angling the longest bottom piece for a bow effect. Then I hand stitched a scrap of the velveteen around the center of my layered pieces to create a faux knot. It attaches to the back of the dress with snaps after the bodice is laced up.

My favorite thing about the project is the surprisingly comfortable skirt. Because the fabrics are light, it's quite springy; I don't need to wear a petticoat with it if I don't want to (a blessing in the Atlanta heat).
 Now I just need my crown and maybe a golden heart-shaped handbag (or a scepter that has storage!). Then I'll be ready for flamingo croquet.
