September 2012 Archives
A Fairy's Closet (Part 1 of 2)
September 27, 2012
So, I decided to sprinkle a little pixie dust in the sewing room and create some fairy finery.
I decided to start with a pettiskirt. A couple of years ago, I made this pettiskirt in black. In the time since then, I've made quite a few others, and I have refined and altered my approach a bit. I still use the same tiered construction with a wide center strip that folds in half to form the casing for the elastic waistband, but now I have two layers of identical skirting so the pettiskirt is reversible, and I add a 2-inch wide ruffle of fluff at the bottom edge. This is similar to the ones that are often made for little girls, and I think it is SO fun. You really get plenty of swing.
I started with blue nylon chiffon tricot. I LOVE that it comes in 108-inch wide cuts. That means I don't have to cut as many strips to make a skirt, which is ALWAYS welcome news.
To start cutting, I fold the fabric onto itself a couple times, so that I can quickly cut strips with my rotary cutter. Because this fabric can be slippery, I line it up as best I can, but then I just true up the end by cutting it.

Tier one: 4 8-inch wide strips
Tier two: 7 8-inch wide strips
Hem ruffle: 20 2-inch wide strips
I don't fret too much over perfection on these. All the ruffling hides most sins. Here are my three piles all together:
 Once the pieces are all cut, I start ruffling. If you have a good relationship with your ruffle foot, this project could whiz right along. I find I have problems working with sheers on my ruffler, so I gather by hand on my machine.
I just gather and gather and gather, layering strips together at the ends instead of joining them with a seam.
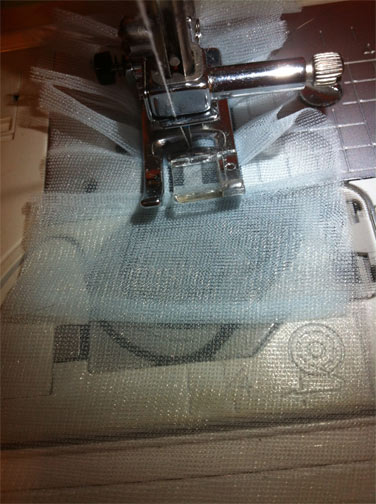
 I assemble it all as one loooooooooong piece, and then I cut that piece in half at the mid point to create the two separate layers of skirt. For me, this saves time, because I can just crank everything out while only having to keep track of three piles of strips, instead of separating them into six piles. However, if you prefer to work with smaller pieces, that's fine, too!
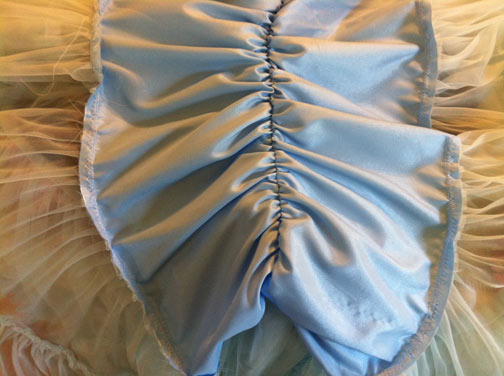
 Once I have all those ruffles together and then split into two, I attach them to the waist section, which I cut from the charmeuse. It's one piece, 16 inches wide, and I cut it the full width of the fabric. Then, I sew one set of ruffles along each raw edge, and sew a seam that closes up the circle, stitching from one hem up to what will become the waistband, and then back down the other side, all in one long seam. Next, I fold the satin at the middle and stitch a 1-inch deep casing for my elastic (remember to leave a small opening so you can insert the elastic!). This is what it all looks like from the inside:
 Here's a tip: I don't really worry much about getting all the layers to math up perfectly in length before I sew them together. I gather all the pieces, stitch the tiers together, and if any piece is longer than another, I just clip it right off. When assembling the tiers all as one piece before splitting into two layers, I still end up with two perfectly even layers of ruffles. The only time I really make sure I match up is when I attach the layers to the waistband/top tier satin.
So, I cut 8 pieces of sheer organza ribbon to match my skirt, each 28 inches long.
 I stitched the pieces of ribbon down along the waistband of the skirt.
  The distance between your ribbons will vary depending on the waistband you need, so I just try to distribute them evenly.
 For now, you can let your ribbons dangle or tie them in sweet little bows.
Haunting Halloween Hair Accessories
September 23, 2012
In a previous blog on fascinators, I described how I create a base for each design by singeing the cut ends of two pieces of grosgrain ribbon, and then stitching the two pieces along each long edge to create a tube. The tubes can be any length -- different sizes work for different designs -- but they have to be wide enough for a headband to slip through for wearing. I like to make a handful of these tubes and have them at the ready so I can just be creative and flow from one project to the next without stopping.
 For my first bit of Halloween finery, I started with a length of spool tulle (say that three times fast), and gathered it with my machine so that one side of gathers was shorter than the other.
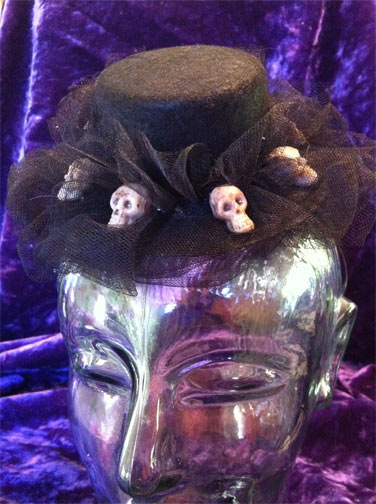
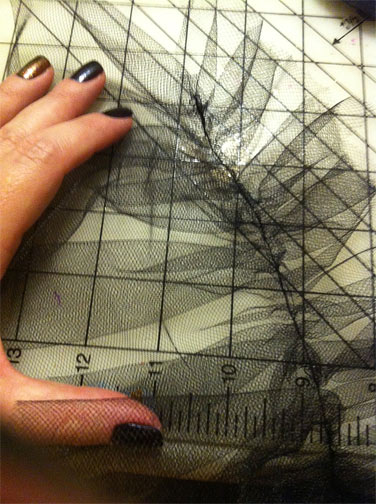 Next, I glued the gathered tulle to a doll's hat. I've mentioned before that starting with the tiny chapeaus made for dolls (I usually get mine at a craft store, rather than a toy store) is one of my favorite tricks for speeding up the process of making fascinators. I'm using hot glue in these photos in the interest of time, but craft glue also works great.
 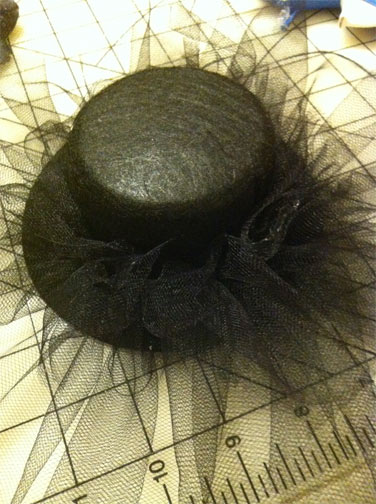 I recently found some really fun skull beads at a novelty store, and bought them without a plan for their use. But now is their moment to shine! I glued eight of them around the crown of my mini hat.
I wasn't loving the way the tulle was sticking out from the hat, so I decided to carefully fold it under, leaving the fold well past the edge of the brim, and then I tacked it down with glue. I carefully worked all the way around the brim this way.
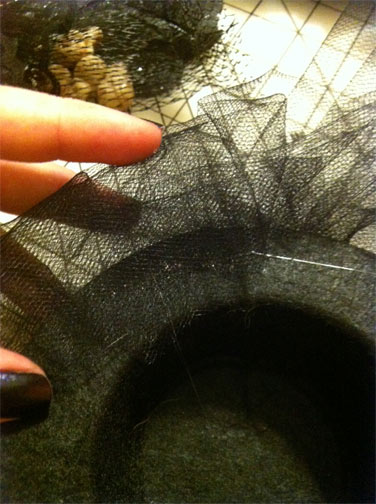 To finish, I glued one of my grosgrain sleeves to the underside of the hat. The hot glue shows on the underside, but since this hat is small and will sit right against the head, it won't show.
  And voila! A little bit of haunt couture.
  The second design started with a scrap piece of white crushed chiffon that I cut on the bias. It's about 4 inches wide, and I gathered it at the sewing machine, and then glued a grosgrain sleeve to the back of it .
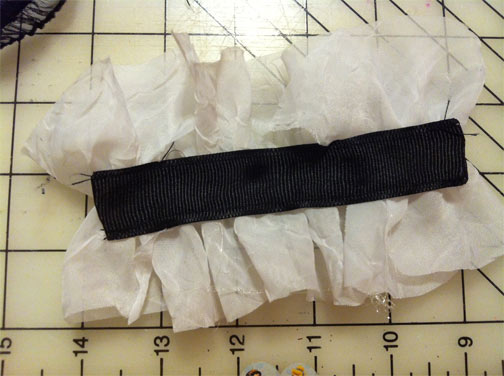 Next, I added a piece of Riley Blake elastic lace trim (I am in love with this stuff) and a small scrap of gimp braid.
 With the addition of three novelty spider rings -- I cut the ring portion off the backs with kitchen shears -- it becomes a gothic maid's cap. I like how the spiders blend a little bit with the background, so people might not notice them until they're up close.
 Last year, I made a ballgown witch dress that used black faux foliage as a trim. I had several leaves left over, so I decided to put them to work.
 I glued the leaves on in layers to one of my grosgrain sleeves. I find that with silk foliage and hot glue, I have an easier time applying pressure from the back than from the top. Saves my fingers from getting too hot!
  Another novelty store find -- tiny bone hands. I think I paid $3 for a dozen of these. I glued them right on top of my leaves.
 A simple black satin ribbon bow, and I am ready for a creepy night out!
If you're like me, you have a drawer full of odds and ends of lace and ribbon. In an effort to use some of these scraps up, I grabbed a length of black lace and gathered it into a circle with a running stitch.
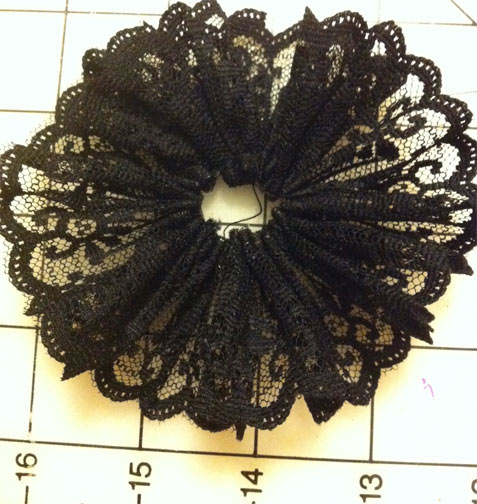 I glued my circle to a base with a loop of ribbon on top of it ...
 ... and added an eyeball to complete the look!
My last fascinator started with a leftover white lace loop gathered into a circle just like the black one above. What I really wanted for this one was a bat. But none of the bats I had on hand were quite right, so I drew a little bat onto a piece of Presto felt and then adhered it to the back of a scrap of black velvet. Then, I cut the velvet around the felt bat. The adhesive keeps the velvet from fraying for light use.
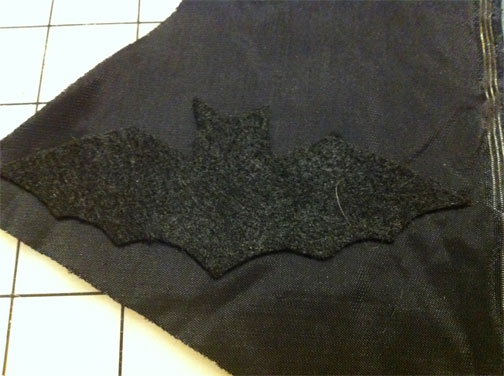
With the bat layered over the lace, and a couple of hotfix rhinestone eyes, my fascinator is complete! I have been wearing this one around the house because I like it so much!
 Now, I'm feeling very ready to celebrate right up until the big day!
 I hope you're inspired to raid your stash and create something uniquely you for the Halloween season! If you do, please be sure to share with us on Facebook!
Academy Jacket Part 2: Almost Done
September 19, 2012
I had hoped that this jacket would just be a two-parter but it seems that the fabric/sewing gods are working against me. Never have I underestimated a project so much. This is my first time working with a Simplicity Amazing Fit Pattern and while I am thoroughly impressed with the pattern, its tips and the general outlook that I have obtain so far, I am stressing under the weight of creating such a detailed, fitted jacket while 9 mo pregnant. I assumed that this pattern would fall together like my previous jackets (which for the record were a breeze): Kwik Sew Knit Blazer, Indigo Junction Trench and Oliver + S Brunch Jacket. I have been hacking away at this blazer since my last posting, doing a bit more everyday working until I get frustrated and then taking a break to avoid mistakes. Mostly I get frustrated by misinterpreting diagrams and instructions. My frustrations also stem from so many markings and while you can transfer them as well as can be that fact is that some markings need to be on the Right Side of the fabric and sometimes on the Wrong Side and you won't know until you read (and re-read) and pattern. I have also gotten frustrated, as I mentioned in my previous post, by the many different seam allowances used in this pattern and how they are not always referenced in the instructions just on the pattern pieces.
I am at the end though, all I need do is go through clip any and all way ward threads, do a finally clipping of all seams to make sure each seam sits just right and hand sew the bottom of the lining to the bottom of the jacket. Then just a final steaming (since we are working with velvet) and sew on my buttons. This translates to only about 1-2 hours of work which is nothing. However, I have yet to choose my buttons. I am undecided on the direction I want to take with my buttons. From left to right: Do I want to go traditional (gold anchor), vintage (mother of pearl), academic (wood tone), Donna Reed (gold rimmed Bakelite) or retro (vintage fabric covered). Let me know what you think?
As for assembly, I made some fit alterations to the jacket as described in the pattern by taking in approx ¾'' at the waist on the back and front seams as well as letting it out about ¼'' at the hips. I did not take in the sides at all. Like I mentioned in Part 1 I cut out for a C cup since I need the extra bust room. I really like the drape of the C cup since it hugs more. I then transferred all these alterations to the freezer paper pattern pieces I cut out from the originals so I could match the lining to the exterior.
I am loving my navy polka dot lining that I feel is classic but fun so as to contrast with the subtle velvet. I opted to craft the under collar from the lining so when it is cold, brisk or rainy out I get a pop of fun to cheer me up. Be sure to use a stiffer interfacing on your jacket than you would normally pair with your jacket fabric so you can have a nice crisp lapels and collar. Also, do not scrimp on time spent on your sleeves. This is where jackets can be the most uncomfortable whether from being too short, too tight or ill fitting. Any extra time spent on a well fitting sleeve is time well spent and that means this jacket will spend more time in your wardrobe. Also when working with velvet, invest in a walking foot. Sewing velvet is often like trying to push like-ended magnets together; the ends don't meet and want to slip right past where you want them to meet. Steam your seams and wrinkles, don't iron or press. Be patient and keep your pattern pieces to hand so you can quickly reference any markings or transfer them to the Right Side of your fabric as needed and to double check fittings. Follow the instructions and BASTE FIRST. Don't try to eye ball fittings or save time but stitching when you should be basting. You will appreciate the look and finish in the end.
Don't forget to vote on your button choice and I will let you know the outcome when I return from Maternity Leave in November!!! Have fun!
Quick Halloween Costumes
September 17, 2012


Help your kids make their own super hero costume by first whipping up a pair of solid colored tshirt and pants combo using a Kwik Sew tshirt and Oliver + S knit pants pattern. Next, follow Martha Stewart's basic costume instructions on turning this basic emsemble into a superhero's bread & butter!

The creative types over at Spoonful.com have a huge selection of kids costumes both quick and fun. I love the Princess Fairy Costume. My little one isn't into princesses but she has plenty of pals who are. Their moms are always asking for great ideas to create their own instead of buying the plain or low quality big box store versions. I would gladly recommend this adaptation as well as showing them Fabric.com's amazing Tulle selection.

For this lovely Flower Costume from Parenting.com all you really need is some great felt. Our Rainbow CraftFelt is a green fabric (as in good for the environment) that you can feel good about your kid wearing and playing with until they outgrow the costume. This pattern uses found and recycled articles from your kid's wardrobe and makes them floral with huge felt petals. It looks like a lot of fun that older siblings can help out with!
Stay Warm for Autumn Fun
September 16, 2012
Atlanta is having an unusually delightful September -- much cooler than normal! This drop in temps has me hoping for a chillier than usual Halloween, and just in case my wish is granted, I thought I'd prepare with a jacket to keep me warm but still in the spirit of the season (my absolute favorite time of year). The female castmembers at Walt Disney World's Haunted Mansion attraction have adorable little green jackets to wear in the winter that have fabulous batwing collars, and I thought it would be fun to make my own version.
I started with green and black upholstery velvet. This was mostly based on color -- the green available in the upholstery velvet was my favorite of all the green velvet options. Since this jacket will be a little costumey, I also like the sheen on the upholstery velvet.
The jacket is pretty straightforward, but I wanted to share the pattern alterations I used along the way. It's so simple to tweak a design to make it something truly your own -- if you've never done so before, I highly encourage you venture outside the pattern envelope and do some experimenting.
My standard jacket pattern is actually a Frankenstein version of various pattern pieces I've used, liked and copied through the years. It's somewhere between a tailored jacket and a barn jacket, and I usually just tweak it for any given occasion. It's rather similar to this Indygo Junction pattern. But it has a neckline that's cut for a two-piece collar, which is not what I wanted for this project. So, first, I had to cut the front neckline to have a gentle sloping edge, as shown below.
 I'll come back to the collar piece in just a moment.
I wanted a finish to the sleeve similar to the ones I so admire at my favorite Disney attraction, so I cut the sleeve with a curved notch at the bottom, and I cut matching pieces in my black velvet to applique over the bottom edge to create the cuff.
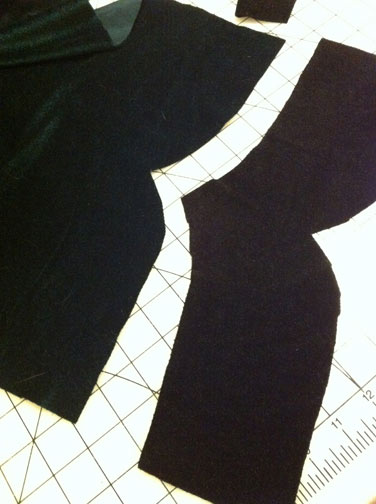
I basted the black overlays into place (a little tricky with the nap of the velvet fighting me), and then treated it as one piece going forward. The bottom edge is finished by the seam that joins the sleeve lining, and the top edge of the appliqued piece gets covered with trim.


Here's the collar piece on its own, so you can see the shape. It's cut on the fold. Because this fabric has a good body on its own, I didn't interface it. I just stitched it to the lining along the curved batwing edge, turned it, and set it in at the neck line.
 And here are all the pieces together, in jacket form. You'll notice these sleeves are a little shy of full length -- I want the option of basting in a ruffle later if the mood strikes to more closely emulate the Haunted Mansion costumes.
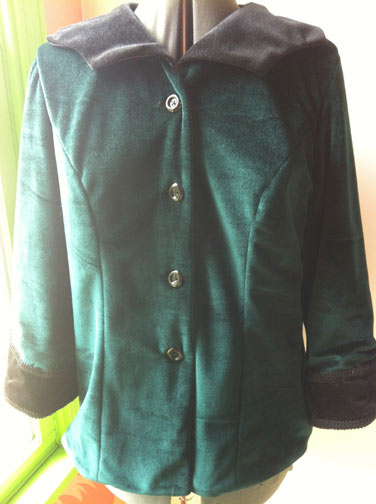 This is how the cuff detail turned out. I hand stitched the braid in place, because all the layers were making my machine fussy. I could have applied the braid before closing up the seam, but I wanted to avoid the bulk at the stitch line,
 This is the back of the collar (in need of a little more steaming!).
 I am now ready for some real-and-for-true autumn weather this Halloween! Whether I'm taking a walking ghost tour through the cemetery, visiting a pumpkin patch or taking a hay ride, I know I'll be cozy. I'm now wondering if I could adapt this jacket to having some sort of elfy or poinsettia vibe for the holiday season ... hmmmm ....
Fall Felt Wreath
September 15, 2012
For everywhere but Georgia it seems that fall is in the air. The leaves are turning and there is a bite in the air. I can feel it in my bones even if I can't feel it in the temperature outside. I yearn to choose jewel tones, leaf motifs and drink apple cider. So, of course, I made a wreath to channel my inner thoughts. At least my door can look as festive as I feel even if my family is still in tank tops and shorts.
To make a Fall Felt Wreath like mine you will need to visit a few tutorials. The first is a free bird pattern that is designed to use as a mobile, and I did use it to create one for my first born and plan to make a second for my soon-to-be little one, but this time I crafted just one bird from felt. When you make yours be patient when turning it since the felt is thicker than the quilting cotton this pattern was designed for so it will be stubborn. Once you triumph you can use a small whip stitch to close the tail after your firmly stuff. The second tutorial is the felt rose bud by Creative Jewish.
The supplies you will need are one straw wreath form that can be had from your local grocery store, hardware store or big box store, some scrap yarn, about 100 yds of 2 colors. I choose two tonal colors in a cotton blend and a wool blend for pom-poms and to wrap the wreath. You will also need several pieces of felt in fall colors for roses and the bird. Lastly you will need your glue gun.
First, wrap your wreath with both yarn colors. I wrapped mine last because once I had my pom-poms, roses and the bird my wreath needed something more. If you wrap yours first you can ensure it has complete coverage and it will make it even more beautiful. Tie it off in the back and add a little extra at the top for hanging. Next, make your pom-poms, about 5-8 will do. You can either tie them on or glue them in place. Attach them in a cluster towards the bottom so your bird will have a nest. Next, make your bird and carefully glue him in place. Be sure you lean your wreath up against a flat wall before you do this so you can make sure your bird doesn't lean toward the back too much as this will interfere with hanging. If your bird doesn't push your wreath away from the wall then he is sitting just fine. If he does, reposition him more toward the front of your wreath. I positioned my bird's back to the front of the wreath so it would appear he was building his fall nest. Then I clustered some roses right below him, about 4-6 should be good unless you love them and want more, more, more. You can cluster more at the top or cover the remaining wreath. Try topping them off with faux berries, pearls or beads for some added glitz. Glue your roses in place.
You can embellish your wreath further by embroidering your bird's back, draping a long piece of knitted icord around your wreath or cutting out felt leaves and gluing them in clusters around your roses. I hope you will share your own creations on our Facebook page.
Picking the right stitch pattern
September 12, 2012
When designing your own knit project you may go around and around trying to decide which stitch pattern is the correct one. I have had this battle many times. Either I have a distinct vision in my head of what I want my stitch pattern to look like (herringbone, small cable or twisted stitch) or I know how I want the garment to hang but no vision of the texture. In either case I turn to my collection of Stitchtionaries, a dictionary of stitch patterns that show a swatch of the completed pattern with instructions on how to complete the pattern. In these books you can learn a lot of each pattern just based on the small amount of info given and it can help you determine the best stitch pattern for your project.

Most stitchtionaries will only provide you with a picture of the swatch and pattern instructions. On the surface this may seem unhelpful when trying to determine the drape of the fabric created from the pattern or how durable or delicate it is. But this is not always the case. If you look closely you can determine the drape by noticing how the fabric changes from the bound off edges to the middle. If the fabric nips in at the middle then it is a dense fabric that pulls its stitches tight making it hang heavy. If the swatch appears to be the same width from bound off edge to bound off edge than you can guess that it is a lighter fabric that can be easily adjust to hug a shape or hang nicely. The lightest fabrics will be airy laces or eyelet patterns followed by simple textured stitches- like stockinette, twisted stockinette and seed stitch- finishing with some dense stitches like linen, double knit and transverse herringbone.

Be sure you consider not only the drape or density of the fabric a stitch pattern will make but also how well it will play into the overall design of your project. If you are creating a sweater that features many details like ruffles, an interesting neckline or dramatic sleeves, chose a stitch pattern that is simple. This will keep the focus on your main elements. If your overall design is simple like a blanket, dishcloth or sock, go bold or dramatic to spice it up or make it interesting. You can also consider combining stitch patterns to emphasize elements you want noticed. For example you can create a sweater with a simple body shape featuring a bold stitch pattern (like a lace emblem or thick cable pattern) coupled with a simple pattern on the sleeves to keep all the focus on the body. Or you could create a lap blanket with a basic garter or moss stitch center and an attention-grabbing chevron or picot border.

January Cropped Sweater Pattern
When selecting your stitch pattern make sure you consider the main elements of your design- drape and density, focus and overall look. And finally don't forget to swatch, swatch, swatch!!!!
You can find more knitting posts here, just click on the right side on "Knitting Monthly Archives" for more.
Check out our amazing yarn selection here
Monster Eye Halloween Wreath
September 10, 2012
It's time to get started on your Halloween projects! I imagined nothing would be scarier or more fun than a Halloween wreath until I thought that a monster peeping out of the wreath would be even better! Depending on your eye design you could make your monster super scary or super fun. I opted for fun because my kids are youngsters and scare easily. If yours are older than scary is the way to go. Get them in on the fun too by having them help with the design and fabric choice. You will need about a ½ yd of Halloween fabric or a Halloween color, some monster fur or skin, some felt pieces in Halloween or monster colors and a foam wreath form. You want to stick with cotton for the wreath so you can tear the fabric into strips to get the frayed, monster look. Cut notches into your selvedges every 1'' and then pull and tear the strips to the end. If you don't want your knots to show then you can sew your ends RS together, otherwise just tie the ends together as you wrap your strips around your wreath form. As your ends meet up at the back, knot them together but leave enough to create a hanging loop for your door.
For the eye background you will need a ¼ yd piece of canvas or faux fur or felt in a monsterish color. Since this wreath will be a peep hole for the monster the background will represent the fur or skin of your monster. I went with an abominable monster look since it is still very hot here and I want to channel some cooler weather (it's not working by the way). You can experiment with different kinds of fabric to get the monster look you want, try minky for a super soft monster or metallic knits for a space age monster. On the WS of your background fabric trace the inside of your wreath and then add 2-3'' and cut. You can glue or hand stitch this onto the back of your wreath with the RS facing out the center of the wreath.

To make your eye like mine you will need 2 colors of felt (White, black and green). Cut one circle 3 1/2'' from the green, one 3'' from the white and one 1 1/4'' from the black. Stack the white on top of the green and the black on top of the white. You can either glue or machine stitch your eye together. Draw a sinister but bold eye brow or if you don't draw find a clip art picture of a great thick monster eyebrow and print it to use as a pattern. Make sure your eyebrow conveys the correct message. If it is straight, your monster is not aggressive and unintersted in "human goings-on". If your eyebrow is slanted down towards the nose of the monster than your monster is mean. Make sure the brow you choose has just the right amount of meanness. I went with wary and grouchy! You can glue your eyebrow in place or hand stitch it to your background. Make sure if you glue to apply pressure until your glue is set.
Now is the time to add embellishments as you like. You can add a message to hang on your wreath: "Beware" or "Monster Residence". You can drape spider webs around your wreath or add some plastic spiders using your glue gun. My favorite is to hang old bones from your wreath like your monster just ate and threw them out the door. Add your favorite Halloween tidbits and your trick or treaters will either giggle in delight or run away scared, leaving all their candy behind!
New Hot Patterns Free Pattern Download: Tumbling Leaves for Cozy Comfort
September 9, 2012
I actually assembled this pillow both with and without the trapunto approach so you can see the difference in dimensionality you can achieve with this method. Both of my pillows are made with upholstery velvet, so other than the difference in the detailing, all things are equal on these two.
 For the first, non-trapunto version, I sandwiched two layers of Warm & Natural cotton batting between my velvet and my cotton backing fabric, and stitched the design through all layers to create the front of the pillow. This creates a very gently quilted look. Cotton batting is not as high-loft as some other batting choices, so a high-loft poly batting will give you a little more depth to your stitching.
 For the second version, I assembled as directed in the pattern, stitching the design through the velvet and backing fabric, then cutting small slits in the backing fabric and gently stuffing in the details with small bits of batting. As you can see, this version has much more dimension -- the details on the leaf really stand out.
 Here are both pillows together again so you can really see, side-by-side, how differently they turned out from one another. I like them both, but I really love the sculptural look of the second one.
 This is also a good gift project. If you know someone who loves the great outdoors and likes to bring nature inside, you can easily customize these to match any decor. Since they're autumn-themed, you might have to give out holiday gifts a little early so the recipients can get full use out of them right away!
Ready to try your hand at these dimensionally-detailed pillows? Download the free pattern here, grab a half-yard of your favorite home dec fabric and get started!
A Movie-inspired Chapeau for Fall
One of my favorite movies of 2011 was "The Artist," without a doubt. It was such a beautiful, charming film, and the clothes -- to die for! It's no wonder it won the Oscar for costume design. I love love LOVE 1920s style, but it's not always the most flattering on my figure -- I'm definitely an hourglass, and my bust line and hips make it tricky to achieve the lean, boyish look that was so vogue in the Roaring '20s. Lucky for me, the accessories are just as fun as the garments!
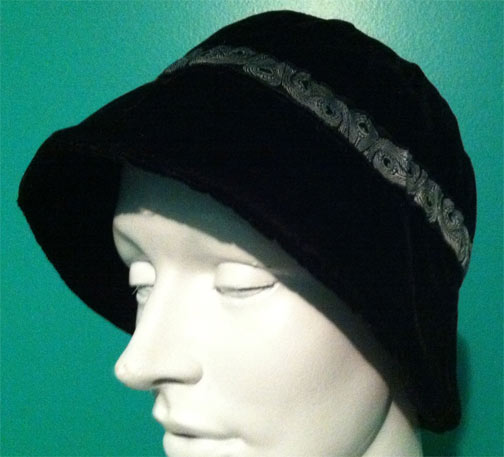
After the third or fourth time I watched "The Artist," I had developed a major itch for a velvet cloche to mimic Peppy Miller's style. Now that we're heading into fall and velvet is one of the "it" fabrics of the season, it seemed like the perfect time!
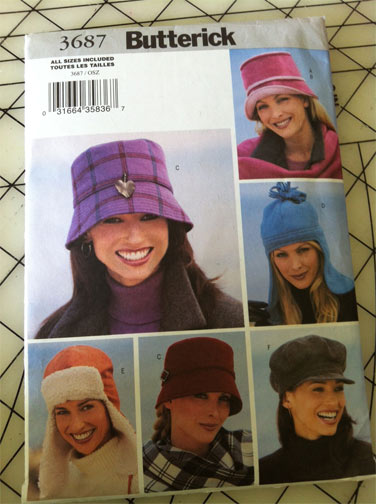
I dug through my ridiculous pattern stash (seriously, I need to inventory sometime), and found this pattern from days gone by that seemed like a good start. Kwik Sew 3481 is another great pattern for this project.
 I mentioned already that I used velvet for the hat, but of course, I wanted a fun, contrasting lining. I used a scrap of blue taffeta that I had on hand. One of the best thing about hat patterns is the opportunity to use up some stash and have a little fun when it comes to lining!
To trim my hat, I wanted a pretty jacquard ribbon, and I was smitten when I saw this black and white peacock trim. Just the perfect touch of deco flair!
 Assembly time for a project like this is fairly short -- count on 2.5 to 3 hours, give or take. Perfect for a rainy afternoon or a quiet evening at home.
  I will be wearing this hat all through autumn and into winter. I love its simple lines, and the velvet makes it feel a little luxurious without being fussy -- I know I can still wear it with cords and a blazer.
  Don't forget: October is breast cancer awareness month. I know many seamsters like to make chemo hats to donate, and as I was working on this project, I thought it might be nice to really strive to make super stylish hats this year. I always think about comfy and cute, but I don't always focus on elegance. Who wouldn't want a velvet hat? Long after chemo's over, it can still be worn just for style.
I also can't wait to accessorize this accessory. I have a number of sparkly pins that I'm sure I will rotate as an adornment for this little number. And I'll dance through the cooler months, feeling like Peppy Miller!
Dragon*Con Costuming: Part 2 of 2
September 8, 2012
I often am surprised and amused when talking to people about costumes or showing them photos. There are so many reactions of "Those are really nice -- they're like normal clothes!" I think that people who don't sew are only exposed to the costumes in large party stores or temporary Halloween shops -- when they see a costume piece that's made as well as any other garment (often much better), it sort of blows their minds. And there are so many Dragon*Con costumers doing work that's really high quality -- so I wanted to share one with you.
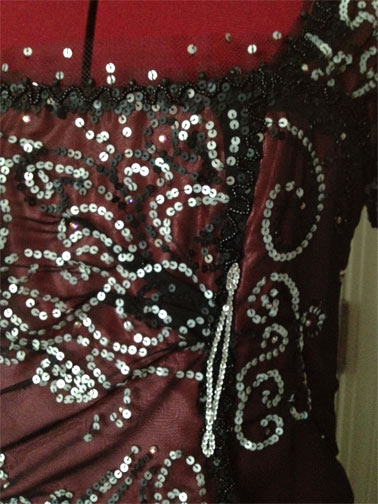
The dress I'm featuring here is a recreation of a costume from "Titanic" -- Rose's dinner dress. The costumer is my dear friend Dawn, and she really did a spectacular job on this project. She started off using a pattern as a basis for her custom pattern, and then heavily modified it. The salmon taffeta is from Fabric.com, of course. That lovely black overlay with all the embellishment? It's custom draped by Dawn, and every single bead and sequin is sewn by hand. Every. One.
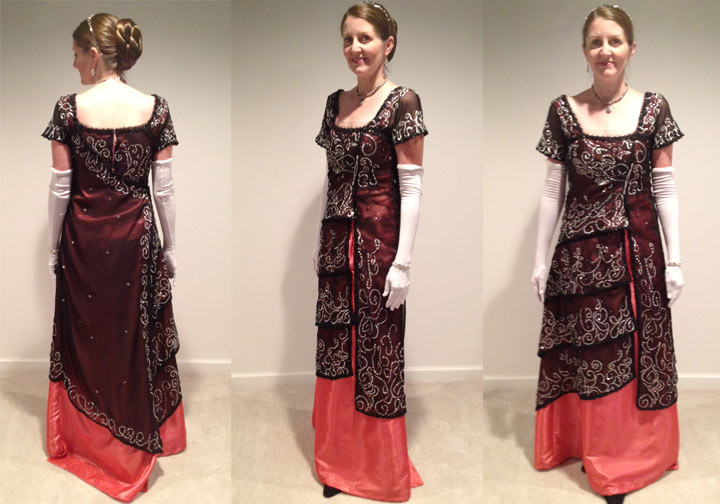 Dawn estimates she spent roughly 150 hours on embellishment alone, and it shows.
Every detail is attended to, right down to the decorative pin on the front of the bodice.
Dawn wears this dress so beautifully -- she is the epitome of grace and elegance. She's also the perfect ambassador for costumers, showing couture-level style in her recreations of film pieces she loves. I hope I get to see her wear this piece again and again, but knowing Dawn, a new creation will dazzle me first!
Nautical Ship Wheel Pillow Tutorial
September 7, 2012
Nautical is IN! Wide stripes, anchors and navy & white are the classic combos that are visible in home decorating everywhere. You may want to add a beachy feel to one room or just a hint of nautical. It is easy to curb any craving of nautical décor. My Ship Wheel Appliqué Pillow can finish off your room or inspire you to get started. If navy isn't for you try adding another shade of deep blue (like the dark turquoise canvas I used for this project) or red and white (popular light house colors) or off white/cream and blues and greens. Any color combo that evokes the feeling of sand and water will help create that tranquil environment in your home.
For the Ship Wheel Pillow
you will need:
1 yd white
or off white fabric (I used canvas
because it looks like sail cloth) for pillow case
½ yd of
navy, deep turquoise or red for appliqué
Ship Wheel Clip Art (here
is the picture
I used)
Instructions:
Measure your pillow and
add 1'' to the width and height for seam allowance and cut one piece from your
white fabric (if inserting a zipper, cut two pieces and use these
instructions). For the back envelope pieces, cut 2 pieces using the same
height measurement as above but divide your width in half and add 4'' (example:
original cut width is 21'' h x 21'' w, cut 2 pieces 21'' h x 14.5'' w [21/2=
10.5 + 4= 14.5]). Zig zag or serge across one 21'' end for each back piece.
Fold down this edge ½'' and press. Topstitch across pressed edge. Set back
pieces aside
Print out your Ship Wheel Appliqué
making sure you print it to the size you need. If you want 3 smaller wheels
like my pillow measure the diagonal of your pillow to determine size. If you
want one large, print it in mosaic or print it at a copy shop. Trace your ship
wheel onto the heat n bond and apply to the wrong side of your navy fabric. Cut
along the outside of your wheel. To create the interior of the wheel, use a
fabric marker or chalk pencil to add in the details and sew over the lines with
bright white thread. It is best to do this before you apply the appliqués to
your pillow front.
Apply your appliqué[s] in a manner you find pleasing. I applied mine on the diagonal because it is a popular nautical flag/sail design. You can then straight stitch or zig zag stitch around your ship wheel.
Lay your front pillow piece RS up and overlap your back envelope pieces like, well, an envelope with RS facing the front piece and pin in place. Stitch a ½'' seam all the way around the pillow. Clip corners and turn RS out. Insert pillow.
This is a great design to
add to canvas bags, bibs, curtains hems and mod podged to furniture to complete
your nautical theme. Change it up a bit by combining one off-the-wall fabric,
like silk, satin or velvet, with a standard nautical fabric, like canvas or
cotton duck, to add elegance or texture. Once you start adding nautical you won't
be able to stop.
Check out our other
nautical themed posts here
Knitting with Life Lines
September 5, 2012

Dragon*Con Costuming: Part 1 of 2
September 4, 2012
You really have a harder time finding people in street clothes than people in costumes at this show. It's so fun to see all the hard work people put into their sewing and craft projects -- just to be able to play dress up for a weekend and share their passion with friends and strangers. It's really what makes fan conventions magical.
I thought our Fabric.com readers might enjoy a look at just a few of the great outfits I was lucky enough to see this year, so here we go ...
This first pair is from a video game series called "Kingdom Hearts." I'm a huge fan -- I played the first title relentlessly for hours on end -- so I was thrilled to encounter these two in the hotel sundries shop.

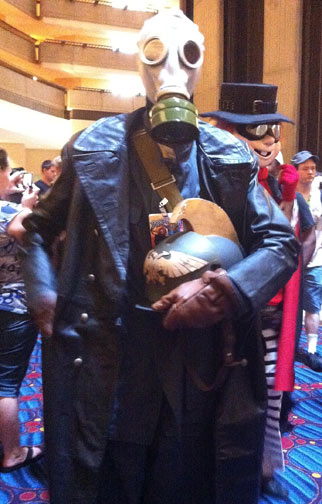 Next up is a really impressive Xenomorph from the "Alien" movie series. This should give you a sense of the dedication that goes into fan-made costumes. This is not a costume you can just purchase -- each element of the exoskeleteton is hand made.
  How cute is this classic Batgirl? SO CUTE. Every detail is just perfect.
  All of the armor on these three custom robots is hand made. That's an iPad lodged in the chest plate of the largest 'bot. So cool!
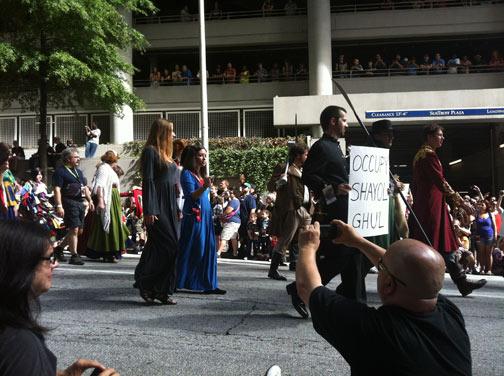
  The next two photos are for my fellow blogger Tara. She's a fan of the "Wheel of Time" book series, and while I was initially worried that I would never recognize the right costumes for her, the Saturday morning parade came to the rescue! There was a whole group of them, carrying "Occupy Shayol Ghul" signs and not even showing how hot they must have been in the late summer heat.
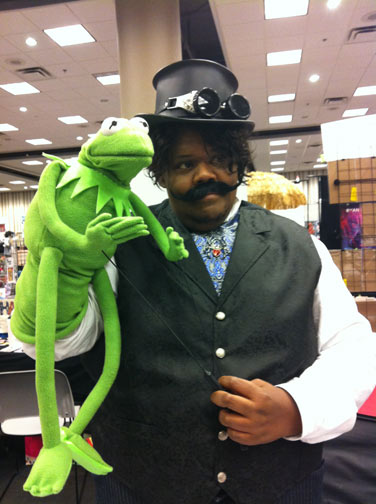
 This is an instance of a costume that's tiny -- made for a hand! This Kermit puppet is made from basic materials -- fleece and ping pong balls -- but the end result is nothing short of magic.
Two lovely ladies in 18th century finery. The diversity is another thing I love about Dragon*Con -- you'll find gorgeous historical gowns with loads of handwork right alongside all the robots and Jedi.

There were numerous versions of Effie Trinket from "The Hunger Games" at this year's gathering, but this was one of the very best.

 I hope this little tour gives you a taste of what the Dragon*Con is like. For every photo here, there are thousands -- literally thousands -- of other beautiful costumes that I didn't capture. I also can't give you full picture unless I can somehow simulate the huge crowds you have to work your way through to see everything, but it's always worth it when you run into something that makes your eyes widen and inspires you. I already have my project list for next year!
In my next post, I'll share close-up photos of a Titanic reproduction gown to give you a sense of just how much work goes into one of these costumes. Stay tuned!
*Special thanks to Dawn Murphy for the last three photos in this post.
Dirty Laundry Travel Bag
September 3, 2012
If you are a traveler than you know that more often than not when packing you plan for everything (socks, toothpaste, curling iron, face wash, etc) except dirty laundry. I like to think of myself as a pretty smart packer; I don't pack a lot of extras and try to cover all the essentials but I always forget about where to stow my dirty laundry on worn. I usually end up using a plastic bag from a local store but that is:
1) Ugly
2) Not great for moisture and odors (hello, husband socks)
3) Often get mixed up with my purchases.
So I made a Dirty Laundry Travel bag that is perfect for any kind of travel. My double drawstring design makes closing a cinch and easy to hang from any hook or knob. The drawstrings are knit fabric so you can pull them tight for a snug closure and don't require sewing. When made from cotton it is breathable and lightweight but you can add a vinyl coated lining if you are using this for young children's clothing. The size is easily adjusted to suit your needs. I made mine 14 '' high by 15'' wide (Finished size) which should hold about a weekend's worth of dirty clothing. The Dirty Laundry Bag also works well for laundering delicates as well as storing toiletries in your luggage.
To make your own you will need
½ yd of cotton duck, twill or other medium weight/bottom weight fabric
Scrapes of quilting cotton for appliqués
1 yd of 3'' wide Jersey Knit fabric (cut with the stretch)
Download Dirty Laundry Travel Appliqués here
Instructions:
Cut 2 16'' squares. Serge or zig zag across the top of each square and down 2'' on each side. Fold over 1.5'' of each top toward the WS and press. Stitch close to the top to make draw string casing.
Trace Dirty Laundry Appliqués onto Heat n Bond and cut out. Apply Heat n Bond to WS of your quilting scraps and cut out. Remove paper backing and arrange your appliqués onto the RS of one of your Dirty Laundry body pieces. Iron in place. Zig Zag stitch around each appliqué or use a straight stitch and add some additional stitching lines for details (see my underwear).
Place body pieces RS together and stitch using ½'' seam down one side starting right below the drawstring casing, pivoting at the bottom corner, across the bottom, pivoting at second corner and back up the third side. Finishing just below the drawstring casing, back stitch at both ends. Trim your corners and turn bag RS out.
Cut your jersey knit in half lengthwise, gaining two 18'' pieces. Pull each piece tight to cause the long sides to curl. Use a bodkin or safety pin to thread each drawstring through a casing. Double or triple knot each drawstring at both ends.
You can add embroidery to make one for each family member or loved one. I recommend making several in different sizes for longer and shorter trips, kids and even pets (great for keeping collars and leashes in one place when visiting the in-laws). I am packing mine into my hospital bag for baby#2 in a few weeks and plan to use it for future family visits.
You can also change the appliques and make a really great knitting/crochet project back-Christmas Gift Idea!!!!
Academy Blazer Part 1
September 1, 2012

Being a preppy girl at heart, I fell in love with blazers a few years ago and my favorite retailer, J.crew, sells one that is at the top of my list. It is velvet, cropped, fun and a little funky given the colors it is offered in; it is just perfect. However, its price tag puts it far from my reach. I decided that recreating it would be a great addition for back to school season. College students, teachers and professionals all need a great blazer so why not make your own inspired by this great high-priced piece from J.crew.
I am starting with Simplicity's Amazing Fit Blazer (2446) because it offers the fit I am looking for (fitted and trim) with the cropped option as well as hip length so I can make several different versions if I like. I am also attracted to the fact that you can get a custom fit with this pattern given that you can cut for your bust size and it teaches you how to baste, fit and tailor to your size. While this is a very attractive feature, I am making this while 9 mos pregnant for wearing after I have dropped my baby weight so getting an exact custom fit will not work for me. However, my DIY custom dress form (see post here) will help me get a basic fit, similar to the fit you will get shopping off the rack or purchasing a blazer from our inspiration store. I will be cutting for the biggest bust size because I am on the busty side plus I want to wear it right away. I will also be cutting one size larger than I normally wear for the same reason. I love the velvet look and will be using our Doux Cotton Velvet, which is a dream to work with. I wanted to be daring and use our Lime Green at first but thought something a little more neutral might be better for my first velvet blazer go-around so I choose Green Lily, which is actually more of a dusty teal than green. The color is true to the sample below and not to my pictures. I tried to get it in the best light to make the color of the jacket true but it was either sharp details or great color. I went with details for you.


So far I have the shell completed and that was a task because of all the fitting. This means cutting and pinning, then basting with 1'' seams then fitting, occasional ripping out and repining then marking, ripping out all the basting then re-sewing. Phew! I actually just basted with RS together instead of WS together because I overlooked that bit in the instructions by accident so I sewed over my basting lines and it saved a bit of time. I did end up ripping out about 8-10'' of my basting on the back to accommodate my hips and also on the front to a lesser extent. I ended up going from 1'' to 1/2'' at the back and to 5/8'' on the front.
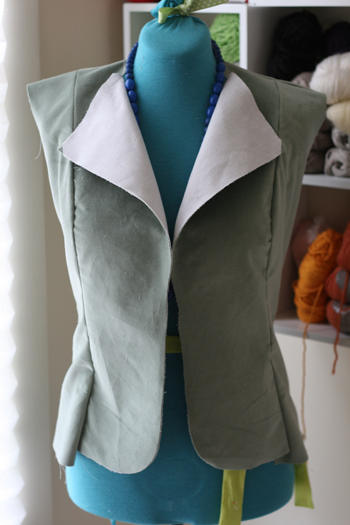
My one pet peeve concerning this pattern is that there are several different seam allowances and all are written on the pattern pieces and not also on the pattern instructions. Since I trace my pattern pieces onto freezer paper I have to pull out my tissue pattern every time to check on a seam allowance. If only Simplicity had thought to include them again in the instructions.
I am going to be making some pattern modifications as we go along including a fun collar among others. The only differences I can see from this pattern and our inspiration is the angle of the pockets, and the omission of the welt pocket right above the right side flap pocket.
Stay tuned for the conclusion of my blazer in part 2 and I can't wait to show you my fun lining!!!
