Creek crawling tips
Top tips to help you explore the upper reaches of the river.
The upper reaches of a river often go unexplored but usually offer stunning scenery, great waterside pubs and interesting places to moor. With a little prior planning and sufficient tidal rise, many rivers are navigable for a fair distance and offer a welcome rest to the hubbub of the main port. Here are six tips to help you to the head of the creek.
1. Deep water
The deeper water usually flows near the outside of the bend. Keep this natural phenomena in mind when the buoyage starts to thin out. Often a sand bank or shallow patch on the inside of the bend is ready to catch the unwary or those thinking of taking a shortcut (Fig A).

2. Pick a side
When the buoyage becomes sparse, instead of looking for the middle of a channel, find and edge and stick to it (Fig B). If you are in the middle of a channel and suddenly lose depth there is no way of knowing where deep water is located. If however the echo sounder is used to locate one side of the channel when the depth reduces you will know which way to turn.
In the illustration (Fig C) we have chosen the starboard side of the channel. By following a constant depth on the echo sounder it will lead us around the river. If the depth reduces we turn to port and if it increases we turn to starboard.
3. Tidal Heights
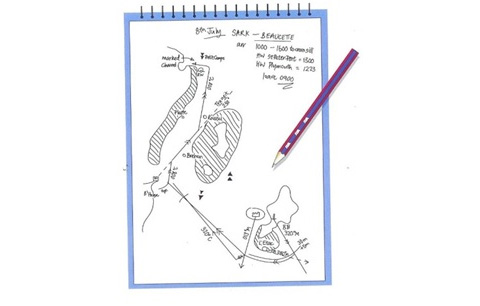
Tidal height dramatically changes what you see, compared to the charted view. A channel may look straight forward on the chart because it gives the view you’d get at the lowest low water. But a rising tide covering the banks makes the obvious channel disappear; leaving just a scattering of marks, so if in doubt note the bearing and distance to the next mark on a plan to indicates which way to go.
Most rivers get shallower as you travel upstream and require you to establish the tidal height to give you safe clearance. Remember the depths on the chart give the lowest depth expected and any predicted tidal height is added to it. Therefore if there is a depth of 2m on the chart and there is a tidal height of 3.7m, the actual expected depth would be 2m + 3.7m = 5.7m. Heights for many ports are available on the internet or the actual rise of tide can be calculated using information found in an almanac.
To work out a height:

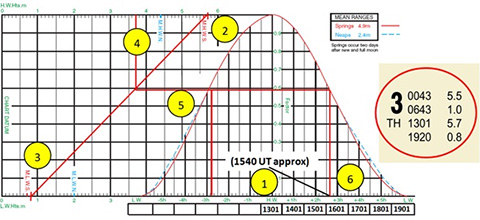
When will we have 3.7m of tide?
(1) Enter HW time and fill in the boxes for each hour before and after HW (1301 UT)
(2) & (3) Mark in the heights of today’s HW and LW, draw a line between them
(4)Find 3.7m on the HW Hts scale.
(5)Draw a line downwards to intersect today’s HW/LW line, across to meet the curve and then down to the time scale.
(6)There will be 3.7m from about 1010 until 1540 UT
4. Clearance
Allow sufficient clearance under the boat. If you have a keel and the propellers and rudder are protected, the clearance may be less than if the props and rudder would be the first to touch. The required clearance may also be affected if the bottom is hard rock or soft mud and whether the tide is rising tide or falling as greater margins are prudent with rocks and on falling tides. Proceed slowly and watch the echosounder. A look behind the boat will often indicate whether you are starting to get shallow as the wash from the props will start churning up mud or sandy coloured water.

5. Make a plan
Keep the all- important chart down below to stop it blowing away and instead draw a plan. Drawing a plan allows you to start building a mental picture of where you going as one bend in a river is often similar to another. Keep track of your position by crossing off key points and buoys as you go.
6. Taking the heat
Shallow water increases the chance of weed, sand and mud making its way into your engine seawater filter. Check the filters afterwards and keep an eye on your engine temperature during the trip.
Contact UsArticle Published: April 29, 2014 9:45
Article Updated: May 12, 2014 9:50