
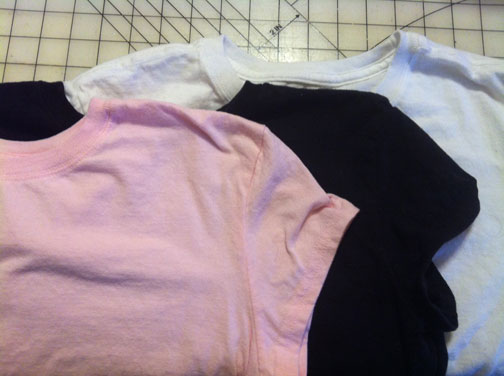
I like to stay current with trends, but I don't like to spend a boatload of money to do it. As part of my spring prep, I decided to upgrade some existing pieces with that still-popular and ultra-feminine trend: lace!
I started this project with three basic T-shirts and an assortment of lace trim, and decided to add little inserts to each of the shirts.
For my white shirt, I selected this sweet floral lace trim and decided to add it in at the shoulder seams and hem.
I first cut open my shoulder seam from the hem of the sleeve right up through the neck edge, using the existing shoulder seam as a line guide.

I picked out the extra seam allowance fabric that was left at the shoulder seams to eliminate bulk.
 Note:
If you get a little overzealous in your seam ripping, you might open up the
sleeve seam in the process! No worries -- it's nothing that a quick bit of
machine stitching can't fix.
Note:
If you get a little overzealous in your seam ripping, you might open up the
sleeve seam in the process! No worries -- it's nothing that a quick bit of
machine stitching can't fix.
Next, I just overlapped the edge of the lace onto the cut edge of the shirt, and straight-stitched it in place. Since the knit doesn't fray, there's no need to edge finish before this step.
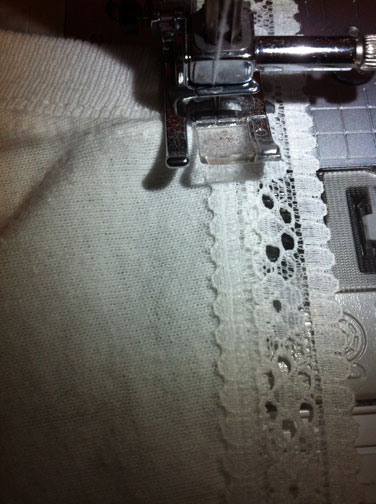
I joined my lace to the other cute edge the same way, and voila -- my shirt is more ladylike!
 Here's
the little inset along the hem of the shirt:
Here's
the little inset along the hem of the shirt:
For my black shirt, I wanted to add a little peek-a-boo length to the sleeves, so I first cut the sleeve hems off.

Then, I used the same stitching technique to reattach the sleeve that I used to join the cut shoulder sections above.

I opted to use this more open lace trim for this one, because it sits in a place where it doesn't have to obscure a bra or camisole strap.
 For
my final shirt, I used a much narrower black
lace for my trim. I cut out the armsceye seams on the shirt and then
rejoined the sleeves to the body of the garment using the lace insert. Because
the lace is fairly narrow, the fabric is almost abutted -- I could have just
stitched the lace over the existing seam (this lace is also quite dense, so
there's not much see-through factor), but I removed the factory stitching to
reduce bulk.
For
my final shirt, I used a much narrower black
lace for my trim. I cut out the armsceye seams on the shirt and then
rejoined the sleeves to the body of the garment using the lace insert. Because
the lace is fairly narrow, the fabric is almost abutted -- I could have just
stitched the lace over the existing seam (this lace is also quite dense, so
there's not much see-through factor), but I removed the factory stitching to
reduce bulk.I also added an asymmetrical bit of trim on one hip, and a circle of lace at the neckline.


I can't wait to pair my newly made-over shirts with spring and summer skirts! In the meantime, I'll probably layer them with jackets and cords, trousers, or jeans. While I stuck with plain shirts, you can of course use the same approach to customize a beloved TARDIS or Hello Kitty shirt as well. Classy or cute, lace can add the perfect feminine touch to almost any shirt.

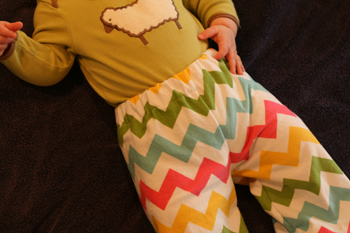
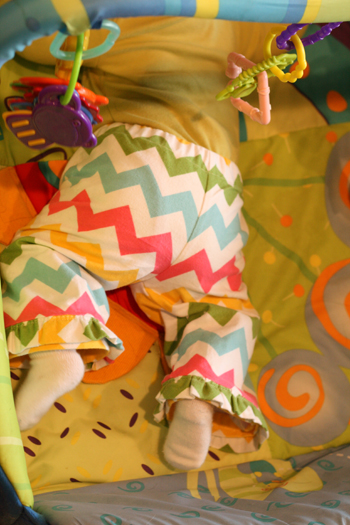
We are lucky enough to have another great free kids' pattern in our Free Pattern Download section: Create Kids Couture Taylor's Pj Pants. It is a great pattern and fun to make. This is an excellent beginner's pants pattern too. Everything from the cutting to the assembly is a great introduction for a first pants project. I decided to add a ruffle detail to the bottom of my pants to feminize it a little bit more for my little girls (more on the ruffle below). The pattern is very comfy, according to my 4 yr old, and quite roomy too. I made the size 4 and size 6-12 mo for my 5 mo old. Both fit well with room to grow. I do recommend if you cloth diaper, like me, to make a size bigger to fit the diaper. Both pants run long, as evidenced by the picture, so make sure your intended child tries them on before you hem the bottom. I measured mine against a pair of pants from my daughter's wardrobe. I love that the pattern is the same front or back; this makes it super easy when dressing either of my children who are only still when sleeping. The Riley Blake Flannel that I used is really soft and washes very well with little shrinkage. The elastic measurements for each size were spot on which makes it easy for moms who will make this during nap time or school time when children are unavailable for measuring. The designer's cutting suggestion was a great little time saving tip and helps line up those stripes, chevrons or patterns just right. I suggest cutting several pants at one time because these will be a big hit. They also make wonderful shower presents for new moms. I like to gift larger baby sizes (6 mo and up) that are often overlooked when gifting a new baby and PJ pants are perfect for that age range.

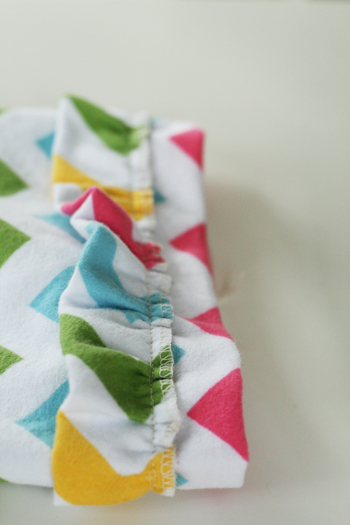
To add a ruffle to your completed Pj pants you need approx 1 ½ to 2 yds of 3'' wide flannel per pant. Take your strip and fold them in along the length and press. Run a basting stitch down the open end of the strip ¼'' away from the edge with your bobbin tension very loose. You will see the fabric start to gather as you sew. Repeat ½'' away from the edge. Pull your bobbin thread to gather your fabric to your desired fullness. Press your gathers to help keep them in place. Line up the raw edge of your ruffle with your hem stitchline with your ruffle upside down (see picture below) and stitch in place with a ¼'' seam.
Press you ruffle towards the bottom of your pants and topstitch ¼'' away from the top. Depending on how deep your hem is your ruffle may cover your cuff or it may sit above it like a little skirt. You can stack ruffles for a very feminine look or add bigger ruffles to suit your style. Either way this is a simple ruffle to spice up a simply great PJ pant pattern. The addition of the ruffle will not significantly increase your time making this a great one day project!

A great tip: I recommend stitching your seams then serging them (or zig zag if no serger) this will reinforce the seams (because you know kids don't just wear PJ pants to bed) and will keep away any stray threads that might irritate during sleep.

The Riley Blake Flannel Chevron is going fast but check out our Riley Blake Flannel Dots and Riley Blake Super Star Flannel is great for boys!


Silvia's upcycling projects are a hoot to read about and also bring hope to every girl's lone drawer of t-shirts that are too big, too obscure or too ugly to be worn but for whatever reason are also not to be thrown out. She turns them into underwear. How fun is that? Her underwear has introduced me to the world of elastic lace for panties instead of fold over.

Silvia has a plethora of projects in both yarn and fabric that I so want to recreate from my own stash. And she can knit anyone I know under the table. I could not even turn out projects like than back when I was a swinging single with not children or dogs to tie up all my time. I don't know how she does it but I suspect she has 4 arms. Her writing, style and sense of humor are also my cup of tea. I find myself giggling when catching up on her blog. She is a little dry and a little silly, just what I look for in a good knitting/sewing/crafty blog. I encourage you to check out Silvia's blog; I am sure you will be as inspirited as I am.


So because I was already set to blog on my serger (See previous post- Product of the Month: Sergers) I decided that you readers should have a project too. This is especially true for the newbies who are considering a serger but think they will only use it to seam up some t-shirts. These super easy napkins are a great stash buster (if you like to mix n' match) or the perfect way to add a splash of color to your table. If you have a dinner party coming up or are hosting your first family meal at your house and you need some gorgeous napkins fast then this project is for you. Bonus: You can learn yet another feature on your serger.

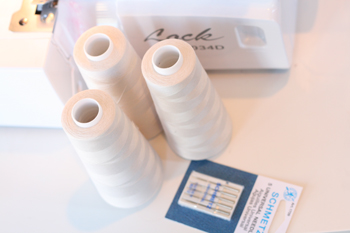
Most sergers are equipped to create a rolled edge so check your manual to determine how your machine needs to be configured. My Brother 1034D needs to have the stitch finger removed. Once you have your machine set up it is time to test the tensions on your 3 threads: Needle, Upper Looper and Lower Looper. Take a piece of waste fabric that is approximately the same as your project fabric to test your tensions. Turn your knife on and then trim away any messy edges as you stitch until you get your tension correct. I had to make my upper looper tension heavier than the recommended range so experiment inside the range first and then outside the range if the tension is still not right. Change each dial one at a time, stitch a few inches, check it and then make another change. If you make several changes at once and something is not right you won't easily be able to determine the problem.


The red is the messy tension and the green is the corrected

To make clean corners, don't pivot at the corner like with a traditional sewing machine. Stitch to the end of the fabric plus some extra to make a thread chain and then lift the foot and turn the fabric. Begin each corner beyond the edge of the fabric. Finish each corner with a small drop of Fray Check then clip off the thread chain. This will keep the corner threads from coming undone and will give it a nice finished end.


To make 8 napkins you will need 2 yds of cotton print fabric (44'' wide). Make an 18'' square template from poster board or freezer paper. Take your pre-washed fabric and fold it in half 4 times (you will have 8 layers) and then lay your template on top and cut out all 8 napkins at once. With your knife on run each napkin through your serger cutting off ¼'' to eliminate any frayed or wonky edges.
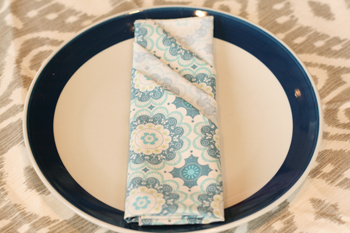

You can recreate any of folding designs by following my Kitchen board on Pinterest. The bow is my personal favorite but I also have a soft spot for the rose for having girlfriends over for tea. My napkins were created from Riley Blake Flutter in Doily Blue and Dream Blue (Due to be back in stock mid April)


I am new to sergers (I've had mine less than 1 year) but I can't believe I have lived without it so long. I admit that my serger sat in its box for a solid week before I could muster the guts to open it and learn its secrets. It was intimidating. But since then I have realized it was intimidated because I was so ignorant. I really had no idea what it really did and how it worked. One day I took a deep breath and decided that I was making a mountain out of a mole hill and I just needed to start already. I am so glad I did. Yes, it is a whole new machine. Yes, it is different than my sewing machine. Yes, it does move fast; much, much faster. So what. Learning my serger is still an ongoing process but I knew it had to be our product of the month because even though I may only know a smaller percentage of what my Brother 1034D can do, it is an amazing product.
For those of you who are like me pre-serger, a serger is another name for an overlock machine. An overlock machine is a machine whose main purpose is to perform than overlock stitch which is a stitch that sews over the edge of one or two layers of fabric securing the edge and stitching or locking the layers in place while encasing the edges. Sergers run at high speeds and also feature a knife which trims the edge and makes for a smooth finished edge. Trimming your fabric while finishing the edges helps hid any chopping cut edges and frayed edges.
You can use your serger for just finishing loose fabric edges or for garment construction, hemming and for decorative stitching. I am most familiar with finishing edges and construction. I am slowing dabbling in hemming and decorative stitching. I am having much too much fun right now whipping up t-shirts in no time and saving time serging edges instead of double hemming with all the ironing that comes with it. I love the professional finish I can give to the inside of my garments now. It is very fulfilling to gift a give that looks as nice on the inside as it does on the outside.

Here are some of my tips for beginners looking to get into the serger game:
1. Consider the Brother 1034D at $235 it is equivalent to a midlevel sewing machine while offering features found on more expensive models. I choose this machine for several reasons. First it uses regular sewing machine needles so less equipment to buy starting out. It offers both 3 threads (good for knits and rolled edge) and 4 threads (good for finishing woven edges and high stress areas (under arm and crotch) while also offering a blind hem foot. And it is easy to thread.
2. There are many videos online that show you how to use your serger. Seriously there is a video out there for so many machines that yours is certainly included.
3. Learn to maintain your machine. When the needle moves fast enough to pump out over 100 stitches a minute than you are going to want to keep it that way. Purchase machine oil and learn where to put it and how often. If the area is tricky to get to than add oil to a paintbrush and brush it on.
4. Change your needle often. I didn't and soon found the most annoying screeching sound coming out of my machine at odd times. It made me jump out of my skin every time. I started to believe I was haunted by a banshee. I changed my needle and it stopped. Change your needle weekly or with every other project, whichever comes first.

5.
Clean your machine after every project. My serger is full of lint even after one 16'' square and lint can gunk-up your machine, absorb oil and block the smooth motion of your high speed machine.
6. Learn which basic stitches to use on which fabric from the beginning. It will save you a lot of hassle and thread.
7. Learn your tools. Your serger comes with many tools: needle changing tools, tweezers, thread cone holders. Learn them because you never know when you will need one. The Brother 1034D uses an Allen wrench to change needles and tweezers for threading.
This project is pretty easy, though there is some mess involved. First off, you have to soak your lace trim in fabric stiffener for a little while. This photo shows me dragging my lace through the stiffener to make sure it got fully coated before I mushed the whole piece into the liquid.
 Once your lace is well-coated with fabric stiffener, you just need to squeezed out any excess and lay it flat. Remember to protect your work area with a non-porous covering -- I just used a trash bag.
 Here is a piece of dry lace next to the wet, stiffener soaked piece, just so you get a sense of what to expect:
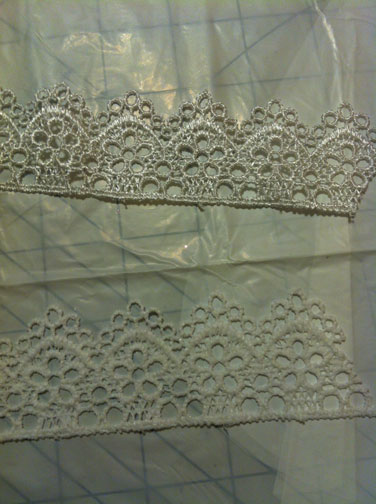 Unlike the photo above, you'll probably want to have multiple pieces drying at once so you can optimize your time.
Once your lace is fully dry, you can start playing! (Note: If your lace is dry but not as stiff as you'd like, you can apply another coat of fabric stiffener, I just brush it on in this case, being careful not to let the liquid collect in the gaps of the lace.)
If you're making full-circle crowns, you'll need to close them up. Some people use glue here, but I like to stitch mine. Either way works just fine. You want to overlap your ends a little, and if possible, line up the repeat design of your lace to hide the join.
 Once your crown is sewn or glued into its circle shape, you can paint it any color you like! You can use spray paint or craft paint with a brush (again, be careful to keep the paint from filling in the holes in your lace and obscuring the design). Here's a mini-crown, painted purple:
 The best thing about this project, to me, is how creative you can be with embellishments. For this full-size crown, I kept it simple, and just painted it silver and added a sparkly pin from my jewelry drawer:
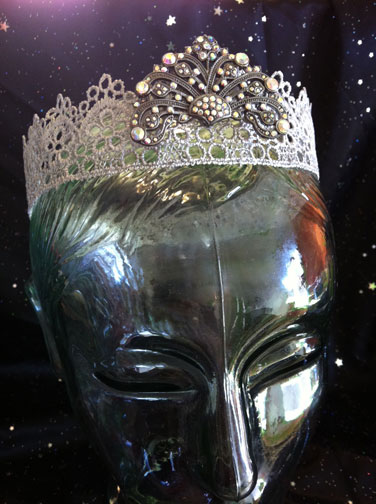 You can also coat your crown with a thin layer of Mod Podge and apply glitter:
 Only have a small amount of a lace trim, but you love it and want to make something out of it? No problem! Just make a tiara instead of a crown:
 And then, my favorite variation on the lace crown project -- tiny crown fascinators:
 Like the tiara, these are just attached to a headband with small stitches and glue. These two are painted with pink and purple paint with a bit of glitter mixed in, and then embellished with rhinestones. (I am clearly madly in love with my hot fix applicator.)

There are so many more ways to play with this project! You could add buttons, ribbon, fabric flowers -- anything that will glue or sew on is fair game! You could make these up as amazing favors for a princess party -- or just make the basic crowns and let the princesses decorate them. It's a really inexpensive project, so you can experiment and play with a bunch of designs without worrying to much about cost or waste. That's a good thing, because I already have a bunch of ideas for my next batch ...
If you sew then eventually you will need to clean your machine. A dirty machine can lead to broken needles, annoying noises, snagged fabric and skipped stitches. Your machine should be cleaned out often but the frequency depends on how much you sew and what fabrics you sew with. If you sew often then you should clean your machine more often, about once a week if sewing with none fuzzy fabrics like cotton. If you are using felt, fur, fleece or any other fuzzy fabric, clean your machine once you finish that project.

Cleaning your machine is simple but I recommend dedicating some time to make sure you get all the dirt and lint out. To get started you will need your machine's manual to see if there are any special instructions or no-nos. If you can't find it most manufacturers have them available online for download. If your machine is older, call the manufacturer and ask them for any tips or FYIs on cleaning your machine. Next, grab a basic craft paint brush (No need to bust out your fine tipped natural bristle brushes, nylon is fine). The brush grabs the lint and dirt stuck deep inside. Take the cover off the bobbin case and the needle plate cover and brush it down. Then, take out your bobbin and your bobbin case and brush both of them down well. Remove your bobbin case (or shuttle) and brush it all over. Then take your brush and go to town on the inside of your machine, in and around where the shuttle sits and any area that you can fit your brush. If the brush can fit there then I will bet there is lint in there. Gently twist and swish your brush around and clean off the lint each time. Look for unexpected places for lint to hide: I have an auto thread cutter and the lint just builds up on it(last picture above with red circle) but you wouldn't know it because fabric is always covering the knife when I use it. So I lower my presser foot and push the button for the knife to slide out and brush it quick and continue to do so until no more lint appears on my brush. Be careful with oil, some machines need it and some don't; your manual will instruct you on this. My machine came pre-oiled and doesn't recommend that I add any. Carefully reassemble your bobbin area. If the body of your machine is dirty you can gently wash it with a natural spray cleaner like vinegar and water.

To clean your serger you will also need your manual and a small paint brush but also some machine oil. Most sergers need to be oiled on a regular basis because they move so fast and with such precision. If your machine doesn't need to be oiled you can find that info in your manual. Before you oil anything in your serger it is important to clean all the lint out otherwise lint can get stuck in the oil and gunk it up. Starting on the outside, I love to use a scrap of knit fabric and rub down the outside to clean off all the lint. The knit really attracts the dust and dirt without harming your machine. It would take forever with a brush. Next open your machine and, again, go to town with your paint brush and clean out all the lint from every nook and cranny you can find. Then, carefully add just little oil to any parts outlined in your manual. If it is hard to get the bottle to the parts, I recommend using another cheap paint brush and using it to dab on the oil.

After you have been knitting for a while you might consider branching out from written patterns to charted patterns. At first it might seem like a new language that was deciphered using the Rosetta Stone but it is not that difficult and a real time saver in the end. Charts can be easier to read than written directions because they don't have language to get in the way. Plus they save paper which is a great thing when travelling with your knitting or if you are printing out a pattern. A smaller pattern means you can also use a magnetic chart keeper to help you out.
Before you begin reading your pattern look for a legend to help you learn common symbols for the techniques used in your pattern. A cable or lace pattern legend will feature many symbols while a color chart legend will include all of the colors needed for that pattern (you can opt for your own color choices) and a textural chart legend will outline where to change from knit stitch to purl stitch.
Charts are read from bottom to top and from right to left when working on the right side and from left to right when working on the wrong side. This holds true unless it is otherwise noted that all wrong side rows are worked a certain way everytime (i.e all wrong side rows are purled) or all wrong side rows are worked as the right side rows or you are kntting in the round. Remember to read it in the same direction that you are working your stitches. Each space on your chart represents a stitch. If you are knitting in the round or your pattern stipulates how to handle wrong side rows so they are not included in the chart then every row on the chart will be read right to left and represents a rightside row.
There are many tools you can use to help you read your chart one line at a time. You can use a highlighter to color completed lines. A magnetic chart keeper helps to keep your chart in place as well as having moveable magnetic bars that can allow you to only see the line you are working. When working from a chart in a book I recommend making a copy of the chart which you can mark up. This is also a smart tip for any beginners to chart reading; make a few copies so you can mark them up if it helps you learn.


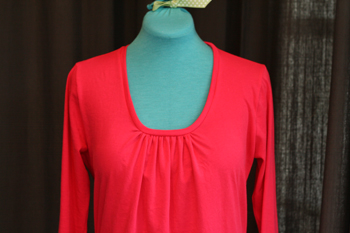
This is my first time using a Jalie Pattern and since completing two tops I can say that the pattern is excellent. It is well written with pictures and instructions that were both helpful. The sizing is also top notch. I did not have any of the issues that I find with the major pattern companies (I usually have to size down 2 sizes with the big 4 companies). On first glace the Jalie 2806 Scoop Neck T-shirt pattern is very similar to a HotPatterns pattern in that there are many sizes, it is printed on paper (which I prefer) and the instructions are not separate. I really enjoyed the many modifications that came with this pattern: 3 different sleeves and 2 necklines. Jalie also provided instructions for using your sewing machine and serger. If you need some extra help in your construction be sure to check out Jalie's video here. It is excellent; very well produced and filmed.
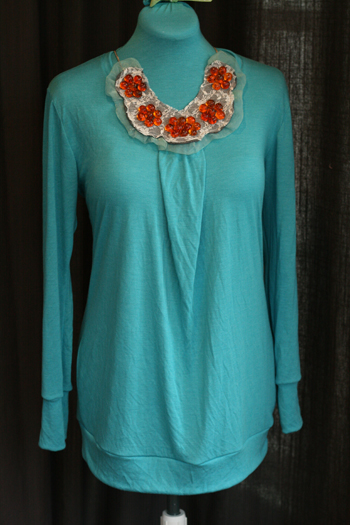


This pattern went together very well and I am pleased with the look. My only complaint is with the fabric of the blue shirt which is a Modal blend. This blend makes it very soft with a wonderful drape that just didn't work with this pattern (It also wrinkled as soon as I looked at it). The fushia shirt is 100% organic cotton and has much less drape but more stretch that the Modal Blend. It works and fits much better than the blue and was easier to sew up. I recommend a high cotton blend or 100% cotton if using a light weight knit or a medium weight knit. I tried both necklines and am a fan of both. The gathered neckline is very flattering and falls at just the right place on my chest. I opted for the ¾ length sleeve because it is still chilly out but I added a band to match the banded hem on the bottom of the blue shirt. Since I made the blue shirt first and I liked the sleeve band so much I added it to the fushia shirt as well but omitted the hem band. The length of the pattern is a generous length to hit at your hips with a ¾ '' hem without the hem band. The hem band adds a nice flounce at the hips not the belly where it would just look frumpy. I had some trouble once I added on the neckband with my stitches showing from when I serged the band before I attached it. I fixed this on the fushia shirt. On the blue shirt I attached the neck band with my knife disengaged. On the fushia shirt, I engaged it when attaching the neck band to the neckline but only cut about 1/8'' off. This is not enough to affect the appearance but enough to cover any stitches.


For my sleeve band, start at the elbow notch on the arm and draw a straight line down to the bottom of the sleeve adding width at the bottom (see picture below). Measure this and add 2-3'' for the length of your sleeve band. The width is the same as the hem band. Cut out 2 and assemble and add onto the sleeves just like with the hem band. This added enough length to make a ¾ sleeve a full sleeve so that it hits right at the wrist.

As a wrap up the blue shirt features the gathered fold over neckline, hem band and modified ¾ sleeves with band. The fushia shirt features the ruched neckline with a ¾ hem and modified ¾ sleeves with band.
For my first go at this one, I decided to use an old Disney print that I had squirreled away and a coordinating fabric from the same group. Since Princess Tiana is a chef, she seemed like the natural choice for an apron. The pattern is simple and takes very little fabric. I ended up piecing my ruffle and tie cuts (instead of cutting them in long, continuous pieces), because my fabric was a little spare. Worked out just fine!
 I love the adjustable neck tie on this pattern -- if I ever have small chefs visiting, I can easily tie it to work for them!
For my second version, I decided to change the shape of the bib and pockets. Instead of using the heart motif, I decided to expand the bib to be more rectangular, and take the curves off the tops of the pockets. Here's how I cut the bib around the existing pattern piece:
 And here's how I cut the pockets:
 I pulled from the stash again on this one, choosing a damask cotton print for the main apron, a contrast stripe for the ties, and lace yardage for the ruffle details.
 You can see in this shot that I'm a little askew in my pocket placement here. Whoops!
 I am ready for baking!
  It's so easy to whip this apron up, and the retro feel of it is right on trend. Since you can easily make changes to the pattern, it can be customized to fit any style -- a perfect gift for a chef of almost any size. You could make several for a cooking party, or customize for any holiday. Get the free pattern download here, and get cookin'!