How...how do you draw mouths the way that you do??! They're always so expressive and just plain pretty to look at. Please teach us more of your awesome ways *bows humbly*
Ohhh gosh, thank you! I’m glad you like em! I actually don’t do anything too special, but here’s a few tips!
The first thing I focus on is the top lip. The more you focus on the curve, the more variation and form it’s given.
Then, I focus on the lip shape in general. The top lip is actually “darker” than the bottom, because it’s in shadow.
It’s better illustrated in color, and it makes seeing form it it easier and clearer.
Another big aspect I rely on and love to utilizes is the gums. Gums are great for giving a very real, tangible, finite look to the teeth, rather than have them stretch endlessly in the mouth. Again, use curves!
Another big thing with the gums, is knowing where the’re at. Think of how the jaw is lowered and raised, rather than the top, which remains static. For the top though, the lip itself can reveal the gums, when stretched.
When expressing emotion, (and I know I bring this up a LOT) exaggerate! Pull the corners back far, show the gums, show the bottom row, move the tongue! Again, use curves! Never keep too static a line, especially in the top lip.
And finally, wrinkles! Use the surrounding skin and flesh I to your advantage! Pull it for age and expression, compress it to show youth, (typically).
I mentioned on twitter that I wanted to do a lip sync tutorial and immediately got some people who were interested so I put one together real quick!
I’m going to use a bit of unfinished lip sync from my taz animated part as reference. They’re just gifs so no sound, but you should still be able to tell that he’s saying “I’d say a solid B… Solid B minus.”
Anyone who’s looked up how to do lip sync has seen phoneme charts. Phonemes are just the shape your mouth makes when you make certain sounds.
When you do lip sync, you want some kind of reference to make sure it’s right
What’s easiest is to say it yourself and pay attention to the shapes your mouth is making. Since you’re going frame by frame, your audio is slow enough that you can make each shape slowly and distinctly and you can get each individual phoneme down in the animation.
Don’t do this.^
An easy way to tell if you’re animating lip sync wrong is if you run out of frames to make each shape. You don’t need them! Making each shape is unnatural. People talk quickly and the mouth doesn’t have the time to get into each shape. They blend together, sometimes to the point where the shape doesn’t change at all!
Not only does the 2nd gif take less frames and energy to make, it’s more relaxed, it looks less distracting, and his lips are much easier to read!
These are reference charts to show the differences more clearly
This is the difference between getting swallowed up in every last detail and paying attention to reality.
What matters more than hitting every syllable is making it look natural and flow with the acting. That’s why anime mouth flaps can work so well. A strong pose through the whole body matters more than one mouth shape.
Hello! In celebration of a new year, I’m gonna show all of you a tip how to draw lips for Black/African/Dark Skinned people.
If you’re drawing a black/dark skinned person, the top lip is a slight step above or below their actual skin tone while the bottom lip can range from a faded pink to brown.
Black/African men’s and women’s lip lean towards “nude/palm of the hand” makeup color. Some cases it’s pink but everyone’s lip color varies from pink to brown. In my experience of going outside my house, the darker the person, the pinker the bottom lip is while the lighter brown skin lips will be closer to their actual skin tone.
Another note is that the pink /brown tone on the bottom of the lip is near the slit of the mouth, not the complete lip like lipstick makeup. Try adding different tones to a lip and blending both top and bottom lips together because everyone’s different! A very good detail to remember.
TL;DR: USE A REFERENCE. GOOGLE IMAGE SEARCH DOESN’T BITE! Thank you for your time! Go out and draw them awesome dark skinned characters and people!
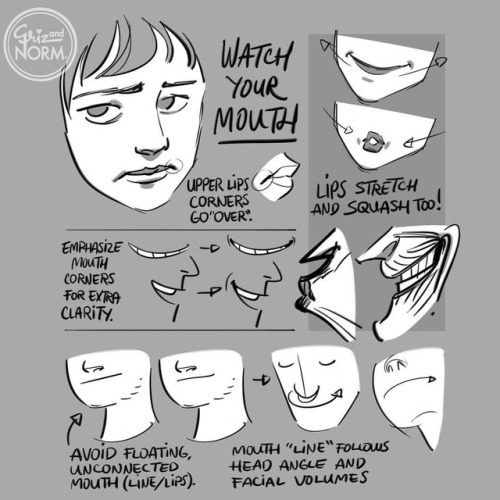
Tuesday Tips - Watch Your Mouth (new tip, which will be included in 100 Tuesday Tips Volume 2, available next year. The first volume is finally back in stock in our Etsy shop.)
Even without language, we communicate a lot with the shape of our mouth (lips, mouth corners, teeth, …) Like all facial features, its complexities can be simplified, but a good understanding of it all is a must!
-Norm
#100tuesdaytips #100tuesdaytipsgrizandnormbook #watchyourmouth #grizandnorm #arttips #arttutorial #disneyartist
You can put as much or as little definition into your teeth as you like, but I go about halfway
And remember that it’s dark inside mouths, and that there’s a tongue in there. I’m terrible at tips, I’m sorry! Polararts has a much better tutorial haha.
This was a request and at first I wasn’t sure if I had anything to provide with, but as it turn out it got a little longer than I expected because there were actually things I had to say!! Wow!!
Anyway, this is some guidelines I follow when I try to make the face expressfull, more specifically the mouth! It is often neglected, since it’s actually pretty hard, I’ll admit. But I’m here to help (hopefully…)! A mouth expression tutorial as per request. Enjoy and hopefully it will help some a little. ʕ•ᴥ•ʔ
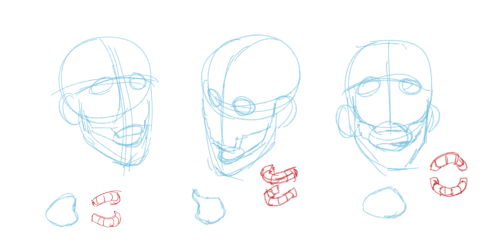
Draw the teeth at the right angle.
This is super important. The upper jaw follows the angle of the head, and the lower jaw will depend on how open it is. Make sure you have a rough estimate of where the teeth are, and how much of them you’re going to see!
The lips will VERY roughly follow the same angle as the teeth. It really depends on the character, but it gives you a sense at least.
If you DON’T do this, you’re going to lose so much volume and the mouth is going to end up looking unrelatable. I showed this example in this tutorial:
It’s not just the lips!
The cheeks, chin, and tongue play a role too!
Try look at your own mouth or references! I have a very pliable and large mouth, so that’s one reason why my characters have it too lmao.
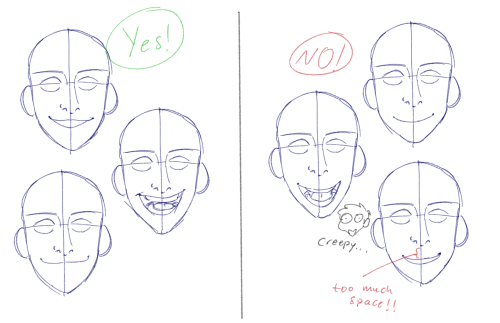
ASYMMETRYYYYY (ง ͠° ͟ل͜ ͡°)ง
I cannot emphasize how important asymmetry is when drawing expressions. It applies not only to the eyebrows to achieve the Dreamwork Face™, but also the mouth. Seriously if you draw a symmetric mouth I will deliver myself to your mailbox and then shout at you until you fix it.
Look at the difference between these two for example: which one has more “life”?
I think you get the idea.
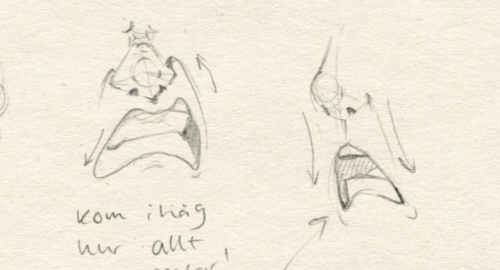
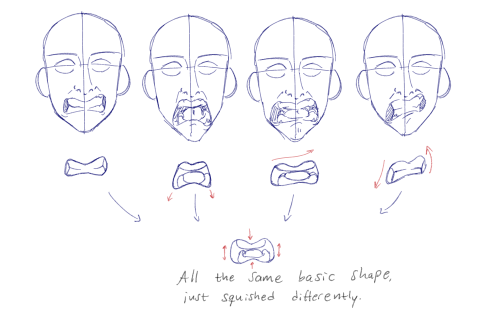
Push and squish - give it flow
Here’s an old drawing I have but it illustrates how I think when I squish the mouth, and use folding and wrinkles to my advantage.
Look at your own face and see where skin bundles up, where it creases the most and when bumps appear on your chin. Subtle details makes all the difference!
One VERY effective detail is illustrated in the first sketch, where I pull upwards on one side, and downwards on the other. That’s a good detail to use when the character is making a skewed expression, or is extremely frustrated. I encourage you to play around with that concept bc it’s ~super effective~!
EXAMPLES:
Happy: Your entire mouth is pushed upwards, not just the corners of your mouth!
I tend to draw a :3 mouth bc I’ve been drawing Lance too much….. You don’t have to but it’s basically imprinted in my motor memory by now.
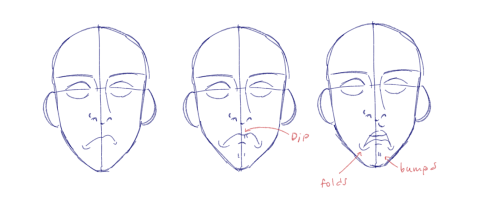
Pouting/frowning: corners are pushed down, middle pushed slightly up. Sometimes, there’s a slight dip in the middle too. It can give a sense that the character is biting their lips.
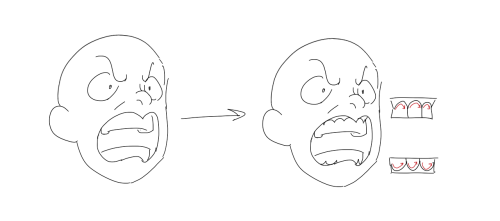
Showing frustration/intimidating/is intimidated: basically showing a lot of teeth. The corners are as open as possible and the middle sorta more squished. An extremely important detail here is showing some of the gums, and open space between the cheeks and teeth. That way it looks like the mouth it open to it’s full potential. Here is also where you basically MUST add folds and bumps, or else it’s not going to look relatable.
(Here I am again with the pulling upwards on one side and downwards on the other, as illustrated on the last sketch)
And then again, here’s just another doodle showing how important it is to show the gums. It’s the same face twice, but the second one looks slightly more frustrated doesn’t it?
As you can see, this last one is very versatile and I draw it a lot. Play around with the basic shape and see how much subtle details makes a lot of difference!
That’s it!
I hope that cleared some things up and was somewhat helpful! Enjoy drawing ✨