Swatch Service with The Confident Stitch

6 Jul

TCS Swatch Service

I don’t know about y’all, but my fabric buying habits have dramatically changed since this whole pandemic shit started. While I strongly prefer to buy my fabric in person, I’ve had to learn how to shop online again. It’s been an interesting learning curve, to say the least. How often have we purchased fabric that ended up being wildly different than what we were anticipating? Sometimes this is due to bad photos/monitor situations (like with incorrect colors or very strangely-scaled prints), and sometimes the company just does a piss-poor job of describing their product accurately. Either way, it’s frustrating – not to mention expensive!

For this reason, I love ordering swatches. It’s so handy to get an actual piece of the fabric, that you can, you know, actually get your hands on. This, too, is a little risky though – since there’s no guarantee the fabric won’t sell out before you make your decision!

Today I’m going to tell you about a new way to swatch, as offered by The Confident Stitch and their new Swatch Service!

TCS Swatch Service

The Confident Stitch‘s Swatch Service is pretty straightforward – every 3 months, you receive a card with a selection of fabric swatches for the upcoming season. There is a variety of fibers and weights included, everything from swimsuit lycra to rigid bottom weight. The fabrics are chosen to coordinate with one another, which makes it easy capsulate your wardrobe if that’s your thing.

One thing that I really appreciated is that the swatch cards are available in 3 different options: warm tones, cool tones, and quilting cotton. No more getting a box of swatches in all cool blues when you’re more of a warm red kinda person, or vice versa! Furthermore, the card is limited to 8 swatches, so it’s more of a curated experience and less of an overwhelming “let’s throw everything in the box and hope something resonates!”

In addition to swatches themselves, the cards also include care instructions, fabric facts, and pattern suggestions. For even more in-depth fiber nerdiness, Swatch Service also provides emails (sent after the cards are shipped) with more details about each fabric. There are videos so you can see how the fabric handles (also great for checking out print proportion), links to different color options, and blog posts with more information on each fabric, including tips for cutting and sewing.

Oh, and you also get a discount on all the fabrics featured in your swatch book, which is valid for 90 days!

TCS Swatch Service

The Swatch Service starts at $15 per card/quarter, with discounts for ordering multiple cards and/or months.

The folks at the Confident Stitch sent me both the cool and warm tones swatch cards, so I could get a good look and feel of them in order to write this post!

TCS Swatch Service

The first thing I noticed was how professional they look – heavy cardstock, full color printing, and the swatches themselves are firmly attached to the card (sorry mine are a little beat up – I was carrying them around in my backpack all week!). You can flip up each swatch to reveal essential information (fiber content, care instructions, suggested needle size, fabric width and price per yard). On the left-hand side are pattern suggestions and line drawings, which can be used in combination with the swatches to create a small capsule wardrobe that is suited for the season.

TCS Swatch Service

TCS Swatch Service

As you can see, the fabrics all coordinate with each other quite beautifully. As someone who struggles with creating a cohesive color palette (I end up just making things in every single color and then wonder why nothing coordinates with each other), it’s pretty magical to have the colors and prints already chosen for you!

One thing I really love is that the swatches are all fabrics that are reorderable (if you’re like me and you tend to sew designer end-cuts, I know you feel my pain in regards to non-reorderable fabric lol), so generally these same fabrics will be available even if you take your sweet time deciding on which swatches to pick. This also means that many of the fabrics come in multiple colorways! So maybe you love the feel of the Robert Kaufman Essex Linen, but that blue isn’t doing it for you – just know there’s probably something even better (hint: there is. Essex Linen rules, btw!)

TCS Swatch Service

TCS Swatch Service

I think my favorite thing, though, is the little sewing tip under each swatch! Each fabric has a professional pointer to help with sewing, fabric care, or choosing a suitable pattern. They are fun to read and would be super handy for any beginner who needs a little extra guidance.

TCS Swatch Service

TCS Swatch Service

The Swatch Service is great if you’re the sort of person who needs a little guidance with choosing fabrics for your upcoming sewing projects, or prefers a more tactile shopping experience. I also think this is a wonderful option for new sewists who are still trying to navigate the crazy world of fabric hand, drape, and fiber content – and may not necessarily have access to a local fabric store that carries a wide variety of options. It’s also just a nice little way to support a small business, while also getting a fun (and hopefully inspiring!) piece of mail a few times a year! Are you a mood board / visual sewing planner sort of person? This card already comes with pre-cut swatches and line drawings that you can use! Yes!

TCS Swatch Service

Here are the warm and cool cards next to each other! Personally, I’m really feeling those warm tones – but the cool is pretty nice, too! Which one do you like?

** Just a note: This is a sponsored post. The Confident Stitch sent me these swatch cards for free, and I was compensated for this post. All unbiased views and opinions are my own! 

Completed: The Maywood Backpack

18 Jun

Wow guys, it’s been a minute, huh? I try not to neglect this space, but the fact is I only write when I feel like it… which is honestly, kind of rare. I’d rather be making stuff!

So anyway, here’s something I made recently!

Maywood Backpack

This is the Maywood Toteback! Realtalk – I have PINED for this damn bag since I first saw one in the wild (I think it might have been at one of my jean workshops!). I love how it flips from a tote bag to a backpack with a push of the straps:Maywood Backpack

Maywood backpack

I think y’all know I love sewing backpacks (1 2 3), although I have to limit myself since there are only so many backpacks a person can use! (a backpack update: #1 gets used occasionally, #2 was gifted to my little brother who absolutely loves it, and #3 still is used frequently when I travel. You know, back when we were still allowed to travel haha). I justified this one since it’s a bit more refined than my standard canvas pack – the solid black waxed canvas, gold hardware, and rich leather straps just make it look so classy. And I love that I can flip it to a tote, for times when I don’t feel like carrying my shit around on my back – or, TBH, when I feel like showing off my rad back patch haha.

Maywood Backpack

Maywood Backpack

The pattern itself is a super simple design – it’s a basic bag with boxed corners and a zippered top, fully lined to hide all seams. The pattern includes a large front pocket (for hiding the front tote strap when using this as a backpack) and an inner pocket that is large enough to fit a laptop (my 13″ MacBook Pro fits perfectly, FYI). What really makes it shine is the high-quality materials, especially those leather straps!

I knew I needed more than 2 giant pockets for this bag – and while it’s a slim size (you can fit a surprising amount in there, but it is arguably smaller than your standard backpack), I didn’t want to overload it with so many pockets that I stuff the whole thing too full to zip closed (typical Lauren – if there is space, I will find a way to fill it). But I did want a small pocket to throw my wallet in – and, based on past backpack experience, I wanted it to be zippered so nothing would fall out.

Maywood Backpack

I ended up adding a little patch pocket that closes with a zipper, using the pattern pieces + instructions from the Addictive Free Canvas Tote from Niizo. Niizo is hands-down my favorite pattern + kit maker for bags, I always find their techniques to be so clever! I’ve made the tote before so I was familiar with the steps to insert this pocket. I like that it’s a patch pocket (so I could rip it off with no issues if I ended up deciding that I didn’t want the pocket!), and it has the zippered closure that I require. It’s the perfect size to hold my wallet, which is basically what it is intended for. I also added a little loop to the side seam, which I use to hang my keys or AirPods (using a carabiner clip) so they are easily accessible, but also secure while not taking up precious pocket real estate.

I actually sewed this pocket twice – my first go wasn’t quite perfect, and there were a few mistakes that just looked glaringly bad enough that I feel it was worthy of a re-do. I made this bag while on set for a big photoshoot (it is allowed where I live, please don’t @ me), and we were done with all our sewing… so I figured I had all the time in the world to get it right. I recut my pocket pieces from muslin, and while using the rotary cutter I glanced away for a fucking second and ended up somehow slicing through the tip of my left pointer finger. To make a very long and boring story short, I got 7 stitches the next day and also lost about 1/4 of my nail as the blade cut right through the nail bed. I’ve never had to get stitches before – hell, I’ve never had a sewing accident that warranted going to the walk-in clinic! – and let me tell you… that shit SUCKED. There was about a week and a half that I had very limited use of that finger which resulted in me not being able to type or knit without pain. Thankfully, it’s completely healed up at this point and my nail is slowly starting to grow back.

I guess the moral of this story is – 1. Pay attention when you are using your rotary cutter! and 2. Sometimes re-doing a pocket is the worst decision you can make that day LOL

Maywood Backpack

Anyway, it turned out all right in the end! I’m glad I added the pocket, although I wish I’d just kept the first version (as well as part of my finger haha). I used medium weight muslin and a metal zipper and I think it fits in with the rest of the bag nicely. Also, you can see here how much stuff fits in the bag! My laptop, charger, Kindle, notebook, pen pouch, and wallet are all hanging out in there. I also typically bring my knitting bag (which is full of a sweater at this point). It holds a lot!

Maywood Backpack

So, a little more about the kit I used! I got the whole ass kit from Pintuck & Purl (I think Maggie special ordered it for me, ha!), which includes everything – fabric, hardware, leather, and the pattern. All the pieces are pre-cut and marked, which means you can jump right into making! I’m boring as shit and I wanted a 100% black bag, but there are other color options (including a contrasting front pocket) if you don’t want to embrace your inner Goth. I also got the tool kit, for hammering in all the hardware. The outer fabric is waxed canvas, the lining is a heavy cotton duck. Both materials are structured enough to stand on their own without the use of interfacing. All of the leather is hammered on – no sewing (so no worries about whether or not your machine can handle it!). The handles are backed with leather supports, so the whole thing feels sturdy even when you’ve got it overloaded to max heaviness.

Maywood Backpack

I’ve been carrying mine around daily for about 3 weeks now and it has been perfectly suited for my needs!

Maywood Backpack

In other news, I hope you enjoyed my artsy photos that were definitely not taken in my back yard haha.

New Vogue Sewing Patterns: A Roast

29 Apr

Ooooh y’all looks like we’ve been blessed with a lil’ treat this month – new Vogue Patterns are out and they are something else. It’s almost like they’ve been saving the crazy ones and decided to give us a treat to take our minds off the world basically being a dumpster fire otherwise.

Before we get into it – I want to address the question that I get asked all the time, which is why I don’t write these reviews anymore. Ummm y’all I don’t know if there is another Vogue website I’m not seeing but honestly the stuff they have been releasing for the past few years has been pretty inoffensive. I look every single season and I really don’t see anything that warrants being made fun of. Lots of boring and meh stuff for sure, but none of the crazy WTF-were-y’all-thinking shit that we used to see in their catalogues. It’s not a conspiracy. No one told me to stop posting. I’m not holding out to be mean. I really just… don’t see the WTF much these days. That’s it, that’s the tea.

That being said, oh there’s plenty of it this season. Let’s take a look!


Vogue 1702 / Claire Shaeffer
It finally happened. Science has found to way to breed pants with skirts and created this hybrid monstrosity. But have we gone too far?


Vogue 1694 / Marcy Tilton
It’s a strange fabric choice but TBH I kind of like it.


Vogue 1697
Cute dress or whatever, but who is responsible for styling this shoot? The way the bias has draped at her lower back looks like a fucking jelly roll.


Vogue 1692 / Júlio César NYC
Ok, Angelina.


Vogue 1704 / Rachel Comey
Hot air balloon sleeves: A must-have for the season’s fashion.


Vogue 1707
Who approved that button placement? It looks like God put her nipples in the wrong spot.


Vogue 1710 / Rachel Comey
Jesus, Mary, and Joseph what the FUCK am I looking at here??


Vogue 1708
So I guess this is supposed to be a jumpsuit where the “bodice” is just long ties that you can wrap however. It’s a cute idea in theory I guess but in reality it looks like she quit sewing the garment halfway through and is trying to Little Mermaid her way into pretending like it’s a whole ass dress.


The back is cute, tho.


Vogue 1706
Hospital scrubs, but make it fashion.


Vogue 1700

Who wore it better?


Vogue 1703
I don’t hate the pattern, I just want to talk shit about the stripe placement.


Vogue 1695 / Today’s Fit By Sandra Betzina
Bonus – the bow doubles as a pillow!


Vogue 1705
Thanks, I hate it.


Vogue 1701
† THE POWER OF CHRIST COMPELS YOU! †

That’s all for this round! Thanks to Vogue Patterns for giving us some entertainment during these shitty, shitty times. Which one was your favorite?

This one is mine. Elbow windows! WITH RUFFLES. I cannot even tell you how long I’ve spent laughing at this.

Tutorial: How To Adjust the Waistband of Your Jeans

1 Apr

jeans waistabdn tutorial

Hey friends! I hope everyone is doing well and staying healthy during these strange times. I think most of us are firmly in the “stay home and self isolate” camp (at least, I hope all y’all are! STAY HOME!!) (except for those who are, of course, on the front lines – thank you, thank you, THANK YOU, for your sacrifices every single day. Y’all the real MVPs <3), and while it’s a great excuse to catch up on all the projects we’ve been putting off… I know I’m not the only one who is experiencing a dip in their creative energy. It’s not surprising; stress can really do a number on your mental health and overall energy, and sometimes the first thing to go is the desire to do anything other than [barely] survive. However, for me – and I’m sure this can be said for a lot of us – being creative is what brings me joy, so it is important that I make at least a tiny effort every single day. Sometimes that means I sew, sometimes I draw, sometimes I just read. And sometimes I want to sew, but not necessarily start a new project. This is where alterations are so useful! I can get a little bit of sewing in – 20 to 60 minutes – and let my brain have a little stab at problem-solving. Plus, it feels pretty good to take something previously unwearable and make it wearable!

So with all that being said – today I want to share a tutorial on how to alter the waistband of your jeans! This is something you can do on both handmade and ready-to-wear jeans (I actually perform this alteration frequently for clients as one of my side-gigs). You can of course use these steps for any waistband adjustment – trousers or skirts for example – just be aware that some steps may differ depending on what you are working on.

I am sorry in advance for the quality of the photos. I originally shot these with the intention of posting them on Instagram, but while typing my caption i realized it was too long for the app! So I’m moving it here to a blog post (and I can’t re-shoot the steps since, well, all my pants fit now! LOL). For more mini-tutorials and pro tips, please follow and/or occasionally check in on Instagram – the hashtag is #lladybirdprotips

Some notes about this process – as I mentioned, this is not technically jeans-specific, as you can use this process to alter any waistband, including trousers and skirts. Keep in mind that anything you alter without belt loops will mean a visible waistband seam (which I personally thing is a worthwhile trade-off for having a fitted waistband, but you can be the judge of your own wardrobe!). If you don’t like the idea of a visible waistband seam, you can either re-cut a new waistband (I keep leftover fabric from projects specifically for this purpose!) or remove volume from multiple areas (which would make the adjustment appear more of a ~design element~ rather than an alteration).

Heart on Ginger Jeans

When determining the amount of take out of your waistband, you will be tempted to overfit. Don’t do this. You want to aim for snug, but not tight. It’s hard to really articulate this into specific words, but I’ll try. A waistband should not have negative ease (unless it’s super stretchy), but should be quite close to your own actual measurements, if not slightly larger (no more than 1”, but this will vary based on body shape and personal preference). For me, I like a waistband that is fitted enough to only allow a couple of fingers, but not so snug that it gives me back fat / love handles. I know with some body shapes, this can be unavoidable – so use your best judgement, and understand that it’s totally fine if you end up needing to re-adjust later down the line. It’s a learning process, after all! Better to not take out enough and need to re-do the adjustment (think of it as another chance to practice, rather than that you did it “wrong” the first time), than take out too much and render the pants unwearable. Because of this, I tend to err on the side of a looser waistband when first sewing my pants, with the understanding that I can always make adjustments later down the line. Sometimes your fabric – especially if you are working with a rigid denim – takes a bit of wearing and washing before it really settles into its shape. A LOT of my pants start out needing a belt for the first few wears, then the waistband shapes itself over time and washing. I recommend waiting a couple of months before doing this alteration!

I know a lot of people recommend adding darts to your yoke to get a better fit, or subbing a curved waistband. While these are certainly viable solutions, I personally find a curved waistband uncomfortable (and it’s something you rarely see in RTW – most waistbands are cut straight and eased in) and I think darts in a yoke look terrible (there, I said it! Fight me!). So my method is a little different, but it works! Try it!

Now, without further ado- Altering the Waistband of Your Jeans: A Lil’ Tutorial!

Jeans Alteration: Waistband
1. Try on your jeans and pinch out the center back waistband until it fits snugly. Pin this measurement (or use a binder clip), and then measure the distance from the pin to the fold. This is how much you will need to take out- in my case, 1” total. Don’t worry about doubling the measurement or anything, we aren’t mathing here! If you are fitting yourself, you may need to pinch the side seam rather than the center back.

Trying to figure out if you just need to adjust the waistband or the whole back of your pants? A good rule of thumb is if it fits everywhere *except* the waistband (like you just need a belt to snug it up, or else the waistband shelfs open when you sit down)- then you will just work on the waistband. If you’ve got quite a bit of extra space down the center back of your pants as well (like you can easily shove your whole hand down there), then you will want to also take in the center back seam in addition to the waistband. If you’ve got loads of unnecessary room everywhere in the back, you probably just cut a size too big – so take a bit out of the side seams in addition to the center back. Don’t be afraid to pin shit until you’ve got a fit that feels good!

Jeans Alteration: Waistband
2. Ok, time to start unpicking! Completely remove the center back belt loop, and remove the bottom stitching lines from both side back belt loops.

Jeans Alteration: Waistband
3. Remove the back waistband from the jeans, from side seam to side seam. Depending on how much you are taking out of the waistband, you may be able to get away with unpicking less (although I tend to err on the side of removing more than less, since you’ll be closing the whole thing up later anyway). I do not recommend unpicking far beyond the side seam!

Jeans Alteration: Waistband
4. Remove all top stitching and under stitching from all sides of the waistband, so that you can completely separate the waistband from the facing. You don’t need to unpick completely from side seam to side seam here – 3”-5” is plenty, depending on how much you are taking out. If you are removing understitching, you will need to unpick about 1” of top stitching beyond the understitching on either end. Mark the center back of the waistband (I used a pin here).

Jeans Alteration: Waistband
5. Fold the waistband at the center back together short ways, with the right sides facing, and open out all folded seam allowances so it is completely flat. Sew a new seam line from one end to the other, with the distance from the fold being whatever measurement you took in step #1. Repeat for the waistband facing.

Jeans Alteration: Waistband
6. Cut open the fold, trim seam allowances if needed (I like to trim my facing seam allowances slightly shorter so there isn’t a bunch of bulk right at the center back), and press both seams open.

7. Sew the waistband and the facing together along the top edge, and understitch.

8. Pin the center back seam of the waistband facing to the center back seam of the pants, with the right side of the facing against the wrong side of the pants, then ease the top edge of the pants to match the new length of the waistband (no photo, sorry!). You will probably need to pull the waistband quite a bit to stretch to fit (#unintentionalpoetry), but it can be done! I took out 2” total from my waistband (1” on the fold), using a very low stretch denim cut on the cross grain, and was able to ease it in with some womanpower. If your fabric is very rigid or you need to take out a lot, you may want to unpick the top stitching from the center back seam of the pants and remove some of the excess there, grading to nothing along the CB seam line. Use your best judgement here!

10. Now sew the facing to the top edge of the pants, pulling the waistband to stretch and easing the top edge of the pants to fit (pro tip – keep the facing on top and the pants against the feed dogs of your machine. This will kept ease the excess fabric, as well as give you more control over stretching the waistband). Press the seam allowances up toward the waistband, steaming out any ease wrinkles at the top edge of the pants if necessary.

Jeans Alteration: Waistband
11. Now just sew everything back together! Pin the waistband on the outside to cover the previous stitching line, then topstitch along the top edge of the pants. Topstitch the waistband to the facing along the top of the waistband. Re-attach the center belt loop (which ideally will cover your CB stitching line) and the bottom of the side back belt loops. Give everything a good press and you are done!

Claryville Jeans

And that’s it! Honestly, this is a very easy (and very emotionally fulfilling!) adjustment – I think writing this blog post might have taken longer than actually making the alteration! I encourage y’all to give this a whirl if you have a pair of jeans that’s just a little loose in the waist – even the smallest adjustment can make a huge difference!

Some notes: The jeans in this tutorial are the Claryville Jeans from Workroom Social (blog post can be found here). Also, I am still offering Virtual Private Lessons if you have an alteration need that you’d like to chat about or get a little guidance with! So far they’ve been a blast!

How is everyone holding up these days? What are you doing to bring a little creative joy to your life?

Now Offering Virtual Private Sewing Lessons!

19 Mar

cat in studio

Hey friends! As we navigate the situation with the COVID-19 pandemic, I know a lot of us are encouraged if not mandated to #staythefuckhome to slow down the spread of the virus and help flatten the curve. Which means lots of time for sewing – yay, silver lining – but not a lot of options for being social or getting help in the form of classes and workshops. I know I personally have had to cancel / reschedule 2 workshops so far and anticipate many more will meet the same fate (peep my workshops page for updates), which in addition to the loss of income is just a total bummer! I’m bummed!

While it is unfortunately not possible at this time for me to offer online workshops (logistically, I just can’t swing it – although I will continue to look into it so that may change in the future!), I do think one-on-one lessons can be managed via video platform. So, starting now – I am happy to announce that I am offering Virtual Private Sewing Lessons! Yay!

All information (including a FAQ because everyone loves a good FAQ) is on the Virtual Private Sewing Lessons page of my blog, but a quick rundown of how this works:

  • You will sign up for preferred lesson via the PayPal link ($18 for 30 minutes, $30 for 60 minutes, $45 for 90 minutes).
  • After payment has been completed, click the RETURN TO MERCHANT link to be redirected to my Calendly page to select your preferred time and date (availability is from 11a – 6p CST Monday -Saturday, although I can be flexible if your time zone does not work with these. Send me an email!).
  • To complete your request, you will be asked to tell me a little bit about what you would like to cover during the lesson – this will allow me time to do any necessary prep work so that we can go straight into the good stuff during your session! You can also email me pictures / confusing instructions, ask questions – whatever gets us best prepared!
  • Lessons will be held via Google Hangouts (which is free to use on your phone, tablet, or computer.

Since this is a new technological territory for me (let’s be real, there are gonna be some hiccups!), for a limited time I am offering these lessons at a discount of 40% off my standard hourly teaching rate. I know a lot of us are looking at an uncertain future in terms of the economy + our jobs, so I hope that these lower rates will also allow more people to take advantage of this new platform and strengthen their sewing knowledge!

So what can be covered in a Virtual Private Sewing Lesson? Well – just about anything, I reckon! Here are some ideas to get the juices going:

  • Deciphering confusing sewing instructions
  • Real-time demos for specific techniques
  • Help with fitting (I’m not sure how well this will work since I tend to fit very hands-on, but I am willing to try and see what happens!)
  • Basic clothing alterations
  • Flat pattern adjustments
  • General sewing advice (such as fabric and pattern recommendations, finishing techniques for certain projects, advice for handling tricky fabrics, troubleshooting)
  • Or we can just chat because chatting is fun!

Selfishly, I am also hoping this will allow me to be more social while still maintaining my self-isolation – so perhaps that will be the same for you! Shit is stressful enough right now without having to deal with long bouts of loneliness, amirite?

I have some new projects and tutorials that I’d like to share on this blog, so stay tuned for those! In the meantime, please check out my Virtual Private Sewing Lessons page if you are interested in booking at session with me! Share it with your friends! I think we could all use a little creative distraction right now 🙂

Stay safe, stay healthy, wash your hands, and STAY THE FUCK HOME! Love y’all!

cat

Completed: Tongue-Tied Sweater

26 Feb

It’s been a minute since I shared a knitting project! I actually *have* been knitting – I always have at least 1 project on my needles at any given time (usually two – one for the couch, and a smaller/simpler one for the road!), and I always keep my Ravelry account updated! But for whatever reason, I never feel super compelled to share them on my blog. Anyway, here’s one today!Tongue-Tied Sweater + Dawn Cords

This is the Tongue Tied sweater by Poison Grrls. I actually chose the yarn before the sweater pattern – a very uncharacteristic knitting move for me (usually I have my pattern selected before I start shopping for yarn). To be completely honest – I wasn’t in the mindset for planning a new sweater when all this happened, as I was still steadily working my way through my last sweater (see! There’s one I knit and never shared here lmao). But this yarn caught my eye at Pintuck & Purl and once I got my hands on it, it was all I could think about.

Tongue-Tied Sweater + Dawn Cords

The yarn is CashLuxe Spark by Sweet Georgia Yarns, a gloriously soft and cushiony fingering-weight yarn with this incredibly rich color and the cutest subtle sparkle! I’m not a super duper yarn snob (I love natural fibers, blah blah, but I don’t typically buy *really* expensive yarn. Although. That may now change haha) but I really, really, really wanted this yarn on my body. I initially considered socks – I mean, who doesn’t want to wrap their toes in cashmere? – but at $38/skein, that was a little rich even for my blood. So obviously it made sense to buy two skeins and turn it into a sweater, because that’s totally fiscally responsible.

Tongue-Tied Sweater + Dawn Cords

Tongue-Tied Sweater + Dawn Cords

I started this sweater right after I finished my last one, toward the end of December last year. It knitted up really fast – partially because, well, it’s a tiny fucking sweater, but also I just really enjoyed every part of the process. I LOVED touching that yarn, so so much. I actually would have finished this quite a bit sooner, except once I got to the point of picking up the sleeves I let it sit dormant for a couple of weeks while I worked on other stuff.

Not a lot to say about this pattern, but here are some notes:
– I knit the size Small, based on my bust measurement. My gauge called for size 2 needles (body) and 1 needles (ribbing).
– This is a really fitted sweater! I mean, I knew that going in – but trying it on, yeah, it’s basically painted on. Aggressively blocking the entire thing really well helped a lot, and now it skims my body perfectly.
– Because it was so tight, I did have some issues with getting a stretchy enough bind off (I actually had to re-do my bind off at the bottom AND the neckline twice!). I ended up using size 3 needles and a super stretchy bind off. With the neckline, that was mainly my fault for being an idiot. I thought I’d be super clever and do a fold-over neckband, but quickly discovered (while unsuccessfully trying to pull it over my head) that those don’t stretch at all. LMAO.
– Mod-wise, I added 1″ of length to the body, since I wanted to be able to wear this with high-waisted jeans (it’s pretty short!).
– If you think you see a yarn tail in the back, you’re right. I haven’t woven it in yet. I don’t know why.

Tongue-Tied Sweater + Dawn Cords

I loved knitting this pattern! It was easy to follow, simple to knit (but not boring), and the proportions are just lovely. I’ve already got a few more Poison Grrls patterns in my radar for my next sweater. I love Amy’s aesthetic and I love that she uses fingering weight yarn – perfect for our mild winters!

Tongue-Tied Sweater + Dawn Cords

Tongue-Tied Sweater + Dawn Cords

Oh, I also made my pants, too! These are more Dawn Jeans, made in Robert Kaufman non-stretch corduroy from Pintuck & Purl! (I picked it out the same time I was fantasizing about that yarn haha). Not much to say about these that I haven’t already said – I made my normal size, this time with the wide legs and the cropped length. The cropped length isn’t actually that cropped – I ended up having to take off another 3″ or so (but I also have a 28″ inseam sooo take that as you will). I’m also not super thrilled about how the back fits, but I believe that’s just what you get with wide leg pants. The wrinkles are there because there is too much fabric at the inner thigh (the issue I had with my Calvin Klein jeans), but for true wide-leg pants you really don’t want to remove width there. Whatever, I’m not the one looking at my own butt so I don’t care.

Tongue-Tied Sweater + Dawn Cords

So anyway, that’s my new sweater! Fun to knit, fun to wear, and the sparkles make me happy 🙂 Oh! And I still have some of this yarn leftover – so you better believe I’ll be making a tiny pair of socks 🙂 If anyone has suggestions for short-cuff sock patterns – preferably one with bobbles (I don’t know why but I’m feeling like I want bobbles on these), let me know!

Completed: Rayon Crepe Magnolia Dress

4 Feb

LMAO for some reason I’ve been sitting on these photos since Thanksgiving, no idea why I’ve been dragging my feet to post this! Anyway, better late than never!

Rayon Crepe Magnolia dress

This is the Magnolia dress from Deer & Doe, this time in View A with the plunging neckline, long sleeves, and a very mini length (ok, so that’s not view A exactly, but let me live). I’ve made this dress before and wore it a few times this last year, and I was interested to try it again with some modifications.

Rayon Crepe Magnolia dress

Rayon Crepe Magnolia dress

My original Magnolia dress skews quite a bit more romantic than how I normally dress (and while I’m not quite ready to let it go yet, I will admit that it doesn’t get a whole lot of wear), but I loved the pattern and I wanted to try it with a more modern twist. One thing I have noticed with my OG dress is the bust is just a bit more generous than my actual body. As I mentioned, I sewed a different view, sized down to a 34 at the bust (keeping the 38 at the waist / hip) and made a quick muslin to assess the fit. Here are the changes I made:
– Took an additional 1/4″ out of the CB along the fold for my narrow back
– Removed a 1/2″ wedge from the front neckline because it was gaping (same as this method, except obviously on the front. Also, oh my god I miss that dresssss)
– Reduced the upper bust by about 1/4″ by shaving it off the princess seams to the bust point (I wanted to wear this dress without a bra and my breasts tend to be a little more bottom-heavy)
– Removed an additional 1/4″ off the side seam

Sounds like a lot, but it was just tiny tweaks! I wanted the dress to be fitted, but still skim over my body (rather than just be tight). Shortening the neckline to bring in the gaping was definitely the biggest thing; I knew I wasn’t going to wear a bra with this dress and I wanted to be CONFIDENT that there was no danger of accidental nip-slips. I’m not going to go into detail the weird gymnastics I performed in my studio to really test this theory, but believe me… the ladies aren’t going anywhere.

Rayon Crepe Magnolia dress

I bought my rayon crepe from Stone Mountain & Daughter Fabrics, back in March last year. I loved the autumnal colors and that beautiful drape! I took home 3 yards, and used nearly every last inch of it, despite this dress being a mini. Those sleeves took up a lot of fabric!

Construction-wise, I didn’t make too many changes to the dress beyond what the instructions call for. I did opt to self-line the entire top – the instructions just have you self-line the bodice, which I think is fine but why not the back? By doing this, I was able to eliminate all the bias facings, and have a completely clean finish. I also self-faced the waistband pieces, again, for a clean finish but this time on the inside. This is just personal preference; I don’t like exposed waistband seams in dresses and for the most part, I always face them. I don’t have any photos of this, so you’ll need to use your imagination.

Rayon Crepe Magnolia dress

To keep that neckline intact and immune to stretching out, I used strips of twill tape to stabilize the edges (here is a similar method to what I used). One thing I irrationally hate in clothing is weird gapey necklines that don’t stay close to the body, so I will do whatever it takes to keep that shit in check. Especially with a low-cut top like this, and again, especially since I ain’t wearing a bra with it! Anyway, the twill tape means that edge is nice and stable.

Rayon Crepe Magnolia dress

Unfortunately, I do think I was a little overzealous with my neckline tweaking – I shortened the twill tape too much, because now the center front of the waistband rides up. It’s noticeable for sure, but it also looks intentional so we’ll just say that was the case.

Rayon Crepe Magnolia dress

Rayon Crepe Magnolia dress

Rayon Crepe Magnolia dress

Surprisingly, the sleeves were the correct length for me without any adjustments (I think having a gathered elastic edge makes things a bit more forgiving). And I believe I did shorten the skirt length further, but I couldn’t tell you by how much (sorry). It is pretty short, though I love it! I feel so sassy and groovy and a little floaty when I wear this dress.

Rayon Crepe Magnolia dress

Anyway, that’s all for this make! Short and sweet (both the dress and the blog post lol). I’d love to make this again in a solid color in the future, but for now, I love the fun print!

Completed: Vogue 2442 Calvin Klein Jeans

7 Jan

Alright y’all, I’m back with one more jeans post – the ~Designer Jeans~ Edition!

Thanks to Vogue 2442, I was able to make my own pair of Calvin Klein jeans 😀

Before we get too far into the post, though, I just want to acknowledge how absolutely stupid this envelope cover is. You can barely see any of the details of the jeans (although the butt close-up is helpful, and to be completely transparent here, it’s a nice butt), and I don’t know why that woman is holding her leg up like that because you definitely can’t do it in these jeans. Nothing about this cover art (or lack thereof) makes me want to try this pattern, but nevertheless, I persevered. For science.

Anyway, here are mine!

Vogue 2442 Calvin Klein Jeans made with Art Gallery Fabrics denim

I went down a little rabbit hole last fall while looking at vintage jeans. I reaaaaaally wanted some vintage Calvin Kleins, if only for the brag factor, but my budget currently doesn’t allow me to spend hundreds of dollars on someone’s used jeans (RIP, the vintage market). I considered sewing them, but recalled looking up vintage CK patterns years ago and they were going for obscene wads of money. Just out of curiosity, I checked again – and was surprised to see that there are plenty to choose from for $10-$20. Calvin Klein licensed his name to Vogue patterns a bunch throughout the 80s and 90s, occasionally offering a jeans pattern. There were loads of mom jeans to choose from (including a truly horrifying Vogue 2851, I mean, come on) but I went with the OG, the Vogue 2442 from 1980. In the effort of being as science-y as possible, I re-measured myself and chose the size that closely matched my measurements – in this case, the 8.

Vogue 2442 Calvin Klein Jeans made with Art Gallery Fabrics denim

It took me a while to find a suitable denim to make these up – I wanted something non-stretch (as the pattern calls for – this was before stretch denim was really a thing!), but not too heavy, and a lighter wash. A bunch of the stuff I was coming up with ended up being way too lightweight, or had too much stretch, so this project ended up being shelved for longer than I would have liked.

Vogue 2442 Calvin Klein Jeans made with Art Gallery Fabrics denim

As you can see, I did end up finding a great denim – from Art Gallery Fabrics, of all places! I’ll admit that Art Gallery Fabrics wouldn’t be my first thought when it comes to denim, but they’ve been expanding their denim gallery and I was curious to see what the offerings entailed. There is a great selection of lightweight (4.5oz, like what you’d use to make a button-down top or a sundress) denims, both printed and dyed various colors. The heavier denims clock in at 10oz (which is the lighter end of a pants-weight denim, and my personal preference), and come in a smaller selection of colors, nonstretch only.

After playing with some swatches, I chose the Crosshatch Textured Denim, in the Bubbling Brook colorway. My other choice was the Solid Textured Denim in Bluebottle Field, but that was sold out, so hopefully I can try it out in the future!

Vogue 2442 Calvin Klein Jeans made with Art Gallery Fabrics denim

Vogue 2442 Calvin Klein Jeans made with Art Gallery Fabrics denim

Anyway, about the Crosshatch Textured Denim! First off, you probably noticed that my jeans don’t exactly have a crosshatched design on them – that’s because you are looking at the wrong side of the fabric, baby! I actually don’t mind the crosshatch look, but upon receiving the fabric I fell in LURVE with the less contrasty wrong side of the fabric, so that’s what I went with on my jeans! My sewing project, my rules! The denim was pretty stiff and definitely not soft upon first receiving; but did get really soft and supple after just one wash. Be warned that it frays a lot, though – you’ll want to make sure you finish your seams (whether serging, or zigzaging, or even binding them) because otherwise the inside of your garment will get real hairy, real fast. If that bothers you, I mean. You do you.

Vogue 2442 Calvin Klein Jeans made with Art Gallery Fabrics denim

Other than the fraying part, this denim was easy to work with. I recently got an Oliso Steam Iron (yes, the little iron that stands up when you stop touching it and yes it never ever stops being hilarious, no matter how much I use it) and this was my first real project to use it on. It doesn’t get quite as melt-your-hands-off-hot as my industrial gravity feed iron does (granted, this is cotton, so it doesn’t really need to be beaten into submission haha), but it heats up quickly, delivers a satisfying steam burst, doesn’t auto shut off every 2 minutes, oh, and IT STANDS ON IT’S OWN LITTLE FEET. My only regret in life is that I can’t find my stick-on googly eyes, because this iron needs eyeballs. Ok moving on.

Oliso Iron!

Oliso Iron!

Oliso Iron!

So, more about the pattern itself! Like I said, I went with the size 8, which was based on my current measurements. I did not make any prior fitting adjustments or a muslin before cutting my fabric – I just went for it! I wanted to see what would happen! (this might be my new motto for 2020). Fit-wise, this was almost perfect right out of the envelope. I did end up making a few minor tweaks before I attached the waistband – because I am extra, and I like fiddling with things! – but if I hadn’t done anything at all these still would have absolutely been wearable.

Vogue 2442 Calvin Klein Jeans made with Art Gallery Fabrics denim

Vogue 2442 Calvin Klein Jeans made with Art Gallery Fabrics denim

Vogue 2442 Calvin Klein Jeans made with Art Gallery Fabrics denim

Adjustments I made:
– Removed 1/2″ from the inner thighs, keeping the crotch length intact
– Scooped 1/8″ from the front crotch curve
– 5/8″ wedge at the center back yoke + waistband
– Cut 5″ total off the hem (I have a 28″ inseam, y’all lmao)

Sorry I didn’t take before photos, but these were all minor tweaks that didn’t translate very well in a photograph. Also, when I’m fitting, I don’t want to stop to take a bunch of weird ass selfies. Sorry, not sorry! Looking at these photos, I see I could have removed a little more from the inner thighs (as evidenced by the horizontal wrinkles pointing directly at my butt), but I can assure you this is a big improvement from the start, and I actually think they look worse in the photos than in real life! But, you know, it’s good enough. I spent far too much of my past sewing days overfitting myself to the point of frustration (and sometimes, actual discomfort). Nowadays, when I feel like I’m done fiddling with it, I just stop. As long as it’s not actually uncomfortable, I think it’s good enough! It has been very liberating and I encourage y’all to consider the same outlook 🙂

The instructions on this pattern certainly were interesting! As someone who’s made loads and loads (and loads) of jeans, these were a little more based on the home-sewer, rather than how RTW jeans are made (granted, I don’t have access to vintage jeans at this time, but the 1980s isn’t exactly the same type of vintage as, say, the 40s, and generally the construction methods back then were more similar to how they are now, i.e., serging seam allowances and such). As this is an older pattern, it wasn’t common for the average home sewist to have a serger – so the instructions include turning under edges, or finishing seams with a zigzag or overcast stitch. Interestingly, there is NO interfacing called for in this pattern (I interfaced the fly facing + outer waistband, out of habit and because I know that gets the me the result I like), but they do have you add twill tape to the top and bottom edges of the curved waistband to keep it from stretching out (that was a no from me, dawg). The other weird thing I noticed was that they have you double topstitch the side seams, and not the inseam. I also skipped that part (I prefer a stronger inseam, thnx) and did it my own way. However, I did follow the instructions for the most part.

Vogue 2442 Calvin Klein Jeans made with Art Gallery Fabrics denim

Vogue 2442 Calvin Klein Jeans made with Art Gallery Fabrics denim

Vogue 2442 Calvin Klein Jeans made with Art Gallery Fabrics denim

Vogue 2442 Calvin Klein Jeans made with Art Gallery Fabrics denim

The pattern includes a back pocket topstitching design, front pocket stays (pocket lining is also from Art Gallery Fabrics, fyi!), and a two-piece curved waistband. The pants are fitted at the waist, hips and thighs, and then the leg goes straight down (which is not what the line drawing suggests; they look a little more tapered on the envelope). Since my denim is such a light color, I opted for a pale brown topstitching thread (my beloved Gutterman Mara 70), rather than gold or copper. I alter a lot of jeans for clients and one thing I’ve noticed is that most jeans use brown thread, not gold or copper! My rivets and buttons are from the Garment District (I think these rivets might actually be for bags, but whatever, I like them); I had 1 extra rivet so I attached it to one corner of the back pocket. I saw this on a pair of jeans the stylist I work with was wearing, and while I normally hate rivets on back pockets, I thought it was kinda cute.

Vogue 2442 Calvin Klein Jeans made with Art Gallery Fabrics denim

Vogue 2442 Calvin Klein Jeans made with Art Gallery Fabrics denim

Vogue 2442 Calvin Klein Jeans made with Art Gallery Fabrics denim

Vogue 2442 Calvin Klein Jeans made with Art Gallery Fabrics denim

My only issue with this pattern is the two-piece curved waistband. Since it’s in two pieces, that means there a seam at the center back – great for fitting, but it also means a lot of bulk at the center back when the inner and outer waistband are sewn together (and then later, a belt loop is sewn on top of that). I also admit that I was running on fumes by the time the waistband facing was attached, so it’s not my best work. But, it’s on the inside, so who cares!

Vogue 2442 Calvin Klein Jeans made with Art Gallery Fabrics denim

Overall, I enjoyed making this pattern and I think the finished jeans turned out great! I love the high waist (better for wearing crop tops with!), and the straight legs are a big style departure from my usual look. I love the lighter wash and subtle texture of the AGF denim, and I love love LOVE how soft it is! I don’t feel like I even really need to break these in, which is wonderful! If you’ve been looking for a good non-stretch, not-too-heavy denim, definitely check out what Art Gallery Fabrics has to offer!

** This post was sponsored by Oliso. All fabrics were provided by Art Gallery Fabrics. As always – all thoughts, opinions, and weird ideas are my own! **

2019: A Year in Review

31 Dec

Can’t believe this year is nearly over! As with my yearly tradition of wrapping up the year, here is my 2019 in review!

2019: Me!

So… a lot happened this year! I think the biggest event was that I bought my first house!

2019: My House

2019: Bought a house!

It’s a 1958 ranch, in a small neighborhood in West Nashville. I closed in March, so the yard was sort of ugly and dead! It has been fun to see what grows throughout the year, although I’m a little salty that we missed out on fall foliage this year (due to an extra hot fall with no rain, then too much rain!), because I would have loved to see what that maple ended up doing! Oh well, next year!

Anyway, owning a house is really fun! It’s expensive, yes, but I can do whatever I want to the house and I love that! It’s also really great to live somewhere nice – and not a landlorded rental. The previous owner had lived here since 1969, so there was a lot of care put into this home and it shows! I’m really happy with my purchase, and have enjoyed spending time here and making it my own. It’s very small, it’s definitely not fancy, but it’s MINE and I bought it all by myself! I love it! I’ve been wanting to buy a home for years and it feels really good to finally cross that goal off my list!

The previous owner’s children committed the mortal sin of painting every room grey (why? why?) before putting it on the market, so I have been slowly repainting the rooms to better match the personality of the house!

2019: Studio
Studio (I know! I owe y’all a tour of this room! Don’t remind me lol)

Bathroom Update!
Bathroom (blog post here)
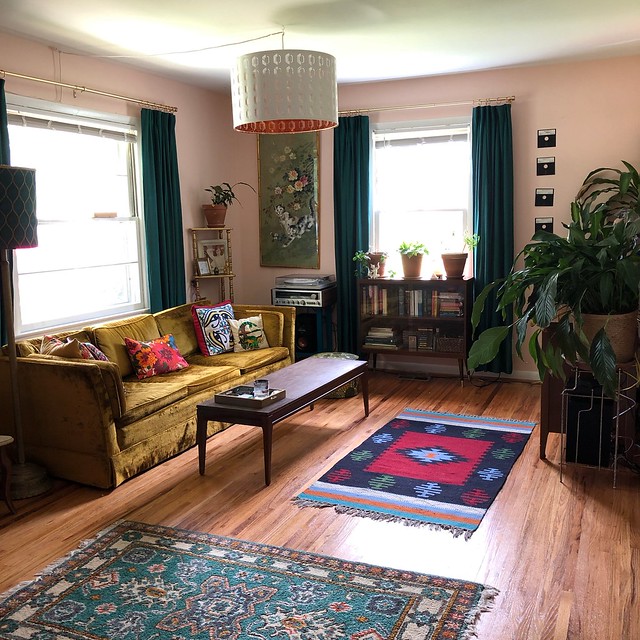
2019: Living Room
Living room

2019: Dining Room
Dining room

Also the kitchen! (not pictured – but it’s white with {unpainted} knotty pine cabinets. SWOON)

I know a lot of people have been asking me to post room re-do’s on this blog, and honestly… I can’t guarantee that will ever happen (I like to keep this space strictly sewing-related). I do post them on my Instagram so you can always follow that! Next year, I want to focus more on the outdoor space!

2019: Teaching at Blackbird Fabrics

In addition to the house stuff, I also did a lot of teaching this year! Overall, I taught 20 workshops from all over the place including New York, California, Florida, Oregon, Colorado, New Hampshire, Virginia, and Canada. All in all, I flew over 40k miles and earned Gold Medallion status with Delta lmao.

Here in Nashville, I taught lots of classes at Craft South, introducing many, many new beginners to the wonderful world of sewing! I also logged a bunch of hours of alterations and fittings with various clients, all of who were absolutely wonderful to work with and spend time around. And not just clients – I really love and appreciate everyone I work with. Stylists, photographers, assistants, reps, everyone is just awesome! Coming from an industry where I worked with some absolute asshats, it’s really nice to be able to work with people who I actually enjoy being around (and, as a freelancer – technically – I can refuse to work with anyone who I don’t like! Ha!). I also think the work is really fun, so that’s an added bonus!

Some other fun things in 2019:

2019: QuiltCon

– I attended (well, worked!) my first QuiltCon event, at the Craft South booth.

– I celebrated 10 years of being cigarette-free!

– I visited The Computer History Museum (Mountain View, CA), The Living Computer Museum (Seattle, WA), and The MADE Museum (Oakland, CA). I love old computers and video games, so people able to fit these excursions into my travels was such a treat! All are really amazing museums, but I think the Living Computer Museum might be my favorite since you can play all the machines! There’s a whole mess of images and videos from all of them in my Story Highlights on Instagram if you want to peek!

2019: 34th Birthday

– I turned 34 and celebrated with a HAMBURGER CAKE at Darrell Thomas Textiles!

2019: Leash Training Amelia

– I harness-trained Amelia! Well. “Training” is kind of a loose term here, I basically put the harness on her and she adapted to it immediately (she loves any excuse to go outside and I guess she figured out pretty quickly that this was how that would happen!). We really enjoyed going out this summer and exploring the yard. Also, walking a cat on a leash is pretty funny.

– I taught an enormous class at Camp Workroom Social – 16 students in total! Definitely could not have done it without my bomb-ass assistants Kelli & Gabriela!

2019: New sewing machine

– After years of pining for an industrial sewing machine, and realizing my tiny home studio would never fit one – I bought a Janome HD9! This machine is sooo fast and SO fun to sew on (and fits nicely in my studio!). If you’ve been interested in an industrial machine but don’t have the money/space for one, I do recommend this machine as a great alternative! I won’t be writing a review for this machine (I’ll be honest… writing machine reviews sucks, it’s boring as hell, and I don’t get paid to do it. So. I’m not doing it anymore lol), but your local Janome dealer can help you out!

2019: Perm

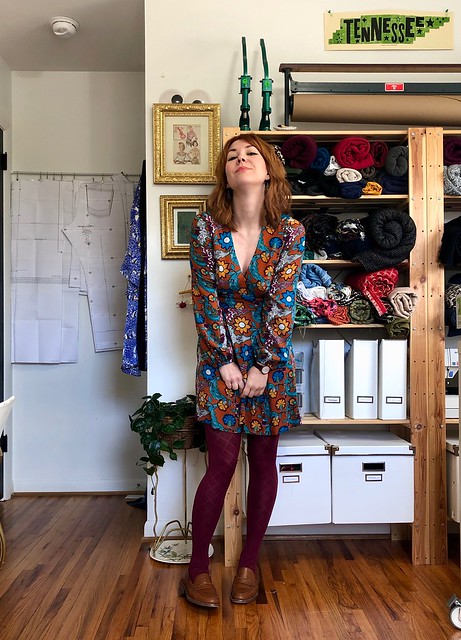
– Speaking of things I’ve pined over for years, I also got a perm! Ha! This is a body-wave perm (meaning it is looser than the traditional spiral curl), which gives my hair lots of texture and body, and allows it to hold a style without very much effort. It still requires styling when I wash it, but the style stays. This photo was taken recently; the perm is about 6 months old and I haven’t needed to touch it up yet. I love it!

– I bought the most expensive piece of fabric I’ve ever purchased (it’s Gucci, and no, I’m not telling you how much I spent on it)

– I worked on my first music video! This was especially exciting to me since most of my work is in country music, which tbh just isn’t as fun as rock music.

– This one hasn’t come into effect quite yet – but I’m leaving my job at Craft South as the Education Coordinator. I have worked this job since 2016 and while I have enjoyed my time there and the wonderful people I worked with, I felt like it was ultimately starting to hold me back and thus it is time to move on. As of January 1, 2020, I will no longer be employed by the company and will be fully freelance. Yay!

2019: Jeans butt

Personal sewing-wise, this has been slooooow year for me. Partially because I’ve been gone so much, and working just as much – partially because my needs have shifted dramatically (I know I talked about this last year but I’m really not into the maximism thing of ~owning shit in every color~ or trying something just for the sake of making something that everyone else is making) – and partially for unrelated reasons. I’ve definitely been sewing less, while trying to stay mindful about the things I am making. And I’ve been blogging even less, which is absolutely no secret. Like most former bloggers, most of my content has shifted over to my Instagram (just compare my 2019 blogged makes vs my Instagram 2019 tag). I’ll admit it is just easier to snap a quick photo with my phone, write a blurb, and post away – rather than drag out the camera equipment, deal with editing, writing an entire post (where I always feel compelled to make it at lengthy as possible), and then replying to comments – all of which require sitting at a computer. Which, I should add, computer time is something I’m constantly trying to reduce. However, I don’t want to kill my blog so I’ve come to terms with less frequent posting. It’s ok. I do want to thank y’all who continue to follow my blog – and continue to post feedback in the comments. I read every single one of them and I really appreciate the continued support!

With that being said, here are some of my favorite makes of 2019! Sorry, most are on Instagram 😛

2019: Dawn Jeans

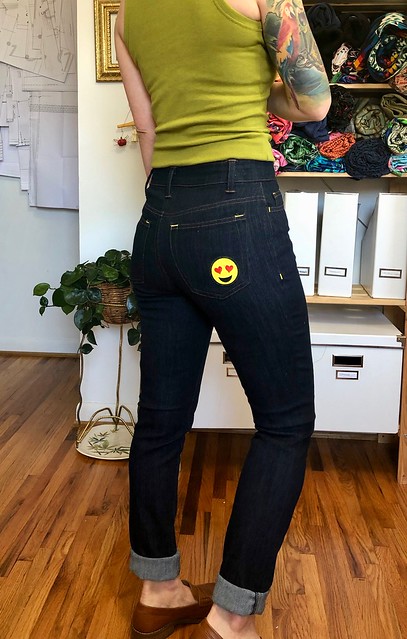
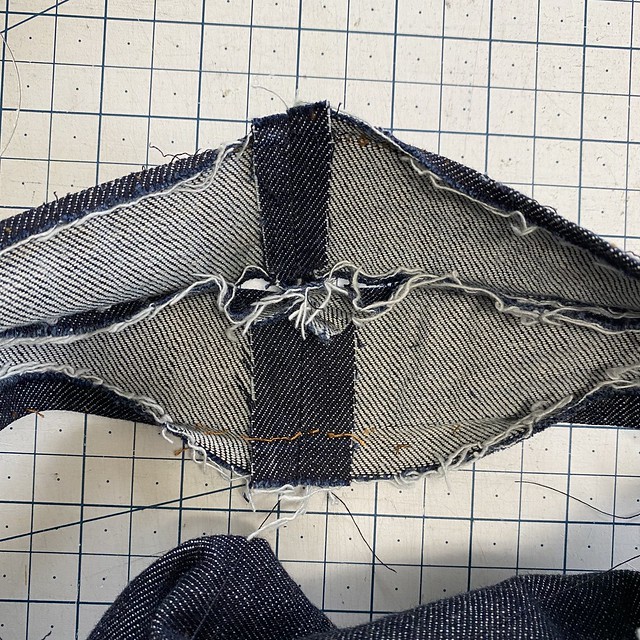
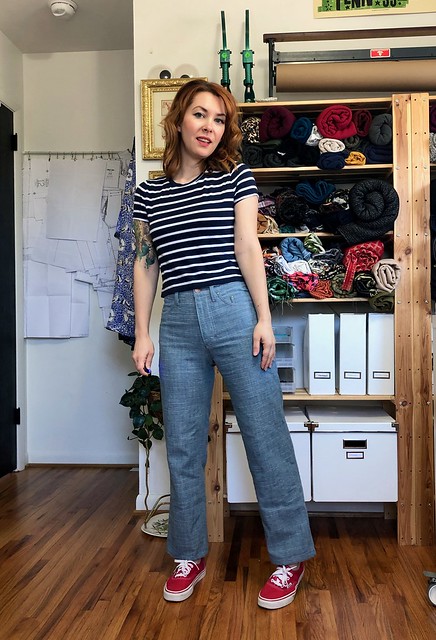
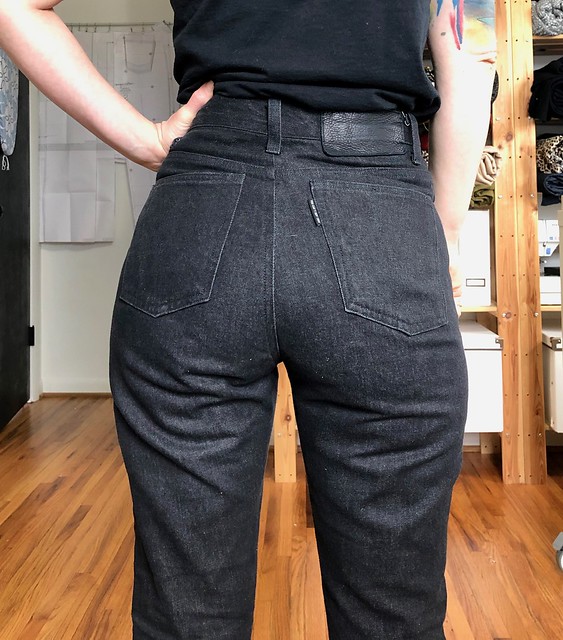
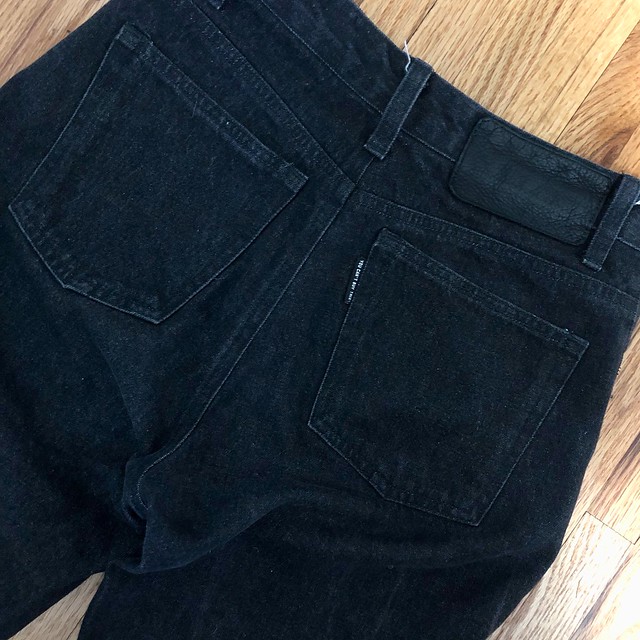
The Dawn Jeans (blog post here). This was the jeans pattern I’ve been waiting for – I love the high, high rise and the rigid, vaguely uncomfortable but so flattering to my booty nonstretch denim. I have worn this particular pair all year and even have them on as a type this! Yay for Dawn Jeans!

2019: Black shorts

Black Dawn shorts. I made these over the summer in a nice black denim and they truly go with everything! I was very sad to put them away this winter, and early anticipate reuniting with them next summer. ha!

2019: Crop Top

Dolce & Gabbana Crop Top. This was made using the StyleArc Ariana dress pattern as a cropped shirt, using leftover Dolce & Gabbana cotton lawn from my birthday dress. I really enjoyed putting this together, I think it’s cute AF, and get a load of that unintentional pattern matching at center front!

2019: Leopard Bra

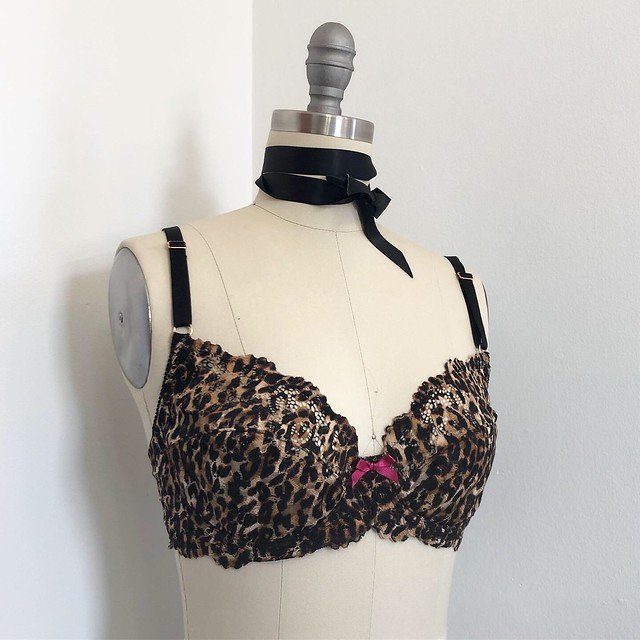
Leopard print lace bra. I used the Berkeley Bra pattern from Orange Lingerie, and leopard lace from Tailor Made Shop. I made a lot of bras this year but this one is definitely my favorite!

I also updated a couple of old makes to make them more favorable:

2019: Patched denim jacket

Minor, but I added a cool tiger patch (which I bought in the Garment District in NYC) to my beloved denim jacket.

Sequin Cat Applique

I also cropped this old hoodie dress and added a cool sequin cat patch (from the same place in the GD as the tiger patch – I actually bought them at the same time lol) to make the cat hoodie of my dreams! I’m so glad I updated because this gets way more wear than the dress ever did. It makes me so happy!

*

On a more serious note, 2019 has been a very hard year for me. A big part of the reason why I stopped sewing and blogging as much was due to struggling with depression for most of the year. I have never experienced depression before, and honestly I wasn’t sure how to even deal with it. It consumed a large part of my year and I’m only just now starting to crawl out of the hole I was in. I started seeing a therapist amongst many, many other things (including daily journaling, changing my diet, and a daily yoga practice), all which helped a lot. The real breakthrough for me was using psychedelics – including psilocybin and ayahuasca – which allowed me to break out of the awful depression loop that I was stuck in, and start actually addressing what was wrong instead of trying to hide from it or self medicate in ways that were destructive. I still have a loooong ways to go and a lot of emotions to unpack and address, but I finally feel like I’m living my life again instead of constantly fighting it.

In a lot of ways, this entire decade has been incredibly painful for me and it was a relief to say goodbye to it after my final ayahasuca journey on 12/14.

Anyway, I share this not to start up a big discussion here about psychedelics and mental health – I am, of course, always open to a chat if you are curious! (if you have something negative to say, please keep it to yourself and read a book instead, thanks) There has been a lot of scientific research on the effects of psychedelics on mental health, including depression, addiction, and even PTSD. My research is primarily limited to what I have read, and my own experiences. I did want to share what has been going on the back end – not everything is always fun and rainbows, even if it looks like that way from a carefully curated Instagram lens. If you are struggling, you are not alone! The biggest piece of advice I can give you is to GET HELP, whatever form that may be. There is no “level” you need to reach before it’s ok to ask for help, no one is going to call you out for not being “depressed enough.” I wish I’d wasted less of my year and done something sooner. You are worth the fight. Don’t give up on yourself.

2019: Amelia in the car

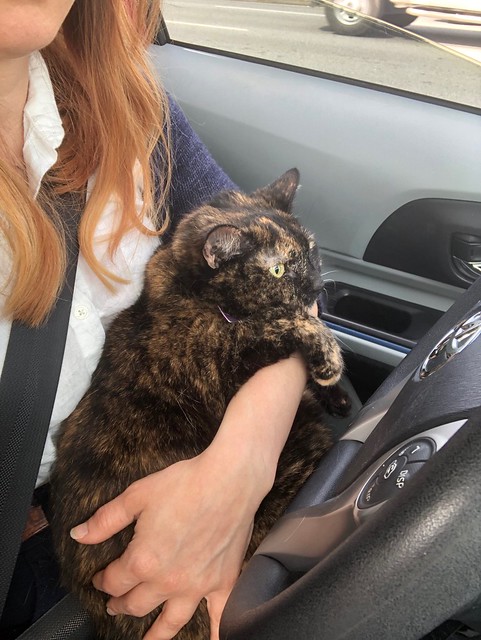
It’s interesting to think of how much has changed for me in the last 10 years. This time in 2009, I was living in a shitty (but very beautiful and old) apartment in midtown Nashville, working a soul-crushing job with people I didn’t get along with. I was in a lot of debt and always stressed about money. I was sewing back then, too (I have always been sewing) and even blogging (here’s a particularly cringe-worthy one from December 2009. Sorry in advance about the broken photos), but certainly not at the level that I am now. One thing that hasn’t changed – I still have good ol’ Amelia. The little asshole is now 12 years old!

Anyway, here’s to 2020!

Completed: Black Dawn Jeans

11 Dec

Hello everyone and welcome to my third installment of Operation-Jeans-Drawer!

Black Dawn jeans

This time, I’m sharing the Dawn jeans by Megan Nielsen. This is another great jeans pattern that, again, has some major differences from the other 2 that I previously shared. I don’t like to say that I have a “favorite” jeans pattern – since they are all so good and serve different purposes! – but right now, I gotta say, this is the one that is getting sewn the most in my studio these days. I shared the first pair I made at last year, and they still get lots of wear (they’ve truly broken in beautifully). I’ve actually made the shorts several times this summer, but this is only the second time I’m sharing the pattern here on this blog.

Black Dawn jeans

So, again, I can’t really compare these jeans to the Ginger or the Claryville since they are very different – but I’ll tell you what their key features are:
BODY TYPE: I don’t think these are necessarily designed for a specific body shape? I will say that they fit me pretty well straight out of the envelope. I did not make a muslin, just cut according to my measurements on the envelope.
FIT: These are slim-fitting, rigid jeans with a high, high waist! Like, the rise will completely cover your belly button (I love it!). If this is not your jam then this definitely is not the pattern for you lol. They aren’t a true “mom” jean – the legs and hips are a little more slim fitting than that – but they do have that suuuuper high rise. I should also add – the standard size pattern comes in sizes 0-20, and there is also a Curve range that includes sizes 14-30! Yay!
FABRIC: You want rigid denim for these! No stretch whatsoever! The good news is it means you don’t have to interface anything except maybe the fly facing (yup, I don’t interface my waistband! Not even at the button hole! Fight me!). The not as good news means that these are not gonna be the most comfy jeans you ever wear. I don’t mean to say that they are uncomfortable… I just mean, you can’t do, like, yoga in them (I can, and have, done yoga in my Ginger jeans lmao). I would not say the jeans are tight so much as they are restrictive. I hope that makes sense. Think pencil skirt vs circle skirt. I love them and I wear them all the time but I will be damned if I wear these on a 5 hour cross country flight, you know what I mean? Also, there is no law saying you can’t make these with stretch denim (def size down tho) but why? Just use a stretch pattern, save this one for those cool rigid denims, twills, and corduroys that you don’t know what to do with!

Black Dawn jeans

So, with that out of the way – here’s my newest pair! I wanted some black jeans because I made black shorts for the summer (also with the Dawn pattern) and I got a surprising amount of wear out of them. This fabric is a rigid denim from Darrell Thomas Textiles, which I bought when I was there this summer for a Jeans Workshop. When I say “rigid,” I mainly mean denim with no added stretch. A little bit of mechanical stretch is good. I have learned that I don’t like the suuuuper rigid denim that does not stretch at all; I find them hard to move in (granted, most of my moving involves a lot of squatting and crawling around the floor so maybe that doesn’t apply to you lol). Anyway, this is a nice denim and no I don’t know the weight! I felt it, it felt good, I bought 2 yards.

Black Dawn jeans

Black Dawn jeans

My only grief with this style of jean is the time that it takes to properly break in. Ugh! Like I said in my previous post, washing them a lot up front does help quite a bit. But you do still have to wear them around and get the wrinkles to soften up and have the denim mold to you body. One of these days I’ll woman up and sit in a bathtub full of warm water with the jeans on and let them dry that way. I’m not brave enough quite yet to try that tho lol. Please don’t be scared of my talk about the breaking in… it’s really not that bad, and it is ABSOLUTELY worth it. But if you make these jeans and they are super uncomfortable… that’s why! Give them some time (and WEAR THEM!) and they will soften up quite a bit.

Black Dawn jeans

Anyway, this denim wasn’t too bad as it was already pretty soft. I washed it three times before I cut it (I always do this with new denim) and that helped a lot. As you can see in these photos – it does relax out (compare these to the Dawn Jeans in my first post and you’ll see what I mean. They are the same size, those were just more fresh!). What you’re seeing is a pair of non-stretch jeans that I wore for probably a week without washing. They don’t bag out so much as they just relax. Yes, there are wrinkles under my butt but they are there to help me move. Otherwise I don’t think I’d be able to sit in these things haha.

Size-wise, I made a straight 4 but ended up letting the hips out a little. I think my hips are more in the size 6 range now, which makes sense (when I originally made these, the size 4 was fine but since then I have gained weight and also had to let my original ones out lol). I also reduced the height of the yoke by 1″ because it was too tall for me – I just ended up with a 1″ fold right in the middle when I put them on, so I cut it off the top. Finally, I also adjusted the pocket bags on this pattern. They are CRAZY deep. Like… I understand wanting deep pockets (I guess, I dunno, I don’t really use my front pockets) but with pants this tight they are absolutely fucking useless. I just cut the bottom curve off so now they are straight. Mainly it was really annoying trying to push them back into place after using the bathroom, and not being able to reach the bottom. They were THAT deep. Absolutely useless.

Black Dawn jeans

Black Dawn jeans

Black Dawn jeans

I kept these pretty simple, with black topstitching thread, black rivets and buttons (matte black from Blackbird Fabrics and I love them!), and a black leather back patch. One of the back pockets actually has a design topstitched in it (yes it’s the TCB lightning bolt, thanks for noticing) but it’s quite subtle. I am hoping that over time, as the jeans are washed and started to fade and crinkle, the design will be more noticable. We shall see! Oh, and you can’t really read the tag in the back pocket, but it says “You Can’t Buy This” Ha!

Black Dawn jeans

Black Dawn jeans

Black Dawn jeans

Forgot to say – this is the slim leg version, with the short inseam (and yes they are actually hemmed in these photos haha). This pants pattern comes with 4 different leg versions – skinny, straight, wide, and shorts – but I’ve only tried this one and the shorts. I have plans to make a pair of cropped wide-legs out of some corduroy, but we’ll see when I actually get around to it (not anytime soon now that I can’t leave the house without socks on haha).

Black Dawn jeans

Anyway, that’s it for this post, as well as for this series of “Lauren Talks About Her Favorite Jeans Patterns While She Also Revamps Her Pants Selection”! I have one more pair of jeans/pattern to share, but I need to sew them first (it’s been a busy month!). Hoping to get that accomplished before the end of the year, we’ll see!

Have you sewn jeans yet? What’s your favorite pattern?