You might have noticed a change in Dear Ned Ludd since the Mabon issue last year, there is a project underway to update Eco Defense to reflect the equipment innovations and realities of night work that have occurred in the last 20 years since it was published. With an issue or 2 delay we will be reprinting the Project here. If you want it more quickly, get a subscription to the journal. They need the support to exist, we do not. To make the old 3rd edition available we will post a electronic version soon for download, look for it as a separate post soon.
“Despite the latest edition being over 20 years old, Ecodefense: A Field Guide to Monkeywrenching is still the go-to manual for many aspiring saboteurs, so it seems only right that this useful old book get a much overdo update. In the next several issues of the Journal I will attempt to bring this venerated old classic into the modern age with corrections to the third edition. Changes I’ve made include corrections to out-of-date or inaccurate information along with tips for causing more damage with less risk to you and your comrades. [Bold and bracketed] statements are ones I’ve added, and strikethrough statements are ones that are out of date, no longer relevant, or just bad advice. Feel free to correct your third edition and share with friends.
CHAPTER 5
VEHICLES AND HEAVY
EQUIPMENT
The classic act of monkeywrenching is messing around with a bulldozer. Probably the best known technique is pouring sugar or Karo syrup in the gas tank or oil system. But this doesn’t really work! It just clogs the fuel or oil filter. There are better-and simpler-ways to “decommission” that piece of heavy equipment threatening your special place. The ‘dozer is a tool of destruction. But like David against Goliath, a little ingenuity and moxie can go a long way toward stopping a monster.
There are, of course, more incendiary ways to take out one of these behemoths. You can totally dismember one with a cutting torch. Or you can just barbecue one.
Be careful when doing this kind of “night work.” People who own expensive equipment don’t take kindly to having unauthorized maintenance done on their rigs and will encourage the police to do their best to find the culprits. (also equipment burns bright and for a long time)
With the detailed instructions and clear illustrations presented here, even “mechanical idiots” such as your good editors can accomplish nighttime maintenance on heavy equipment.
DISABLING MOTOR VEHICLES
OF ALL KINDS
All (motorcycles, cars, trucks, heavy equipment):
1. Pour sand Bleach in the crankcase – Sugar and syrup are ineffective in gasoline or diesel fuel tanks and oil reservoirs. At best, they will merely clog the filter. A handful or more of sand in the fuel tank really only accomplishes the same as sand or syrup or waterbottle or 2 of bleach in the oil is much more effective and much easier. With sand you need not carry incriminating items like sugar or a bottle of Karo syrup
2. Jam door and ignition locks with slivers of wood, a hard tough cement like “super glue,” or silicone rubber sealant.
3. Pour a gallon or more of water or brine stagnant pond water into the fuel tank.
4. Pour dirt, sand, salt, or a grinding compound (like Carborundum) into anything you please. the oil filler hole. If there is a filter (often present on heavy equipment), pour the sand, etc. down the dipstick tube and use the dipstick to ram it down. If possible, remove the outside oil filter and add the grit. (Very fine grit may go through an oil filter, though.)
Not a usable tip on 99% of shit out there anymore
5. Pour water into the oil filler hole. Amount needed depends on engine size-at least 2 quarts for a V-8. Use enough so that the oil pump will draw only water. The water should maintain “oil” pressure without lubricating at all. You can add the antifreeze from the engine or fuel from the fuel tank for a better result
-
Slash tire sidewalls.*(dangerious and can fuck you up on anything other than a car size tire, also loud as shit when the tire pops on a car!) Sidewall stabs cannot be effectively patched, whereas tread stabs can be. Actually stab 2 or 3 times in a row or in the last inch or two of the tread.and they dont patch it On some MOST tires, cutting the valve stems is an easy way to flatten them. Be careful: tires on some heavy equipment are filled with water, often with shit tons of salt of chemicals under very high pressure and it can be dangerous to slash or cut these. They are usually an inch or more of rubber, good luck getting through with your multi tool Even the Bullets ricochet off them, too! OK anyone who has done this knows all of #6 contains the loudest and least expensive group of tips ever put in ecodefense, tires are cheap, focus on other shit, we are better than slashing tires.. use road spikes
-
7. Smash fuel pump, water pump, valve cover, carburetor, distributor, or anything else except the battery (for your safety) or brake system (for their safety). Use a sledge and a steel bar for precision blows. ( or do your work in quiet and don’t let them know , smashy smashy is fun but quiet addititives are more damaging to the machine
8. Pour water and/or dirt into the air intake (usually the big hole right under the air cleaner). The more, the better. Though rocks are more effective and faster. If you just take the air filter then good old dust will act lik sand paper and fuck that engine up good! Also stealing a $50-$100 air filter isn’t really felony material.
9. Pour gasoline or other fuel into the oil reservoir. It will break down the oil and the oil filter will not remove it. Also see bleach, gas in the diesel, ect. Special note red off highway diesel is illegal to run in a semi on the highway. Adding some red dye to the fuel can get the owners in a lot of shit with the state.
10. Put battery acid or some other corrosive in the radiator. Ehh, 3 or 4 bottles of radiator stop leak or that nasty diesel exhaust fluid will cause more issues
- Put Carborundum or other small abrasive particles in the gearbox. ( works better to put it in hydraulic fluid)
- 12. Pour a box of quick rice in the radiator.(dry flake mashed potatoes too!!!
13. Use a pair of bolt cutters on anything possible (except battery cables, other live wires, and brake cables). You can also use plyers to crush the metal lines instead of cutting them so nothing spills in the water…
- Ferric chloride and some other etching compounds used in electronics have the interesting characteristic of eating away copper. If added to the water in a radiator, the radiator will fall to bits in a couple of days.
- Antifreeze eats automatic transmissions swap fluids for fun.
HEAVY EQUIPMENT
Large machines, in the form of earth moving and logging equipment and haul trucks, are the most pervasive tools of land rape. Because of their purchase and maintenance costs, they are extremely attractive targets for monkeywrenching. Downtime for repairs can exceed fifty dollars an hour, and a proper job of sabotage can idle a machine for weeks.
There are hundreds of different types and models of heavy equipment, from the classic bulldozer to the highly specialized harvesting and handling equipment found in the logging industry. Regardless of their specific use, they all have diesel engines and hydraulic systems that are the targets of the experienced monkeywrencher.
A good first step for the equipment saboteur is gaining basic familiarity with the more common types of machines. Effective teamwork can entail dispatching a friend to work on “that loader over there,” or to see if “that’s a security guard parked behind that scraper.” A common nomenclature can minimize confusion and enhance your safety and security. Study illustration 5.1, keeping in mind that the descriptive names are somewhat imprecise, due to the tremendous variety of machine types.
Dear Ned Ludd—Ecodefense Update II: Heavy Equipment
Despite the latest edition being over 20 years old, Ecodefense: A Field Guide to Monkeywrenching is still the go-to manual for many aspiring saboteurs, so it seems only right that this useful old book get a much overdo update. In the next several issues of the Journal I will attempt to bring this venerated old classic into the modern age with corrections to the third edition. Changes I’ve made include corrections to out-of-date or inaccurate information along with tips for causing more damage with less risk to you and your comrades. [Bold and bracketed] statements are ones I’ve added, and strikethrough statements are ones that are out of date, no longer relevant, or just bad advice. Feel free to correct your third edition and share with friends. Though useful on its own, this update directly follows the update from last issue of the Journal: Mabon 2016.
—Ned Ludd
HEAVY EQUIPMENT
Large machines, in the form of earth moving and logging equipment and haul trucks, are the most pervasive tools of land rape [environmental destruction (triggering language is unnecessary)]. Because of their purchase and maintenance costs, they are extremely attractive targets for monkeywrenching. Downtime for repairs can exceed fifty dollars an hour [$150-$200 an hour], and a proper job of sabotage can idle a machine for weeks.
There are hundreds of different types and models of heavy equipment, from the classic bulldozer to the highly specialized harvesting and handling equipment found in the logging industry. Regardless of their specific use, they all have diesel engines and hydraulic systems that are the targets of the experienced monkeywrencher.
A good first step for the equipment saboteur is gaining basic familiarity with the more common types of machines. Effective teamwork can entail dispatching a friend to work on “that loader over there,” or to see if “that’s a security guard parked behind that scraper.” A common nomenclature can minimize confusion and enhance your safety and security. Study illustration 5.1 [now a matching game to test your knowledge, page __], keeping in mind that the descriptive names are somewhat imprecise, due to the tremendous variety of machine types. [If it is possible for your situation, I would highly suggest going further and getting a job working on equipment. Operators can teach you how to sabotage a piece of equipment far better than any book or crusty old EF!er. If you can fix a machine you can more intelligently destroy it.]
Basic Tool Kit
Effective sabotage may require nothing more than a handful of sand on the spur of the moment. More often, it entails planning plus a basic tool kit. In illustration 5.2 you will find the basic elements with which to begin. Since most of this mechanical work will be conducted under the cover of darkness, a good flashlight for each team member and rigid discipline in the use of the light are critical. The military surplus angle-head flashlight (A) is a good buy at most surplus stores. The red lens stored in the base, when mounted over the light, can increase your security. The red light is less noticeable from a distance, and will not ruin your night vision. A cheap acrylic artist’s red paint (B) will do in a pinch, as will some red cellophane, if you can find it. As always, wipe clean of fingerprints all parts of the flashlight, including the lenses, bulbs, and batteries. [Blue and green light is less visible from a distance than red. However, rather than relying on artificial light, I prefer to work on my night vision and have found the need for lights while scouting problematic. Nowadays, headlamps can be found at Walmart and some supermarkets, though you’re much more likely to find one with blue, green, or red color filters at camping and sporting good stores like REI and Bass Pro Shop.] Do not use your flashlight indiscriminately. Cup your hand over the end, allowing only a thin sliver of light to illuminate the area on which you are working. Similarly, use your body to block the light from view. Use a lightweight cord as a lanyard, to hang the flashlight around your neck and avoid dropping and losing it.
A lightweight bag keeps your tools together (C) so that you don’t inadvertently leave them as evidence at the scene. Nylon can be noisy, so canvas (like cheap army surplus) is usually best.
Lightweight running shoes (D) allow silent movement and quick escape. Deck shoes, with their relatively smooth, pebbly soles, leave a minimum of distinctive footprints for matching with evidence at other monkeywrenching scenes. Never wear slip-on tennis shoes since they won’t stay on when you run. If the terrain requires boots, cover them with large socks (E) to obscure their distinctive waffle print. [Having tried running in sock-covered boots in my early years, I would suggest wearing a common brand over this method. When you need to switch to non-sketchy wear, the socks are a pain in the ass to remove. Payless, thrift stores, and farm supply stores are a better bet for finding throwaway shoes difficult to trace back to you.]
Your basic tool kit is shown in illustration 5.3. Cheap cloth gloves (a) can be purchased at almost any hardware or variety store. Dispose of them after a single job, or after a few jobs, depending on the frequency [and severity] of your monkeywrenching. Buy only one or two pairs at a time, and get different gloves from different stores to further confuse the trail of evidence (in case a cloth pattern imprints on a greasy surface or a few fibers snag on a sharp edge or rough surface). [Mechanic’s Nitrile gloves also work great under cloth gloves. They are thick and puncture-resistant, and will also keep grease off your hands. Burn them completely in a fire to dispose of them, and ideally take a street medic training to learn how to take them off without contaminating yourself.]
A common one-gallon plastic jug (b) is ideal for transporting abrasive material like sand to the equipment. [Because nothing says “I’m not suspicious!” like carrying a gallon of sandblasting agent through the woods at night…] The cut-away bottle makes a good shovel-like scoop if sand can be found near the equipment parking area. If, on the other hand, abrasive material must be transported in, any plastic bottle, cleaned with soap, dried, and wiped free of fingerprints will suffice. A screw-type cap is your best insurance against accidental spillage. [A thick water bottle or canteen with a wide mouth works wonders for transporting sketchier materials—but I prefer bleach over sand in the oil, anyway (see the Ecodefense update from last issue, Mabon 2016).]
Lastly, a cheap plastic funnel, available at most grocery stores (or variety, hardware, and auto parts stores) as seen in illustration (c) will allow you better access to the essential motor parts, some of which are not easily reached otherwise. [If you need to carry a long funnel in your kit, consider that you might be better served working on another part of the equipment.]
The advanced saboteur’s kit includes a can of spray lubricant (d), to wash away telltale signs of abrasive grit, and a spray handle for same (e) to improve your aim in the dark of night. [Dirt works better than WD40 for covering signs of spilled oil.] In addition, a crescent wrench (f), wrapped in black electrical tape to eliminate its shiny metallic look and to silence it from banging inside your bag, is useful for gaining access to sensitive areas like oil filters that are rarely protected by padlocks. [Most padlocks and compartments can be opened with the operators key or with basic lock-picking skills.] (Wear gloves when you apply the tape, as it makes an ideal surface for fingerprints.) Also useful for getting into diesel filter systems is a socket wrench and a selection of sockets (g) [this tip only applies to older equipment, and there is so much variation of bolt sizes that you would be carrying 25 lbs. of sockets alone] and an oil filter wrench (h) carefully wrapped with tape to prevent it from leaving telltale scratches on an oil filter housing. [I also suggest a screwdriver or screwpunch, along with diagonal wire cutters known as snips or dikes (toenail clippers will work for those truly clandestine) and a thin-edged file.]
Abrasives
We will assume that you have studied the other operational methods described in this book, and are now standing beside a large mass of slumbering steel. At this point, you can vent your frustrations and attack it in every conceivable way, cutting hydraulic hoses, pulling out electrical wires, hammering at delicate parts, slashing the operator’s seat…. At no small risk to yourself, you will probably cripple the beast for only a few days, and the repairs will go rather quickly once the parts arrive.
But if you are a serious saboteur who wants to have maximum impact, you will work in silence, and when you leave, no one will know you have been there. At least not for a day or two. When your trail has gone cold, and evidence of your presence has been destroyed or hopelessly contaminated, the engines of destruction will literally grind to a halt. Only major shop work can repair them. You will have succeeded. [Very nice advice that should be your motto.]
Experienced monkeywrenchers generally agree that the best and surest way to cripple heavy equipment is to introduce abrasives into the lubricating system. [Filtration has gotten much better since this was written, and most experienced equipment technicians agree that fluid contamination is a much larger pain in the ass, though if you can get grit in the right places it does a lot of damage too.] Illustration 5.4 shows you typical filler caps. The glove in (A) will give you an idea of their approximate size. Be aware that many filler caps have nothing to do with the lubricating system. One that does is the dipstick shown in (B). However, the narrowness of this access point limits the volume of abrasives one can introduce; and an experienced operator’s quick check of the oil level first thing each morning may reveal signs of grit on the dipstick. In (C) is a typical radiator cap, in (D) we see a filler cap on a small hydraulic reservoir, and (E) illustrates one of many styles of fuel tank cover, most noticeable for their large size.
Once you have found the oil filler cap, it is usually simple to pour in dry sand with the aid of a plastic funnel. Illustration 5.5 shows the best procedure for those machines that combine the large oil filler cap with the dipstick (a significant minority of heavy equipment) [This is now much more common on large equipment.] Unscrew and remove the cap/dipstick (a). Pour in abrasive sand (b). Apply liberal amounts of spray lubricant to wash any trace of sand down into the bowels of the engine (c). Re-insert the dipstick and pull it out again to make sure there is no revealing sand adhering to its surface. Many operators check their fluid levels first thing in the morning so you must leave no sign of your work. (Indeed, some companies now require checks of all fluid levels each day before starting equipment.)
Gaining Access
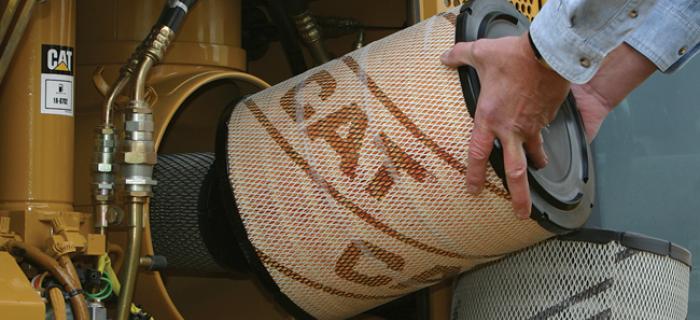
Some equipment owners whose toys are parked in vulnerable areas use padlocks to secure every cap on the machine. Many manufacturers design caps that easily accept these padlocks. This will not stop the dedicated monkeywrencher. Illustration 5.6 shows how to use a crescent wrench to gain access to the oil filter housing of a Caterpillar bulldozer. The filter element can be removed and disposed of well away from the site. In its place goes a liberal dose of abrasive. Be careful not to get any abrasive in the tube marked (B). If this becomes clogged, you will not be able to re-insert the threaded rod that secures the lid onto the filter housing. [This drop-in filter type is not found on modern equipment. The common screw-on canister filter, like a car’s oil filter but bigger, is thin metal and can easily be punctured by a screwdriver or screwpunch or hit with a rock. Hit at the upper section—this will cause a leak that will result in major damage to the engine before it is discovered.]
In 5.7 is another type of oil filter set-up. First use your socket wrench or crescent wrench to remove the small drain plugs (1). Use your open top plastic bottle to catch the oil and keep it from spilling everywhere. Next unscrew the filter case bolts (2) and the filter housing will drop into your hand. Dispose of the filter (3), pour in your abrasive (4), and re-assemble. Number (5) shows an exploded view of the parts involved.
Another filter type is the screw-on variety. These are gradually replacing the filter elements just illustrated. This type is removed with a good quality oil filter wrench found at any auto parts store. It’s as easy as changing the oil in your car. If you don’t know how to change the oil in your car, have a friend show you how. Once you learn this, you can adapt it to your heavy equipment night work. [This information is largely obsolete. Newer style screw-on filters can hold up to two liters of oil per filter. Leave them in place and follow the tips at the start of the Gaining Access section.]
Be careful to avoid too much oil spillage when removing the screw-type filter. Carry it well away from the machine before scratching out a shallow hole to receive the quart or more of oil inside the filter. Pour out the oil slowly and cover the hole to leave no trace. Fill the inside of the filter about 3/4 full of abrasive and screw it back on to the engine. [Again obsolete. Look for a future article detailing the newer style and options. The oil tube and cap style are the only things in the illustrations that are still useful.]
Oil-Access Points
Because of the large number of equipment manufacturers and the various models produced, it would be all but impossible to illustrate all of the oil-access points. The remaining illustrations provide a cross-section that will enable you to quickly learn what to look for. By all means, study whenever possible. When you walk by a piece of equipment, stop for a moment and practice spotting the oil filter cap. Keep your distance, though, so no one will suspect you of tampering. Once you have correctly identified a dozen or so filler caps, the rest come easily.
Remember that your equipment sabotage must not be noticed until the machines begin to break down. Carry a few dark colored rags to clean up any messes like accidental oil spills that may occur when removing filters. Don’t leave things spotless, however, as an extremely clean area on an otherwise greasy, dirty machine is also a giveaway. [Largely good advice! But look out for an updated filter-specific Dear Ned Ludd article in the future.]”