How To Create Content That Keeps Your Readers Coming Back

Publishing content on a regular basis is a great strategy to increase your website’s organic traffic — website visitors who didn’t get to your site by clicking on an ad. But getting those readers is only half the battle.

If you want visitors to subscribe to your newsletter, make a purchase, or engage with your content in any way, you have to keep their attention long enough for a meaningful interaction.

Here are three tips that will help you publish engaging content.

Continue reading → How To Create Content That Keeps Your Readers Coming Back

Posted in Tips & Tricks | Tagged , , , , , , , , , , | 5 Comments

Jetpack 5.3: PHP 7.1 Compatibility, Ad Placement Control, and Visual Editor Improvements

Today’s release of Jetpack 5.3 includes support for PHP 7.1, greater control over the placement of your ads, and several enhancements to the experience viewing and managing your Jetpack site with the WordPress.com visual editor.

Here’s everything you’ll find in this update.

PHP 7.1 compatibility

Sites running PHP 7.1.x with opcache enabled will no longer have any issues when managing their Jetpack site from WordPress.com.

Choose where and how you display ads

Jetpack Premium and Professional customers now have more control over the placement of the ads on their site. We’ve added new options to control where ads appear, along with the option to show multiple ads if you wish.

Visual editor improvements

When managing your Jetpack site from WordPress.com (and using the visual editor), you’ll now have the option to preview it without leaving WordPress.com.

We’ve also updated the WordPress.com Toolbar to include a link to your comments in the My Sites menu.

Various bug fixes

Finally, we’ve resolved a few smaller issues and bugs, including:

  • Addressing compatibility issues with plugins using TinyMCE.
  • Fixing Contact Form submission emails for sites hosted by SiteGround.
  • Fixing an error with the Sitemaps feature when posts or images had special characters in their titles.
  • Re-adding a filter for the Widget Visibility feature that was accidentally removed.

Full changelog and thanks

The changelog provides the full list of updates and changes in this release. If you have questions or feedback, please get in touch.

Install Jetpack on your site or upgrade your current version today and let us know what you think.

Thank you to the contributors to this release:

Andrew Munro, Artur Piszek, Ben Dwyer, Brandon Kraft, Copons, Daniel Walmsley, Derek Smart, Derek Springer, Devin Samarin, Elio Rivero, Enej Bajgoric, Eric Binnion, Filipe Varela, George Stephanis, Igor Zinovyev, Jacopo Tomasone, Jeff Bowen, Jeff Golenski, Kirk Wight, Marcin Bot, Marek Hrabe, Marko Andrijasevic, Michael Turk, Miguel Lezama, Mohammad Jangda, Nicole Kohler, Richard Muscat, Rodrigo Iloro, Ryan Kanner, Rocco Tripaldi, Shaun Andrews

Posted in Releases | Tagged , , , | 7 Comments

Take Payments Easily with Jetpack’s Simple Payment Button

No matter what you use your Jetpack-powered site for, you want it to be successful — and profitable. But making money from your site has traditionally been a challenge if you don’t have the time to set up an online store.

Well, now it’s easier to take payments for your products, services, or charity. Starting today, Jetpack Premium and Professional customers can add a Simple Payment Button to any post or page, and start taking payments with PayPal in just a few clicks.

Add a Simple Payment Button to any post or page in a few quick steps.

To add a Simple Payment Button to your site, you’ll first need to add or edit a post or page in the WordPress.com Visual Editor. Click the drop-down arrow on the left, then choose Add Payment Button.

On the new screen that appears, you’ll be asked to add details for what you’re selling, an image (if you choose to include one), price and preferred currency, and finally the email address for your PayPal account (where the money will be sent).

You can add as much or as little information as you like here — it all depends on what you’re selling.

You can also allow customers to purchase more than one of this product — for example, if you’re selling handmade goods or food. Just toggle on Allow people to buy more than one item at a time to make it happen.

When you’re finished, click Insert and the button will appear on your post or page. Don’t forget to save your changes!

Customers can use Simple Payment Buttons with a credit card, debit card, or their PayPal balance. They don’t have to have PayPal to pay you — however, you will need an account to have your payments deposited into your bank account. Sign up here to get started.

You can use Simple Payment Buttons for anything you like: to sell physical products, accept donations for a charity, or take payments for appointments online. You can also add multiple buttons to a single post or page, or use the same button in multiple locations.

To learn more about adding, customizing, or accepting payments with Simple Payment Buttons, take a look at this support article.

We look forward to seeing how you use these payment buttons to make your site more profitable. Happy selling!

Simple Payment Buttons are available to Jetpack Premium and Professional plan customers. Upgrade now to start taking payments in just a few clicks.

Posted in Features | Tagged , , , | 8 Comments

Three Ways to Keep Visitors on Your Site Longer

Every website owner, from blogger to eCommerce entrepreneur, wants visitors to engage with their site. The longer you keep a visitor around, the more invested they become in your brand — and the more likely they are to make a purchase or subscribe to your content.

That’s why it’s important to capture their attention and keep them clicking through your site past the page they landed on.

Keep them reading with relevant content

A great way to keep your readers on your site longer is to entice them with more of your own content — but in a targeted way that speaks to their interests.

When a reader is already on a post, you can show them related content below to keep them clicking and reading. To do this with your WordPress site, just activate Jetpack’s Related Posts feature.

Screen Shot 2017-08-16 at 10.46.45 PM

To start using Related Posts, visit Settings → Traffic → Related Posts and activate Related Posts.

Make your content easy to access

Keep your readers engaged by showing just how much there is to explore on your site at a glance. By featuring links to content in a sidebar or footer area, you can make it easy to access more posts and pages and keep your readers around longer.

Make use of your website’s real estate by adding lists and links to your content in your widget and menu areas. Widget areas could be your sidebar, footer, or other blocks of content built into the design of your WordPress theme.

For example, with Jetpack, you can show your most popular posts and pages right in your sidebar, along with thumbnail images.Use the Top Posts & Pages widget to promote your content with the most views.

Screen Shot 2017-08-16 at 10.44.49 PM.png

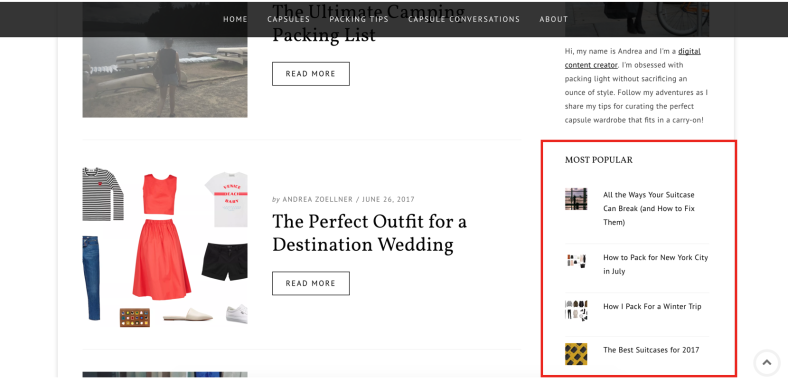
Use the Top Posts & Pages widget to promote your content with the most views. To add a widget, go to Appearance → Widgets. Then, select one of the many widget options to link to your posts and pages. You can add the Top Posts & Pages widget, the Recent Posts widget, a Categories widget, or you could generate a tag cloud to help people find content.

Highlight your content with image widgets

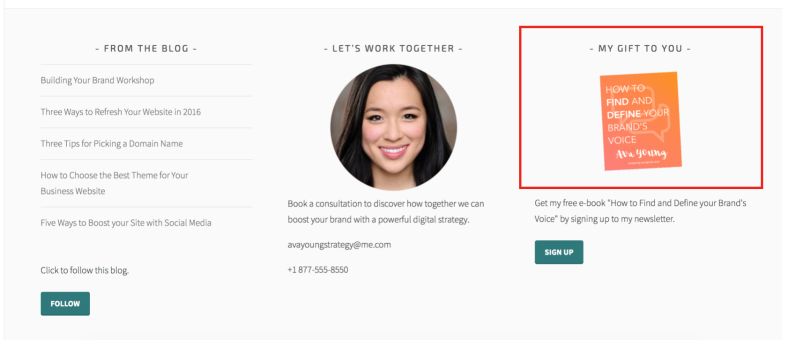
Another fun way to advertise your content is with image widgets. You can add temporary images linking to interesting posts, popular products, or to items currently on sale.

Use this feature to create your very own advertisements right on your site. The visual cues will direct a reader’s attention to the posts and products you want them to explore. This can be very useful for eCommerce sites, service providers, and websites offering special promotions.

Screen Shot 2017-08-16 at 10.51.18 PMScreen Shot 2017-08-16 at 10.50.32 PM

Communicate with clear navigation

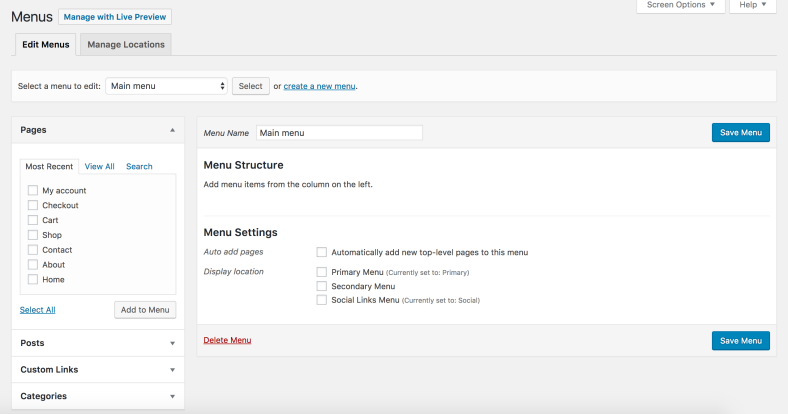
It’s important to remember that if your content isn’t linked in your menu or promoted on your homepage, your visitors won’t find it. Make sure everything is easy to access by creating custom menus in your menu or widget areas. 

These could be short menus or a single complex drop-down menu. Either way, the goal is to make it easy for your visitors to navigate your site with a thoughtful menu structure. When your content is categorized and put on display, it becomes much more pleasant and intuitive to explore your site.

Learn how to create and customize your menus here.

Screen Shot 2017-07-28 at 1.35.13 PM

Use these tips to keep your visitors engaged

Whether you run a personal website or a large eCommerce marketplace, you don’t just want traffic: you want your readers to engage with your website in a meaningful way. That’s why it’s important to reward them with relevant content that delivers on their expectations and adds value to their lives.

The more readers enjoy being on your site, the longer they’ll stay — and the more likely they will become a subscriber or customer. The best way to build your following is to use Jetpack’s Related Posts, Top Posts & Pages widget, and custom menus to make it easier for them to engage.

What about you? What tips do you have to keep visitors on your site for longer? Share them with us in the comments.

Posted in Tips & Tricks | Tagged , , , , , , , , , , , , , | 4 Comments

Why Every Site Should Have Backups

Every single site is different: different designs, different content, different objectives and goals. But there’s one thing that is true for all of them: they need to be online! Whatever your site’s goals, you’ll only meet them if your website is accessible and running smoothly.

Almost every day, we hear from customers who use our backup service because they’ve experienced an outage in the past. They don’t want to repeat the experience of scrambling to rebuild their site again from bits and pieces of old backups, internet archives, and memory.

In hindsight, everyone says that what they should have done is invest in a backup service right away — because every site, no matter its size, design, or goals, needs to be backed up.

Continue reading → Why Every Site Should Have Backups

Posted in Tips & Tricks | Tagged , , | 1 Comment

Jetpack 5.2.1: Fixing Widgets Bug

Yesterday Jetpack 5.2 was released which unfortunately introduced a bug that prevented content in new widgets from being saved. The issue did not affect existing widgets, only newly created ones.

Thanks to prompt reports from our users we’ve released an update (5.2.1) which fixes the issue.

We apologize for the inconvenience and recommend you update now.

Thank you to the contributors to this release: Rocco Tripaldi, Miguel Lezama, Derek Smart, and Elio Rivero.

Pro Tip: Personal plan customers benefit from priority support and faster assistance.

Posted in Releases | Tagged , | 11 Comments

Jetpack 5.2: New Contact Form Experience

Jetpack 5.2 brings you a brand new contact form experience, a better explanation of our recommended features, and several performance improvements.

New Contact Form

Jetpack’s Contact Form for WordPress is one of our most popular free features. And with good reason: it’s the simplest and most effective way of enabling your readers to get in touch with you be it for praise, complaints, requests, or suggestions.

And now we’ve made it much simpler and faster to use.

screen shot of the new jetpack contact form

The new Jetpack contact form is now easier to use.

The next time you add a contact form to a page on your site you will see a new visual interface right inside the editor instead of a popup. Enjoy a full editing experience including adding and customizing fields and labels, re-ordering them by dragging, and easily setting email subject lines and recipients.

To edit, simply click on the form itself, and hit the “edit” icon. You can edit or remove the existing fields, or add new ones by going to the bottom of the form and clicking “add field.”

screen shot of new jetpack contact form

Click on the contact form and then the “Edit” icon in order to add new, change the order of, or delete fields in your form.

Simply drag and drop your fields to organize their order the way you want them. Click “Update Form” at the bottom when you’re done to save your changes.

screen shot of new jetpack contact form

Click “Add Field” at the bottom of your new contact form to add new fields. Click “Update Form” to save your changes.

Recommended Features

When you install Jetpack on a new site, we recommend activating certain popular features that are most valued by our users.

We’ve now improved this experience to better showcase and explain what the features and how they benefit your WordPress site.

Performance Improvements

We’ve also streamlined and reduced weight (file size) of the plugin as well as fixed bugs and introduced enhancements for stability. All these are under the hood ensuring a smoother Jetpack functioning with each version.

Full Changelog and Thanks

The changelog provides the full list of updates and changes in this release and if you have feedback please get in touch as always.

Install Jetpack on your site or upgrade your current version today and let us know what you think.

Thank you to the contributors to this release:

Alexandru Bucur, Anthony, Artur Piszek, Ben Lowery, Brandon Kraft, Daniel Walmsley, Derek Smart, Donncha Ó Caoimh, Drew Butler, Elio Rivero, Eric Binnion, Filipe Varela, George Stephanis, Igor Zinovyev, Marko Andrijasevic, Michael Arestad, Michael Turk, Miguel Lezama, Mohammad Jangda, Payton Swick, Richard Muscat, Rob Landers, Stephen Edgar, Thomas Guillot

Pro Tip: Personal plan customers benefit from priority support and faster assistance.

Posted in Releases | Tagged , , | 9 Comments

Introducing Unlimited Premium Themes (and a 50% introductory discount)

We’re very pleased to announce that you now have access to over 200 Premium WordPress themes as part of Jetpack Professional. We’re also offering a 50% introductory discount using coupon code “PRO” if you want to get straight to the good stuff.

featured-image-themes

Why Go Pro?

Jetpack Professional is now our most complete offering giving you everything you need to design, secure, grow, and manage your WordPress site from start to finish.

  • Professional Design
    Access to 200 premium themes is really just the start. All our themes are fully compatible with Jetpack’s powerful customization tools and you get unlimited use of our high-speed image and video CDNs.
  • Business Class Security
    Everything a truly professional site needs: real-time backups of your entire site with unlimited storage and history; automated and on-demand malware scanning with automatic threat resolution; one-click site restores and migrations; and industry standard spam filtering.
  • Marketing Automation
    Automatically publish and schedule social media posts, Google Analytics integration, SEO preview and editing tools, ad program pre-approval, automatic sitemap generation, and content indexing for related posts.
  • Priority Expert Support
    You get faster resolution to your support enquires from our global team of WordPress experts and direct support from the theme developers.

Watch and Share the Intro Video


Unlimited Premium Themes are available to Jetpack Professional plan customers. Upgrade now to give it a try. Use coupon code “PRO” to get half off.

Posted in Releases | Tagged , , | 17 Comments

5 Minutes to Better WordPress SEO with Jetpack

Bringing traffic to your website isn’t as easy as waiting around for the right people to show up. To get them to come to you, you need to make sure your site shows up in the places they’re looking — like search engines.

Search engine optimization (SEO) is a technical term for tactics that you can use to attract more readers, clients, or customers from search engines. SEO is usually thought of as a complicated, time-consuming series of tasks, but with the right tools it’s well within your reach.

With Jetpack, you can optimize your WordPress site for search engines… and do it in less time than it takes to brew a cup of coffee. Here’s how.

Continue reading → 5 Minutes to Better WordPress SEO with Jetpack

Posted in Tips & Tricks | Tagged , , , , | 5 Comments

Social Media Scheduling is Here

Once you’ve created your latest piece of content, you naturally want to let the world know about it. But up until now, sharing your content on social media was a manual process, and one that ate up a lot of time you could have spent doing other things.

We wanted to make it easier for Jetpack users to share the great content they’ve been creating. That’s why we’re excited to add social media scheduling to Publicize, exclusively for our Premium and Professional plan customers.

With this new feature, you can choose specific times to share your content on your favorite social media networks, like Twitter, Facebook, and LinkedIn. You can schedule one or many shares in advance, and Jetpack will take care of the rest, publishing your custom messages at the times you specify.

Up until now, Jetpack’s Publicize feature would allow you to share content manually. But now you can:

  • Plan all your social shares in advance to save valuable time.
  • Re-share previously published posts so newer followers get exposure to them.
  • Preview each share before it’s scheduled to be sure you’re happy with the content.
  • View all previous shares of your content.

If you’re already a Jetpack Premium or Professional plan customer, you can try this new feature now. Look for the Share button under any single Post:

share-tab-open

When you click Share, you can either share a post immediately or use the calendar tool to choose a time in the future that your content will be posted, tweeted, or shared on the network of your choice.

The social media accounts that you have connected to Jetpack will be displayed on the right side. You can choose which accounts to share to by clicking the toggles on and off (or, if you need to add a new account, clicking the icon in the top right).

share-calendar-open

To make sure you get the best results, click the Preview button to view what your content will look like when it’s shared. If you don’t like what you see, just keep on customizing until you’re happy with the results.

We hope you enjoy this new addition to Publicize — give it a try and let us know what feedback you have in the comments!

Publicize Scheduling is available to Jetpack Premium and Professional plan customers. Upgrade now to give it a try.

Posted in Releases | Tagged , , , | 11 Comments

Say Hello to 200 Themes

Jetpack Professional now bundles 200+ Premium WordPress themes,
alongside business class security tools, and marketing automation.

Use code "PRO" at checkout for 50% introductory discount.