AWS Compute Blog
Deep Learning on AWS Batch
Thanks to my colleague Kiuk Chung for this great post on Deep Learning using AWS Batch.
—-
GPU instances naturally pair with deep learning as neural network algorithms can take advantage of their massive parallel processing power. AWS provides GPU instance families, such as g2 and p2, which allow customers to run scalable GPU workloads. You can leverage such scalability efficiently with AWS Batch.
AWS Batch manages the underlying compute resources on-your behalf, allowing you to focus on modeling tasks without the overhead of resource management. Compute environments (that is, clusters) in AWS Batch are pools of instances in your account, which AWS Batch dynamically scales up and down, provisioning and terminating instances with respect to the numbers of jobs. This minimizes idle instances, which in turn optimizes cost.
Moreover, AWS Batch ensures that submitted jobs are scheduled and placed onto the appropriate instance, hence managing the lifecycle of the jobs. With the addition of customer-provided AMIs, AWS Batch users can now take advantage of this elasticity and convenience for jobs that require GPU.
This post illustrates how you can run GPU-based deep learning workloads on AWS Batch. I walk you through an example of training a convolutional neural network (the LeNet architecture), using Apache MXNet to recognize handwritten digits using the MNIST dataset.
Running an MXNet job in AWS Batch
Apache MXNet is a full-featured, flexibly programmable, and highly scalable deep learning framework that supports state-of-the-art deep models, including convolutional neural networks (CNNs) and long short-term memory networks (LSTMs).
There are three steps to running an AWS Batch job:
- Create a custom AMI
- Create AWS Batch entities
- Submit a training job
Create a custom AMI
Start by creating an AMI that includes the NVIDIA driver and the Amazon ECS agent. In AWS Batch, instances can be launched with the specific AMI of your choice by specifying imageId when you create your compute environment. Because you are running a job that requires GPU, you need an AMI that has the NVIDIA driver installed.
Choose Launch Stack to launch the CloudFormation template in us-east-1 in your account: ![]()
As shown below, take note of the AMI value in the Outputs tab of the CloudFormation stack. You use this as the imageId value when creating the compute environment in the next section.

Alternatively, you may follow the AWS Batch documentation to create a GPU-enabled AMI.
Create AWS Batch resources
After you have built the AMI, create the following resources:
A compute environment, is a collection of instances (compute resources) of the same or different instance types. In this case, you create a managed compute environment in which the instances are of type p2.xlarge. For imageId, specify the AMI you built in the previous section.
Then, create a job queue. In AWS Batch, jobs are submitted to a job queue that are associated to an ordered list of compute environments. After a lower order compute environment is filled, jobs spill over to the next compute environment. For this example, you associate a single compute environment to the job queue.
Finally, create a job definition, which is a template for a job specification. For those familiar with Amazon ECS, this is analogous to task definitions. You mount the directory containing the NVIDIA driver on the host to /usr/local/nvidia on the container. You also need to set the privileged flag on the container properties.
The following code creates the aforementioned resources in AWS Batch. For more information, see the AWS Batch User Guide.
git clone https://github.com/awslabs/aws-batch-helpers
cd aws-batch-helpers/gpu-example

python create-batch-entities.py\
 --subnets <subnet1,subnet2,…>\
 --security-groups <sg1,sg2,…>\
 --key-pair <ec2-key-pair>\
 --instance-role <instance-role>\
 --image-id <custom-AMI-image-id>\
 --service-role <service-role-arn>
Submit a training job
Now you submit a job that trains a convolutional neural network model for handwritten digit recognition. Much like Amazon ECS tasks, jobs in AWS Batch are run as commands in a Docker container. To use MXNet as your deep learning library, you need a Docker image containing MXNet. For this example, use mxnet/python:gpu.
The submit-job.py script submits the job, and tails the output from CloudWatch Logs.
# cd aws-batch-helpers/gpu-example
python submit-job.py --wait
You should see an output that looks like the following:
Submitted job [train_imagenet - e1bccebc-76d9-4cd1-885b-667ef93eb1f5] to the job queue [gpu_queue]
Job [train_imagenet - e1bccebc-76d9-4cd1-885b-667ef93eb1f5] is RUNNING.
Output [train_imagenet/e1bccebc-76d9-4cd1-885b-667ef93eb1f5/12030dd3-0734-42bf-a3d1-d99118b401eb]:
 ================================================================================

[2017-04-25T19:02:57.076Z] INFO:root:Epoch[0] Batch [100]	Speed: 15554.63 samples/sec Train-accuracy=0.861077
[2017-04-25T19:02:57.428Z] INFO:root:Epoch[0] Batch [200]	Speed: 18224.89 samples/sec Train-accuracy=0.954688
[2017-04-25T19:02:57.755Z] INFO:root:Epoch[0] Batch [300]	Speed: 19551.42 samples/sec Train-accuracy=0.965313
[2017-04-25T19:02:58.080Z] INFO:root:Epoch[0] Batch [400]	Speed: 19697.65 samples/sec Train-accuracy=0.969531
[2017-04-25T19:02:58.405Z] INFO:root:Epoch[0] Batch [500]	Speed: 19705.82 samples/sec Train-accuracy=0.968281
[2017-04-25T19:02:58.734Z] INFO:root:Epoch[0] Batch [600]	Speed: 19486.54 samples/sec Train-accuracy=0.971719
[2017-04-25T19:02:59.058Z] INFO:root:Epoch[0] Batch [700]	Speed: 19735.59 samples/sec Train-accuracy=0.973281
[2017-04-25T19:02:59.384Z] INFO:root:Epoch[0] Batch [800]	Speed: 19631.17 samples/sec Train-accuracy=0.976562
[2017-04-25T19:02:59.713Z] INFO:root:Epoch[0] Batch [900]	Speed: 19490.74 samples/sec Train-accuracy=0.979062
[2017-04-25T19:02:59.834Z] INFO:root:Epoch[0] Train-accuracy=0.976774
[2017-04-25T19:02:59.834Z] INFO:root:Epoch[0] Time cost=3.190
[2017-04-25T19:02:59.850Z] INFO:root:Saved checkpoint to "/mnt/model/mnist-0001.params"
[2017-04-25T19:03:00.079Z] INFO:root:Epoch[0] Validation-accuracy=0.969148

================================================================================
Job [train_imagenet - e1bccebc-76d9-4cd1-885b-667ef93eb1f5] SUCCEEDED
In reality, you may want to modify the job command to save the trained model artifact to Amazon S3 so that subsequent prediction jobs can generate predictions against the model. For information about how to reference objects in Amazon S3 in your jobs, see the Creating a Simple “Fetch & Run” AWS Batch Job post.
Conclusion
In this post, I walked you through an example of running a GPU-enabled job in AWS Batch, using MXNet as the deep learning library. AWS Batch exposes primitives to allow you to focus on implementing the most efficient algorithm for your workload. It enables you to manage the lifecycle of submitted jobs and dynamically adapt the infrastructure requirements of your jobs within the specified bounds. It’s easy to take advantage of the horizontal scalability of compute instances provided by AWS in a cost-efficient manner.
MXNet, on the other hand, provides a rich set of highly optimized and scalable building blocks to start implementing your own deep learning algorithms. Together, you can not only solve problems requiring large neural network models, but also cut down on iteration time by harnessing the seemingly unlimited compute resources in Amazon EC2.
With AWS Batch managing the resources on your behalf, you can easily implement workloads such as hyper-parameter optimization to fan out tens or even hundreds of searches in parallel to find the best set of model parameters for your problem space. Moreover, because your jobs are run inside Docker containers, you may choose the tools and libraries that best fit your needs, build a Docker image, and submit your jobs using the image of your choice.
We encourage you to try it yourself and let us know what you think!
ServerlessConf and More!
ServerlessConf Austin
ServerlessConf Austin is just around the corner! April 26-28th come join us in Austin at the Zach Topfer Theater. Our very own Tim Wagner, Chris Munns and Randall Hunt will be giving some great talks.
Serverlessconf is a community led conference focused on sharing experiences building applications using serverless architectures. Serverless architectures enable developers to express their creativity and focus on user needs instead of spending time managing infrastructure and servers.
Tim Wagner, GM Serverless Applications, will be giving a keynote on Friday the 28th, do not miss this!!!
Chris Munns, Sr. Developer Advocate, will be giving an excellent talk on CI/CD for Serverless Applications.
Check out the full agenda here!
AWS Serverless Updates and More!
Incase you’ve missed out lately on some of our new content such as our new YouTube series “Coding with Sam”, or our new Serverless Special AWS Podcast Series, check them out!
- Coding with Sam Episode 1: How to Do Continuous Integration and Continuous Deployment with AWS Lambda and AWS CodePipeline
- Serverless Podcast Special Episode #1 (Serverless Architectures): AWS Podcast #171
- Serverless Podcast Special Episode #2 (Serverless Security): AWS Podcast #178
Meet SAM!
We’ve recently come out with a new branding for AWS SAM (Serverless Application Model), so please join me in welcoming SAM the Squirrel!
The goal of AWS SAM is to define a standard application model for serverless applications.

Once again, don’t hesitate to reach out if you have questions, comments, or general feedback.
Thanks,
@listonb
How to remove boilerplate validation logic in your REST APIs with Amazon API Gateway request validation

Ryan Green, Software Development Engineer
Does your API suffer from code bloat or wasted developer time due to implementation of simple input validation rules? One of the necessary but least exciting aspects of building a robust REST API involves implementing basic validation of input data to your API. In addition to increasing the size of the code base, validation logic may require taking on extra dependencies and requires diligence in ensuring the API implementation doesn’t get out of sync with API request/response models and SDKs.
Amazon API Gateway recently announced the release of request validators, a simple but powerful new feature that should help to liberate API developers from the undifferentiated effort of implementing basic request validation in their API backends.
This feature leverages API Gateway models to enable the validation of request payloads against the specified schema, including validation rules as defined in the JSON-Schema Validation specification. Request validators also support basic validation of required HTTP request parameters in the URI, query string, and headers.
When a validation failure occurs, API Gateway fails the API request with an HTTP 400 error, skips the request to the backend integration, and publishes detailed error results in Amazon CloudWatch Logs.
In this post, I show two examples using request validators, validating the request body and the request parameters.
Example: Validating the request body
For this example, you build a simple API for a simulated stock trading system. This API has a resource, "/orders", that represents stock purchase orders. An HTTP POST to this resource allows the client to initiate one or more orders.
A sample request might look like this:
POST /orders
[
  {
    "account-id": "abcdef123456",
    "type": "STOCK",
    "symbol": "AMZN",
    "shares": 100,
    "details": {
      "limit": 1000
    }
  },
  {
    "account-id": "zyxwvut987654",
    "type": "STOCK",
    "symbol": "BA",
    "shares": 250,
    "details": {
      "limit": 200
    }
  }
]
The JSON-Schema for this request body might look something like this:
{
  "$schema": "http://json-schema.org/draft-04/schema#",
  "title": "Create Orders Schema",
  "type": "array",
  "minItems": 1,
  "items": {
    "type": "object",
    "required": [
      "account-id",
      "type",
      "symbol",
      "shares",
      "details"
    ],
    "properties": {
      "account_id": {
        "type": "string",
        "pattern": "[A-Za-z]{6}[0-9]{6}"
      },
      "type": {
        "type": "string",
        "enum": [
          "STOCK",
          "BOND",
          "CASH"
        ]
      },
      "symbol": {
        "type": "string",
        "minLength": 1,
        "maxLength": 4
      },
      "shares": {
        "type": "number",
        "minimum": 1,
        "maximum": 1000
      },
      "details": {
        "type": "object",
        "required": [
          "limit"
        ],
        "properties": {
          "limit": {
            "type": "number"
          }
        }
      }
    }
  }
}
This schema defines the "shape" of the request model but also defines several constraints on the various properties. Here are the validation rules for this schema:
- The root array must have at least 1 item
- All properties are required
- Account ID must match the regular expression format "[A-Za-z]{6}[0-9]{6}"
- Type must be one of STOCK, BOND, or CASH
- Symbol must be a string between 1 and 4 characters
- Shares must be a number between 1 and 1000
I’m sure you can imagine how this would look in your validation library of choice, or at worst, in a hand-coded implementation.
Now, try this out with API Gateway request validators. The Swagger definition below defines the REST API, models, and request validators. Its two operations define simple mock integrations to simulate behavior of the stock trading API.
Note the request validator definitions under the "x-amazon-apigateway-request-validators" extension, and the references to these validators defined on the operation and on the API.
{
  "swagger": "2.0",
  "info": {
    "title": "API Gateway - Request Validation Demo - rpgreen@amazon.com"
  },
  "schemes": [
    "https"
  ],
  "produces": [
    "application/json"
  ],
  "x-amazon-apigateway-request-validators" : {
    "full" : {
      "validateRequestBody" : true,
      "validateRequestParameters" : true
    },
    "body-only" : {
      "validateRequestBody" : true,
      "validateRequestParameters" : false
    }
  },
  "x-amazon-apigateway-request-validator" : "full",
  "paths": {
    "/orders": {
      "post": {
        "x-amazon-apigateway-request-validator": "body-only",
        "parameters": [
          {
            "in": "body",
            "name": "CreateOrders",
            "required": true,
            "schema": {
              "$ref": "#/definitions/CreateOrders"
            }
          }
        ],
        "responses": {
          "200": {
            "schema": {
              "$ref": "#/definitions/Message"
            }
          },
          "400" : {
            "schema": {
              "$ref": "#/definitions/Message"
            }
          }
        },
        "x-amazon-apigateway-integration": {
          "responses": {
            "default": {
              "statusCode": "200",
              "responseTemplates": {
                "application/json": "{\"message\" : \"Orders successfully created\"}"
              }
            }
          },
          "requestTemplates": {
            "application/json": "{\"statusCode\": 200}"
          },
          "passthroughBehavior": "never",
          "type": "mock"
        }
      },
      "get": {
        "parameters": [
          {
            "in": "header",
            "name": "Account-Id",
            "required": true
          },
          {
            "in": "query",
            "name": "type",
            "required": false
          }
        ],
        "responses": {
          "200" : {
            "schema": {
              "$ref": "#/definitions/Orders"
            }
          },
          "400" : {
            "schema": {
              "$ref": "#/definitions/Message"
            }
          }
        },
        "x-amazon-apigateway-integration": {
          "responses": {
            "default": {
              "statusCode": "200",
              "responseTemplates": {
                "application/json": "[{\"order-id\" : \"qrx987\",\n   \"type\" : \"STOCK\",\n   \"symbol\" : \"AMZN\",\n   \"shares\" : 100,\n   \"time\" : \"1488217405\",\n   \"state\" : \"COMPLETED\"\n},\n{\n   \"order-id\" : \"foo123\",\n   \"type\" : \"STOCK\",\n   \"symbol\" : \"BA\",\n   \"shares\" : 100,\n   \"time\" : \"1488213043\",\n   \"state\" : \"COMPLETED\"\n}\n]"
              }
            }
          },
          "requestTemplates": {
            "application/json": "{\"statusCode\": 200}"
          },
          "passthroughBehavior": "never",
          "type": "mock"
        }
      }
    }
  },
  "definitions": {
    "CreateOrders": {
      "$schema": "http://json-schema.org/draft-04/schema#",
      "title": "Create Orders Schema",
      "type": "array",
      "minItems" : 1,
      "items": {
        "type": "object",
        "$ref" : "#/definitions/Order"
      }
    },
    "Orders" : {
      "type": "array",
      "$schema": "http://json-schema.org/draft-04/schema#",
      "title": "Get Orders Schema",
      "items": {
        "type": "object",
        "properties": {
          "order_id": { "type": "string" },
          "time" : { "type": "string" },
          "state" : {
            "type": "string",
            "enum": [
              "PENDING",
              "COMPLETED"
            ]
          },
          "order" : {
            "$ref" : "#/definitions/Order"
          }
        }
      }
    },
    "Order" : {
      "type": "object",
      "$schema": "http://json-schema.org/draft-04/schema#",
      "title": "Schema for a single Order",
      "required": [
        "account-id",
        "type",
        "symbol",
        "shares",
        "details"
      ],
      "properties" : {
        "account-id": {
          "type": "string",
          "pattern": "[A-Za-z]{6}[0-9]{6}"
        },
        "type": {
          "type" : "string",
          "enum" : [
            "STOCK",
            "BOND",
            "CASH"]
        },
        "symbol" : {
          "type": "string",
          "minLength": 1,
          "maxLength": 4
        },
        "shares": {
          "type": "number",
          "minimum": 1,
          "maximum": 1000
        },
        "details": {
          "type": "object",
          "required": [
            "limit"
          ],
          "properties": {
            "limit": {
              "type": "number"
            }
          }
        }
      }
    },
    "Message": {
      "type": "object",
      "properties": {
        "message" : {
          "type" : "string"
        }
      }
    }
  }
}
To create the demo API, run the following commands (requires the AWS CLI):
git clone https://github.com/rpgreen/apigateway-validation-demo.git
cd apigateway-validation-demo
aws apigateway import-rest-api --body "file://validation-swagger.json" --region us-east-1
export API_ID=[API ID from last step]
aws apigateway create-deployment --rest-api-id $API_ID --stage-name test --region us-east-1
Make some requests to this API. Here’s the happy path with valid request body:
curl -v -H "Content-Type: application/json" -X POST -d ' [
   {
      "account-id":"abcdef123456",
      "type":"STOCK",
      "symbol":"AMZN",
      "shares":100,
      "details":{
         "limit":1000
      }
   }
]' https://$API_ID.execute-api.us-east-1.amazonaws.com/test/orders
Response:
HTTP/1.1 200 OK
{"message" : "Orders successfully created"}Put the request validator to the test. Notice the errors in the payload:
curl -v -H "Content-Type: application/json" -X POST -d '[
  {
    "account-id": "abcdef123456",
    "type": "foobar",
    "symbol": "thisstringistoolong",
    "shares": 999999,
    "details": {
       "limit": 1000
    }
  }
]' https://$API_ID.execute-api.us-east-1.amazonaws.com/test/orders
Response:
HTTP/1.1 400 Bad Request
{"message": "Invalid request body"}When you inspect the CloudWatch Logs entries for this API, you see the detailed error messages for this payload. Run the following command:
pip install apilogs

apilogs get --api-id $API_ID --stage test --watch --region us-east-1`
The CloudWatch Logs entry for this request reveals the specific validation errors:
"Request body does not match model schema for content type application/json: [numeric instance is greater than the required maximum (maximum: 1000, found: 999999), string "thisstringistoolong" is too long (length: 19, maximum allowed: 4), instance value ("foobar") not found in enum (possible values: ["STOCK","BOND","CASH"])]"
Note on Content-Type:
Request body validation is performed according to the configured request Model which is selected by the value of the request 'Content-Type' header. In order to enforce validation and restrict requests to explicitly-defined content types, it's a good idea to use strict request passthrough behavior ('"passthroughBehavior": "never"'), so that unsupported content types fail with 415 "Unsupported Media Type" response.
Example: Validating the request parameters
For the next example, add a GET method to the /orders resource that returns the list of purchase orders. This method has an optional query string parameter (type) and a required header parameter (Account-Id).
The request validator configured for the GET method is set to validate incoming request parameters. This performs basic validation on the required parameters, ensuring that the request parameters are present and non-blank.
Here are some example requests.
Happy path:
curl -v -H "Account-Id: abcdef123456" "https://$API_ID.execute-api.us-east-1.amazonaws.com/test/orders?type=STOCK"Response:
HTTP/1.1 200 OK
[{"order-id" : "qrx987",
   "type" : "STOCK",
   "symbol" : "AMZN",
   "shares" : 100,
   "time" : "1488217405",
   "state" : "COMPLETED"
},
{
   "order-id" : "foo123",
   "type" : "STOCK",
   "symbol" : "BA",
   "shares" : 100,
   "time" : "1488213043",
   "state" : "COMPLETED"
}]
Omitting optional type parameter:
curl -v -H "Account-Id: abcdef123456" "https://$API_ID.execute-api.us-east-1.amazonaws.com/test/orders"Response:
HTTP/1.1 200 OK
[{"order-id" : "qrx987",
   "type" : "STOCK",
   "symbol" : "AMZN",
   "shares" : 100,
   "time" : "1488217405",
   "state" : "COMPLETED"
},
{
   "order-id" : "foo123",
   "type" : "STOCK",
   "symbol" : "BA",
   "shares" : 100,
   "time" : "1488213043",
   "state" : "COMPLETED"
}]
Omitting required Account-Id parameter:
curl -v "https://$API_ID.execute-api.us-east-1.amazonaws.com/test/orders?type=STOCK"Response:
HTTP/1.1 400 Bad Request
{"message": "Missing required request parameters: [Account-Id]"}Conclusion
Request validators should help API developers to build better APIs by allowing them to remove boilerplate validation logic from backend implementations and focus on actual business logic and deep validation. This should further reduce the size of the API codebase and also help to ensure that API models and validation logic are kept in sync.
Please forward any questions or feedback to the API Gateway team through AWS Support or on the AWS Forums.
Scaling Your Desktop Application Streams with Amazon AppStream 2.0

Deepak Sury, Principal Product Manager – Amazon AppStream 2.0
Want to stream desktop applications to a web browser, without rewriting them? Amazon AppStream 2.0 is a fully managed, secure, application streaming service. An easy way to learn what the service does is to try out the end-user experience, at no cost.
In this post, I describe how you can scale your AppStream 2.0 environment, and achieve some cost optimizations. I also add some setup and monitoring tips.
AppStream 2.0 workflow
You import your applications into AppStream 2.0 using an image builder. The image builder allows you to connect to a desktop experience from within the AWS Management Console, and then install and test your apps. Then, create an image that is a snapshot of the image builder.
After you have an image containing your applications, select an instance type and launch a fleet of streaming instances. Each instance in the fleet is used by only one user, and you match the instance type used in the fleet to match the needed application performance. Finally, attach the fleet to a stack to set up user access. The following diagram shows the role of each resource in the workflow.
Figure 1: Describing an AppStream 2.0 workflow

Setting up AppStream 2.0
To get started, set up an example AppStream 2.0 stack or use the Quick Links on the console. For this example, I named my stack ds-sample, selected a sample image, and chose the stream.standard.medium instance type. You can explore the resources that you set up in the AWS console, or use the describe-stacks and describe-fleets commands as follows:
Figure 2: Describing an AppStream 2.0 stack

Figure 3: Describing an AppStream 2.0 fleet

To set up user access to your streaming environment, you can use your existing SAML 2.0 compliant directory. Your users can then use their existing credentials to log in. Alternatively, to quickly test a streaming connection, or to start a streaming session from your own website, you can create a streaming URL. In the console, choose Stacks, Actions, Create URL, or call create-streaming-url as follows:
Figure 4: Creating a streaming URL

You can paste the streaming URL into a browser, and open any of the displayed applications.

Now that you have a sample environment set up, here are a few tips on scaling.
Scaling and cost optimization for AppStream 2.0
To provide an instant-on streaming connection, the instances in an AppStream 2.0 fleet are always running. You are charged for running instances, and each running instance can serve exactly one user at any time. To optimize your costs, match the number of running instances to the number of users who want to stream apps concurrently. This section walks through three options for doing this:
- Fleet Auto Scaling
- Fixed fleets based on a schedule
- Fleet Auto Scaling with schedules
Fleet Auto Scaling
To dynamically update the number of running instances, you can use Fleet Auto Scaling. This feature allows you to scale the size of the fleet automatically between a minimum and maximum value based on demand. This is useful if you have user demand that changes constantly, and you want to scale your fleet automatically to match this demand. For examples about setting up and managing scaling policies, see Fleet Auto Scaling.
You can trigger changes to the fleet through the available Amazon CloudWatch metrics:
- CapacityUtilization – the percentage of running instances already used.
- AvailableCapacity – the number of instances that are unused and can receive connections from users.
- InsufficientCapacityError – an error that is triggered when there is no available running instance to match a user’s request.
You can create and attach scaling policies using the AWS SDK or AWS Management Console. I find it convenient to set up the policies using the console. Use the following steps:
- In the AWS Management Console, open AppStream 2.0.
- Choose Fleets, select a fleet, and choose Scaling Policies.
- For Minimum capacity and Maximum capacity, enter values for the fleet.
Figure 5: Fleets tab for setting scaling policies

- Create scale out and scale in policies by choosing Add Policy in each section.
Figure 6: Adding a scale out policy

Figure 7: Adding a scale in policy

After you create the policies, they are displayed as part of your fleet details.

The scaling policies are triggered by CloudWatch alarms. These alarms are automatically created on your behalf when you create the scaling policies using the console. You can view and modify the alarms via the CloudWatch console.
Figure 8: CloudWatch alarms for triggering fleet scaling

Fixed fleets based on a schedule
An alternative option to optimize costs and respond to predictable demand is to fix the number of running instances based on the time of day or day of the week. This is useful if you have a fixed number of users signing in at different times of the day― scenarios such as a training classes, call center shifts, or school computer labs. You can easily set the number of instances that are running using the AppStream 2.0 update-fleet command. Update the Desired value for the compute capacity of your fleet. The number of Running instances changes to match the Desired value that you set, as follows:
Figure 9: Updating desired capacity for your fleet

Set up a Lambda function to update your fleet size automatically. Follow the example below to set up your own functions. If you haven’t used Lambda before, see Step 2: Create a HelloWorld Lambda Function and Explore the Console.
To create a function to change the fleet size
- In the Lambda console, choose Create a Lambda function.
- Choose the Blank Function blueprint. This gives you an empty blueprint to which you can add your code.
- Skip the trigger section for now. Later on, you can add a trigger based on time, or any other input.
- In the Configure function section:
- Provide a name and description.
- For Runtime, choose Node.js 4.3.
- Under Lambda function handler and role, choose Create a custom role.
- In the IAM wizard, enter a role name, for example Lambda-AppStream-Admin. Leave the defaults as is.
- After the IAM role is created, attach an AppStream 2.0 managed policy “AmazonAppStreamFullAccess” to the role. For more information, see Working with Managed Policies. This allows Lambda to call the AppStream 2.0 API on your behalf. You can edit and attach your own IAM policy, to limit access to only actions you would like to permit. To learn more, see Controlling Access to Amazon AppStream 2.0.
- Leave the default values for the rest of the fields, and choose Next, Create function.
- To change the AppStream 2.0 fleet size, choose Code and add some sample code, as follows:
'use strict'; /** This AppStream2 Update-Fleet blueprint sets up a schedule for a streaming fleet **/ const AWS = require('aws-sdk'); const appstream = new AWS.AppStream(); const fleetParams = { Name: 'ds-sample-fleet', /* required */ ComputeCapacity: { DesiredInstances: 1 /* required */ } }; exports.handler = (event, context, callback) => { console.log('Received event:', JSON.stringify(event, null, 2)); var resource = event.resources[0]; var increase = resource.includes('weekday-9am-increase-capacity') try { if (increase) { fleetParams.ComputeCapacity.DesiredInstances = 3 } else { fleetParams.ComputeCapacity.DesiredInstances = 1 } appstream.updateFleet(fleetParams, (error, data) => { if (error) { console.log(error, error.stack); return callback(error); } console.log(data); return callback(null, data); }); } catch (error) { console.log('Caught Error: ', error); callback(error); } }; - Test the code. Choose Test and use the “Hello World” test template. The first time you do this, choose Save and Test. Create a test input like the following to trigger the scaling update.

- You see output text showing the result of the update-fleet call. You can also use the CLI to check the effect of executing the Lambda function.
Next, to set up a time-based schedule, set a trigger for invoking the Lambda function.
To set a trigger for the Lambda function
- Choose Triggers, Add trigger.
- Choose CloudWatch Events – Schedule.
- Enter a rule name, such as “weekday-9am-increase-capacity”, and a description. For Schedule expression, choose cron. You can edit the value for the cron later.
- After the trigger is created, open the event weekday-9am-increase-capacity.
- In the CloudWatch console, edit the event details. To scale out the fleet at 9 am on a weekday, you can adjust the time to be: 00 17 ? * MON-FRI *. (If you’re not in Seattle (Pacific Time Zone), change this to another specific time zone).
- You can also add another event that triggers at the end of a weekday.
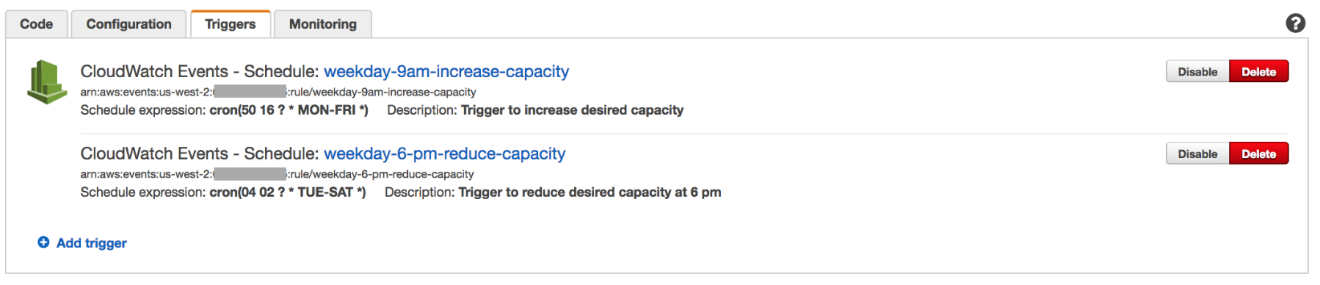
This setup now triggers scale-out and scale-in automatically, based on the time schedule that you set.
Fleet Auto Scaling with schedules
You can choose to combine both the fleet scaling and time-based schedule approaches to manage more complex scenarios. This is useful to manage the number of running instances based on business and non-business hours, and still respond to changes in demand. You could programmatically change the minimum and maximum sizes for your fleet based on time of day or day of week, and apply the default scale-out or scale-in policies. This allows you to respond to predictable minimum demand based on a schedule.
For example, at the start of a work day, you might expect a certain number of users to request streaming connections at one time. You wouldn’t want to wait for the fleet to scale out and meet this requirement. However, during the course of the day, you might expect the demand to scale in or out, and would want to match the fleet size to this demand.
To achieve this, set up the scaling polices via the console, and create a Lambda function to trigger changes to the minimum, maximum, and desired capacity for your fleet based on a schedule. Replace the code for the Lambda function that you created earlier with the following code:
'use strict';

/**
This AppStream2 Update-Fleet function sets up a schedule for a streaming fleet
**/

const AWS = require('aws-sdk');
const appstream = new AWS.AppStream();
const applicationAutoScaling = new AWS.ApplicationAutoScaling();

const fleetParams = {
  Name: 'ds-sample-fleet', /* required */
  ComputeCapacity: {
    DesiredInstances: 1 /* required */
  }
};

var scalingParams = {
  ResourceId: 'fleet/ds-sample-fleet', /* required - fleet name*/
  ScalableDimension: 'appstream:fleet:DesiredCapacity', /* required */
  ServiceNamespace: 'appstream', /* required */
  MaxCapacity: 1,
  MinCapacity: 6,
  RoleARN: 'arn:aws:iam::659382443255:role/service-role/ApplicationAutoScalingForAmazonAppStreamAccess'
};

exports.handler = (event, context, callback) => {

    console.log('Received this event now:', JSON.stringify(event, null, 2));

    var resource = event.resources[0];
    var increase = resource.includes('weekday-9am-increase-capacity')

    try {
        if (increase) {
            //usage during business hours - start at capacity of 10 and scale
            //if required. This implies at least 10 users can connect instantly.
            //More users can connect as the scaling policy triggers addition of
            //more instances. Maximum cap is 20 instances - fleet will not scale
            //beyond 20. This is the cap for number of users.
            fleetParams.ComputeCapacity.DesiredInstances = 10
            scalingParams.MinCapacity = 10
            scalingParams.MaxCapacity = 20
        } else {
            //usage during non-business hours - start at capacity of 1 and scale
            //if required. This implies only 1 user can connect instantly.
            //More users can connect as the scaling policy triggers addition of
            //more instances.
            fleetParams.ComputeCapacity.DesiredInstances = 1
            scalingParams.MinCapacity = 1
            scalingParams.MaxCapacity = 10
        }

        //Update minimum and maximum capacity used by the scaling policies
        applicationAutoScaling.registerScalableTarget(scalingParams, (error, data) => {
             if (error) console.log(error, error.stack);
             else console.log(data);
            });

        //Update the desired capacity for the fleet. This sets
        //the number of running instances to desired number of instances
        appstream.updateFleet(fleetParams, (error, data) => {
            if (error) {
                console.log(error, error.stack);
                return callback(error);
            }

            console.log(data);
            return callback(null, data);
        });

    } catch (error) {
        console.log('Caught Error: ', error);
        callback(error);
    }
};
Note: To successfully execute this code, you need to add IAM policies to the role used by the Lambda function. The policies allow Lambda to call the Application Auto Scaling service on your behalf.
Figure 10: Inline policies for using Application Auto Scaling with Lambda
{
"Version": "2012-10-17",
"Statement": [
   {
      "Effect": "Allow",
         "Action": [
            "iam:PassRole"
         ],
         "Resource": "*"
   }
]
}
{
"Version": "2012-10-17",
"Statement": [
   {
      "Effect": "Allow",
         "Action": [
            "application-autoscaling:*"
         ],
         "Resource": "*"
   }
]
}
Monitoring usage
After you have set up scaling for your fleet, you can use CloudWatch metrics with AppStream 2.0, and create a dashboard for monitoring. This helps optimize your scaling policies over time based on the amount of usage that you see.
For example, if you were very conservative with your initial set up and over-provisioned resources, you might see long periods of low fleet utilization. On the other hand, if you set the fleet size too low, you would see high utilization or errors from insufficient capacity, which would block users’ connections. You can view CloudWatch metrics for up to 15 months, and drive adjustments to your fleet scaling policy.
Figure 11: Dashboard with custom Amazon CloudWatch metrics

Summary
These are just a few ideas for scaling AppStream 2.0 and optimizing your costs. Let us know if these are useful, and if you would like to see similar posts. If you have comments about the service, please post your feedback on the AWS forum for AppStream 2.0.
A Serverless Authentication System by Jumia
Jumia is an ecosystem of nine different companies operating in 22 different countries in Africa. Jumia employs 3000 people and serves 15 million users/month.
Want to secure and centralize millions of user accounts across Africa? Shut down your servers! Jumia Group unified and centralized customer authentication on nine digital services platforms, operating in 22 (and counting) countries in Africa, totaling over 120 customer and merchant facing applications. All were unified into a custom Jumia Central Authentication System (JCAS), built in a timely fashion and designed using a serverless architecture.
In this post, we give you our solution overview. For the full technical implementation, see the Jumia Central Authentication System post on the Jumia Tech blog.
The challenge
A group-level initiative was started to centralize authentication for all Jumia users in all countries for all companies. But it was impossible to unify the operational databases for the different companies. Each company had its own user database with its own technological implementation. Each company alone had yet to unify the logins for their own countries. The effects of deduplicating all user accounts were yet to be determined but were considered to be large. Finally, there was no team responsible for manage this new project, given that a new dedicated infrastructure would be needed.
With these factors in mind, we decided to design this project as a serverless architecture to eliminate the need for infrastructure and a dedicated team. AWS was immediately considered as the best option for its level of
service, intelligent pricing model, and excellent serverless services.
The goal was simple. For all user accounts on all Jumia Group websites:
- Merge duplicates that might exist in different companies and countries
- Create a unique login (username and password)
- Enrich the user profile in this centralized system
- Share the profile with all Jumia companies
Requirements
We had the following initial requirements while designing this solution on the AWS platform:
- Secure by design
- Highly available via multimaster replication
- Single login for all platforms/countries
- Minimal performance impact
- No admin overhead
Chosen technologies
We chose the following AWS services and technologies to implement our solution.
Amazon API Gateway
Amazon API Gateway is a fully managed service, making it really simple to set up an API. It integrates directly with AWS Lambda, which was chosen as our endpoint. It can be easily replicated to other regions, using Swagger import/export.
AWS Lambda
AWS Lambda is the base of serverless computing, allowing you to run code without worrying about infrastructure. All our code runs on Lambda functions using Python; some functions are
called from the API Gateway, others are scheduled like cron jobs.
Amazon DynamoDB
Amazon DynamoDB is a highly scalable, NoSQL database with a good API and a clean pricing model. It has great scalability as well as high availability, and fits the serverless model we aimed for with JCAS.
AWS KMS
AWS KMS was chosen as a key manager to perform envelope encryption. It's a simple and secure key manager with multiple encryption functionalities.
Envelope encryption
Oversimplifying envelope encryption is when you encrypt a key rather than the data itself. That encrypted key, which was used to encrypt the data, may now be stored with the data itself on your persistence layer since it doesn't decrypt the data if compromised. For more information, see How Envelope Encryption Works with Supported AWS Services.
Envelope encryption was chosen given that master keys have a 4 KB limit for data to be encrypted or decrypted.
Amazon SQS
Amazon SQS is an inexpensive queuing service with dynamic scaling, 14-day retention availability, and easy management. It's the perfect choice for our needs, as we use queuing systems only as a
fallback when saving data to remote regions fails. All the features needed for those fallback cases were covered.
JWT
We also use JSON web tokens for encoding and signing communications between JCAS and company servers. It's another layer of security for data in transit.
Data structure
Our database design was pretty straightforward. DynamoDB records can be accessed by the primary key and allow access using secondary indexes as well. We created a UUID for each user on JCAS, which is used as a primary key
on DynamoDB.
Most data must be encrypted so we use a single field for that data. On the other hand, there's data that needs to be stored in separate fields as they need to be accessed from the code without decryption for lookups or basic checks. This indexed data was also stored, as a hash or plain, outside the main ciphered blob store.
We used a field for each searchable data piece:
Id(primary key)main phone(indexed)main email(indexed)account statusdocument timestamp
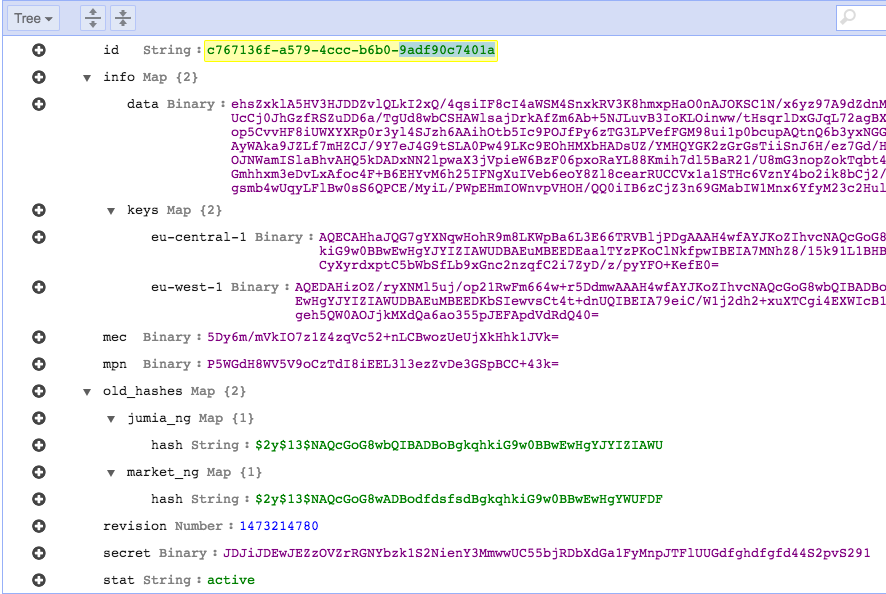
To hold the encrypted data we use a data dictionary with two main dictionaries, info with the user's encrypted data and keys with the key for each AWS KMS region to decrypt the info blob.
Passwords are stored in two dictionaries, old_hashes contains the legacy hashes from the origin systems and secret holds the user's JCAS password.
Here's an example:
Security
Security is like an onion, it needs to be layered. That’s what we did when designing this solution. Our design makes all of our data unreadable at each layer of this solution, while easing our compliance needs.
A field called data stores all personal information from customers. It's encrypted using AES256-CBC with a key generated and managed by AWS KMS. A new data key is used for each transaction. For communication between companies and the API, we use API Keys, TLS and JWT, in the body to ensure that the post is signed and verified.
Data flow
Our second requirement on JCAS was system availability, so we designed some data pipelines. These pipelines allow multi-region replication, which evades collision using idempotent operations on all endpoints. The only technology added to the stack was Amazon SQS. On SQS queues, we place all the items we aren't able to replicate at the time of the client's request.
JCAS may have inconsistencies between regions, caused by network or region availability; by using SQS, we have workers that synchronize all regions as soon as possible.
Example with two regions
We have three Lambda functions and two SQS queues, where:
1) A trigger Lambda function is called for the DynamoDB stream. Upon changes to the user's table, it tries to write directly to another DynamoDB table in the second region, falling back to writing to two SQS queues.

2) A scheduled Lambda function (cron-style) checks a SQS queue for items and tries writing them to the DynamoDB table that potentially failed.

3) A cron-style Lambda function checks the SQS queue, calling KMS for any items, and fixes the issue.

The following diagram shows the full infrastrucure (for clarity, this diagram leaves out KMS recovery).

Results
Upon going live, we noticed a minor impact in our response times. Note the brown legend in the images below.

This was a cold start, as the infrastructure started to get hot, response time started to converge. On 27 April, we were almost at the initial 500ms.
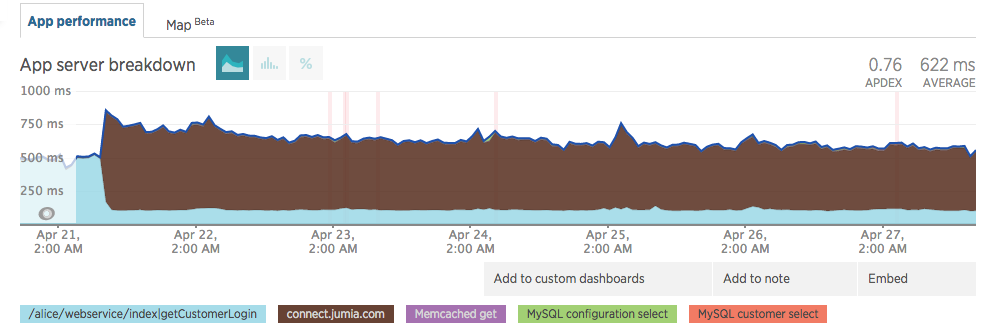
It kept steady on values before JCAS went live (≈500ms).

As of the writing of this post, our response time kept improving (dev changed the method name and we changed the subdomain name).

Customer login used to take ≈500ms and it still takes ≈500ms with JCAS. Those times have improved as other components changed inside our code.
Lessons learned
- Instead of the standard cross-region replication, creating your own DynamoDB cross-region replication might be a better fit for you, if your data and applications allow it.
- Take some time to tweak the Lambda runtime memory. Remember that it's billed per 100ms, so it saves you money if you have it run near a round number.
- KMS takes away the problem of key management with great security by design. It really simplifies your life.
- Always check the timestamp before operating on data. If it's invalid, save the money by skipping further KMS, DynamoDB, and Lambda calls. You'll love your systems even more.
- Embrace the serverless paradigm, even if it looks complicated at first. It will save your life further down the road when your traffic bursts or you want to find an engineer who knows your whole system.
Next steps
We are going to leverage everything we’ve done so far to implement SSO in Jumia. For a future project, we are already testing OpenID connect with DynamoDB as a backend.
Conclusion
We did a mindset revolution in many ways.
Not only we went completely serverless as we started storing critical info on the cloud.
On top of this we also architectured a system where all user data is decoupled between local systems and our central auth silo.
Managing all of these critical systems became far more predictable and less cumbersome than we thought possible.
For us this is the proof that good and simple designs are the best features to look out for when sketching new systems.
If we were to do this again, we would do it in exactly the same way.
Daniel Loureiro (SecOps) & Tiago Caxias (DBA) – Jumia Group
Disabling Intel Hyper-Threading Technology on Amazon Linux

Brian Beach, Solutions Architect
Customers running high performance computing (HPC) workloads on Amazon Linux occasionally ask to disable the Intel Hyper-Threading Technology (HT Technology) that is enabled by default. In the pre-cloud world, this was usually performed by modifying the BIOS. That turned off HT Technology for all users, regardless of any possible benefits obtainable, for example, on I/O intensive workloads. With the cloud, HT Technology can be turned on or off, as is best for a particular application.
This post discusses methods for disabling HT Technology.
What is HT Technology?
According to Intel:
Hyper-Threading Technology makes a single physical processor appear as multiple logical processors. To do this, there is one copy of the architecture state for each logical processor, and the logical processors share a single set of physical execution resources.
For more information, see Hyper-Threading Technology Architecture and Microarchitecture.
This is best explained with an analogy. Imagine that you own a small business assembling crafts for sale on Amazon Handmade. You have a building where the crafts are assembled. Six identical workbenches are inside. Each workbench includes a hammer, a wrench, a screwdriver, a paintbrush, etc. The craftspeople work independently, to produce approximately six times the output as a single craftsperson. On rare occasions, they contend for resources (for example, waiting in a short line to pull some raw materials off the shelf).
As it turns out, business is booming and it’s time to expand production, but there is no more space to add workbenches. The decision is made to have two people work at each workbench. Overall, this is effective, because often there is still little contention between the workers—when one is using the hammer, the other doesn't need it and is using the wrench. Occasionally one of the workers has to wait because the other worker is using the hammer. Contention for resources is somewhat higher in the single workbench case versus workbench-to-workbench.
HT Technology works in a way analogous to that small business. The building is like the processor, the workbenches like cores, and the workers like threads. Within the Intel Xeon processor, there are two threads of execution in each core. The core is designed to allow progress to be made on one thread (execution state) while the other thread is waiting for a relatively slow operation to occur. In this context, even cached memory is slow, much less main memory (many dozens or hundreds of clock cycles away). Operations involving things like disk I/O are orders of magnitude worse. However, in cases where both threads are operating primarily on very close (e.g., registers) or relatively close (first-level cache) instructions or data, the overall throughput occasionally decreases compared to non-interleaved, serial execution of the two lines of execution.
A good example of contention that makes HT Technology slower is an HPC job that relies heavily on floating point calculations. In this case, the two threads in each core share a single floating point unit (FPU) and are often blocked by one another.
In the case of LINPACK, the benchmark used to measure supercomputers on the TOP500 list, many studies have shown that you get better performance by disabling HT Technology. But FPUs are not the only example. Other, very specific workloads can be shown by experimentation to be slower in some cases when HT Technology is used.
Speaking of experimentation… before I discuss how to disable HT Technology, I’d like to discuss whether to disable it. Disabling HT Technology may help some workloads, but it is much more likely that it hinders others. In a traditional HPC environment, you have to decide to enable or disable HT Technology because you only have one cluster.
In the cloud, you are not limited to one cluster. You can run multiple clusters and disable HT Technology in some cases while leaving it enabled in others. In addition, you can easily test both configurations and decide which is best based on empirical evidence. With that said, for the overwhelming majority of workloads, you should leave HT Technology enabled.
Exploring HT Technology on Amazon Linux
Look at the configuration on an Amazon Linux instance. I ran the examples below on an m4.2xlarge, which has eight vCPUs. Note that each vCPU is a thread of an Intel Xeon core. Therefore, the m4.2xlarge has four cores, each of which run two threads, resulting in eight vCPUs. You can see this by running lscpu (note that I have removed some of the output for brevity).
[root@ip-172-31-1-32 ~]# lscpu
CPU(s):               8
On-line CPU(s) list:  0-7
Thread(s) per core:   2
Core(s) per socket:   4
Socket(s):            1
NUMA node(s):         1
NUMA node0 CPU(s):    0-7
You can see from the output that there are four cores, and each core has two threads, resulting in eight CPUs. Exactly as expected. Furthermore, you can run lscpu –extended to see the details of the individual CPUs.
[root@ip-172-31-1-32 ~]# lscpu --extended
CPU NODE SOCKET CORE L1d:L1i:L2:L3 ONLINE
0   0    0      0    0:0:0:0       yes
1   0    0      1    1:1:1:0       yes
2   0    0      2    2:2:2:0       yes
3   0    0      3    3:3:3:0       yes
4   0    0      0    0:0:0:0       yes
5   0    0      1    1:1:1:0       yes
6   0    0      2    2:2:2:0       yes
7   0    0      3    3:3:3:0       yes
Notice that the eight CPUs are numbered 0–7. You can see that the first set of four CPUs are each associated with a different core, and the cores are repeated for the second set of four CPUs. Therefore, CPU 0 and CPU 4 are the two threads in core 0, CPU 1 and CPU 5 are the two threads in core 1 and so on.
The Linux kernel, while generally agnostic on the topic and happy to schedule any thread on any logical CPU, is smart enough to know the difference between cores and threads. It gives preference to scheduling the first operating system threads per core. Only when all cores are busy does the kernel add OS threads to cores using the second hardware thread.
Disabling HT Technology at runtime
Now that you understand the relationship between CPUs and cores, you can disable the second set of CPUs using a process called "hotplugging” (in this case, you might say "hot-unplugging”). For more information, see CPU hotplug in the Kernel.
Each logical CPU is represented in the Linux “filesystem” at an entirely virtual location under /sys/devices/system/cpu/. This isn’t really part of the literal filesystem, of course. Linux designers unified the actual filesystem, as well as devices and kernel objects, into a single namespace with many common operations, including the handy ability to control the state of kernel objects by changing the contents of the “files” that represent them. Here you see directory entries for each CPU, and under each directory you find an "online" file used to enable/disable the CPU. Now you can simply write a 0 to that file to disable the CPU.
The kernel is smart enough to allow any scheduled operations to continue to completion on that CPU. The kernel then saves its state at the next scheduling event, and resumes those operations on another CPU when appropriate. Note the nice safety feature that Linux provides: you cannot disable CPU 0 and get an access-denied error if you try. Imagine what would happen if you accidentally took all the CPUs offline!
Disable CPU4 (the second thread in the first core in the m4.2xlarge). You must be the root user to do this.
[root@ip-172-31-1-32 ~]# echo 0 > /sys/devices/system/cpu/cpu4/onlineNow you can run lscpu –extended again and see that CPU 4 is offline.
[root@ip-172-31-1-32 ~]# lscpu --extended
CPU NODE SOCKET CORE L1d:L1i:L2:L3 ONLINE
0   0    0      0    0:0:0:0       yes
1   0    0      1    1:1:1:0       yes
2   0    0      2    2:2:2:0       yes
3   0    0      3    3:3:3:0       yes
4   -    -      -    :::           no
5   0    0      1    1:1:1:0       yes
6   0    0      2    2:2:2:0       yes
7   0    0      3    3:3:3:0       yes
You can repeat this process for CPUs 5–7 to disable them all. However, this would be tedious on an x1.32xlarge with 128 vCPUs. You can use a script to disable them all.
#!/usr/bin/env bash

for cpunum in $(cat /sys/devices/system/cpu/cpu*/topology/thread_siblings_list | cut -s -d, -f2- | tr ',' '\n' | sort -un)
do
	echo 0 > /sys/devices/system/cpu/cpu$cpunum/online
done
Let me explain what that script does. First, it finds the total number of CPUs. Then, it loops over the second half of the CPUs. Finally, it disables each CPU in turn.
After running the script, you can run lscpu –extended and see that second half of your CPUs are disabled, leaving only one thread per core. Perfect!
[root@ip-172-31-1-32 ~]# lscpu --extended
CPU NODE SOCKET CORE L1d:L1i:L2:L3 ONLINE
0   0    0      0    0:0:0:0       yes
1   0    0      1    1:1:1:0       yes
2   0    0      2    2:2:2:0       yes
3   0    0      3    3:3:3:0       yes
4   -    -      -    :::           no
5   -    -      -    :::           no
6   -    -      -    :::           no
7   -    -      -    :::           no
Disabling HT Technology at boot
At this point, you have a script to disable HT Technology, but the change is only persisted until the next reboot. To apply the script on every boot, you can add the script to rc.local or use cloud-init bootcmd.
Cloud-init is available on Amazon Linux (as well as most other Linux distributions available in EC2). It executes commands it finds in EC2 system metadata within the user-data part of the metadata namespace. Cloud-init includes a bootcmd module that executes a script each time the instance is booted. The following modified script runs on every boot:
#cloud-config
bootcmd:
 - for cpunum in $(cat /sys/devices/system/cpu/cpu*/topology/thread_siblings_list | cut -s -d, -f2- | tr ',' '\n' | sort -un); do echo 0 > /sys/devices/system/cpu/cpu$cpunum/online; done
When you launch an instance, add this for User data in step 3 of the wizard. The instance starts with HT Technology disabled and disables it on subsequent reboots.

An alternative approach is to edit grub.conf. Open /boot/grub/grub.conf in your favorite editor. Find the kernel directive and a maxcpus=X parameter where X is half the total number CPUs. Remember that Linux enumerates the first thread in each core followed by the second thread in each core. Therefore, limiting the number of CPUs to half of the total disables the second thread in each core just like you did with hotplugging earlier. You must reboot for this change to take effect.
Conclusion
Customers running HPC workloads on Amazon Linux cannot access the BIOS to disable HT Technology. This post described a process to disable the second thread in each core at runtime and during boot. In a future post, we examine similar solutions for configuring CPUs in Windows.
Note: this technical approach has nothing to do with control over software licensing, or licensing rights, which are sometimes linked to the number of “CPUs” or “cores.” For licensing purposes, those are legal terms, not technical terms. This post did not cover anything about software licensing or licensing rights.
Automating AWS Lambda Function Error Handling with AWS Step Functions

Aaron Rehaag, Senior Software Engineer, Amazon Web Services
AWS Step Functions makes it easy to coordinate the components of distributed applications and microservices using visual workflows. You can scale and modify your applications quickly by building applications from individual components, each of which performs a discrete function.
You can use Step Functions to create state machines, which orchestrate multiple AWS Lambda functions to build multi-step serverless applications. In certain cases, a Lambda function returns an error. Regardless of whether the error is a function exception created by the developer (e.g., file not found), or unpredicted (e.g., out of memory), Step Functions allows you to respond with conditional logic based on the type of error message in the form of function error handling.
Function error handling
The function error handling feature of Task states allows you to raise an exception directly from a Lambda function and handle it (using Retry or Catch) directly within a Step Functions state machine.
Consider the following state machine designed to sign up new customers for an account:

CreateAccount is a Task state, which writes a customer’s account details to a database using a Lambda function.
If the task succeeds, an account is created, and the state machine progresses from the CreateAccount Task state to the SendWelcomeEmail Task state to send an email to welcome the customer.
However, if a customer tries to register an account with a username already in use, the state machine suggests a different name to the user and retries the account creation process. The Lambda function raises an error, triggering the Catch clause. This causes the state machine to transition to the SuggestAccount task state, suggesting a new name before transitioning back to the CreateAccountState.
You can implement this scenario using any of the programming languages that Step Functions and Lambda support, which currently include Node.js, Java, C#, and Python. The following sections show how to implement a Catch clause in each language.
Node.js
Function errors in Node.js must extend from the Error prototype:
exports.handler = function(event, context, callback) {
    function AccountAlreadyExistsError(message) {
        this.name = "AccountAlreadyExistsError";
        this.message = message;
    }

    AccountAlreadyExistsError.prototype = new Error();
    const error = new AccountAlreadyExistsError("Account is in use!");
    callback(error);
};
You can configure Step Functions to catch the error using a Catch rule:
{
   "StartAt": "CreateAccount",
   "States": {
      "CreateAccount": {
         "Type": "Task",
         "Resource": "arn:aws:lambda:us-east-1:123456789012:function:CreateAccount",
         "Next": "SendWelcomeEmail",
         "Catch": [
            {
               "ErrorEquals": ["AccountAlreadyExistsError"],
               "Next": "SuggestAccountName"
            }
         ]
      },

      …

   }
}
At runtime, Step Functions catches the error, transitioning to the SuggestAccountName state as specified in the Next transition.
Note: The name property of the Error object must match the ErrorEquals value.
Java
You can apply the same scenario to a Lambda Java function by extending the Exception class:
package com.example;

public static class AccountAlreadyExistsException extends Exception {
    public AccountAlreadyExistsException(String message) {
        super(message);
    }
}
package com.example;
import com.amazonaws.services.lambda.runtime.Context;
public class Handler {
public static void CreateAccount(String name, Context context) throws AccountAlreadyExistsException {
throw new AccountAlreadyExistsException ("Account is in use!");
}
}Lambda automatically sets the error name to the fully-qualified class name of the exception at runtime:
{
   "StartAt": "CreateAccount",
   "States": {
      "CreateAccount": {
         "Type": "Task",
         "Resource": "arn:aws:lambda:us-east-1:123456789012:function:CreateAccount",
         "Next": "SendWelcomeEmail",
         "Catch": [
            {
               "ErrorEquals": ["com.example.AccountAlreadyExistsException"],
               "Next": "SuggestAccountName"
            }
         ]
      },

      …

   }
}
C-Sharp
In C#, specify function errors by extending the Exception class:
namespace Example {
   public class AccountAlreadyExistsException : Exception {
      public AccountAlreadyExistsException(String message) :
         base(message) {
      }
   }
}
namespace Example {
public class Handler {
public static void CreateAccount() {
throw new AccountAlreadyExistsException("Account is in use!");
}
}
} Lambda automatically sets the error name to the simple class name of the exception at runtime:
{
   "StartAt": "CreateAccount",
   "States": {
      "CreateAccount": {
         "Type": "Task",
         "Resource": "arn:aws:lambda:us-east-1:123456789012:function:CreateAccount",
         "Next": "SendWelcomeEmail",
         "Catch": [
            {
               "ErrorEquals": ["AccountAlreadyExistsException"],
               "Next": "SuggestAccountName"
            }
         ]
      },

      …

   }
}
Python
In Python, specify function errors by extending the Exception class:
def create_account(event, context):
    class AccountAlreadyExistsException(Exception):
        pass

    raise AccountAlreadyExistsException('Account is in use!')
Lambda automatically sets the error name to the simple class name of the exception at runtime:
{
   "StartAt": "CreateAccount",
   "States": {
      "CreateAccount": {
         "Type": "Task",
         "Resource": "arn:aws:lambda:us-east-1:123456789012:function:CreateAccount",
         "Next": "SendWelcomeEmail",
         "Catch": [
            {
               "ErrorEquals": ["AccountAlreadyExistsException"],
               "Next": "SuggestAccountName"
            }
         ]
      },

      …

   }
}
Getting started with error handling
The function error handling feature of Step Functions makes it easier to create serverless applications. In addition to the Catch clause shown in this post, you can apply the same pattern to Retry of failed Lambda functions.
While you can create Catch and Retry patterns using a Choice state, using Catch and Retry in your Task states allows you to separate exceptions from branching logic associated with the common happy paths through your state machines. Function error handling integrates with all supported Lambda programming models, so you are free to design your application in the programming languages of your choice, mixing and matching as you go.
To create your own serverless applications using Step Functions, see the AWS Step Functions product page.
SAML for Your Serverless JavaScript Application: Part II
Contributors: Richard Threlkeld, Gene Ting, Stefano Buliani
The full code for both scenarios—including SAM templates—can be found at the samljs-serverless-sample GitHub repository. We highly recommend you use the SAM templates in the GitHub repository to create the resources, opitonally you can manually create them.
This is the second part of a two part series for using SAML providers in your application and receiving short-term credentials to access AWS Services. These credentials can be limited with IAM roles so the users of the applications can perform actions like fetching data from databases or uploading files based on their level of authorization. For example, you may want to build a JavaScript application that allows a user to authenticate against Active Directory Federation Services (ADFS). The user can be granted scoped AWS credentials to invoke an API to display information in the application or write to an Amazon DynamoDB table.
Part I of this series walked through a client-side flow of retrieving SAML claims and passing them to Amazon Cognito to retrieve credentials. This blog post will take you through a more advanced scenario where logic can be moved to the backend for a more comprehensive and flexible solution.
Prerequisites
As in Part I of this series, you need ADFS running in your environment. The following configurations are used for reference:
- ADFS federated with the AWS console. For a walkthrough with an AWS CloudFormation template, see Enabling Federation to AWS Using Windows Active Directory, ADFS, and SAML 2.0.
- Verify that you can authenticate with user example\bob for both the ADFS-Dev and ADFS-Production groups via the sign-in page.
- Create an Amazon Cognito identity pool.
SAML for Your Serverless JavaScript Application: Part I
Contributors: Richard Threlkeld, Gene Ting, Stefano Buliani
The full code for this blog, including SAM templates—can be found at the samljs-serverless-sample GitHub repository. We highly recommend you use the SAM templates in the GitHub repository to create the resources, opitonally you can manually create them.
Want to enable SAML federated authentication? You can use the AWS platform to exchange SAML assertions for short-term, temporary AWS credentials.
When you build enterprise web applications, it is imperative to ensure that authentication and authorization (AuthN and AuthZ) is done consistently and follows industry best practices. At AWS, we have built a service called Amazon Cognito that allows you to create unique Identities for users and grants them short-term credentials for interacting with AWS services. These credentials are tied to roles based on IAM policies so that you can grant or deny access to different resources.
In this post, we walk you through different strategies for federating SAML providers with Amazon Cognito. Additionally, you can federate with different types of identity providers (IdP). These IdPs could be third-party social media services like Facebook, Twitter, and others. You can also federate with the User Pools service of Amazon Cognito and create your own managed user directory (including registration, sign-In, MFA, and other workflows).
For example, you may want to build a JavaScript application that allows a user to authenticate against Active Directory Federation Services (ADFS). The user can be granted scoped AWS credentials to invoke an API to display information in the application or write to an Amazon DynamoDB table. In the Announcing SAML Support for Amazon Cognito AWS Mobile blog post, we introduced the new SAML functionality with some sample code in Java as well as Android and iOS snippets. This post goes deeper into customizing the ADFS flow and JavaScript samples.
Scenarios
In this post, we cover the scenario of “client-side” flow, where SAML assertions are passed through Amazon API Gateway and the browser code retrieves credentials directly from Amazon Cognito Identity. In the next, related post, we’ll cover “backend request logic”, where the SAML assertions and credentials selection take place in AWS Lambda functions allowing for customized business logic and audit tracking.
The full code for this scenario, including SAM templates—can be found at the samljs-serverless-sample GitHub repository. We highly recommend you use the SAM templates in the github repository to create the resources, opitonally you can manually create them.
Although this is a Serverless system, you can substitute certain components for traditional compute types, like EC2 instances, to integrate with ADFS. For terms and definitions used in this post, see Claims-based identity term definitions.
Prerequisites
For this blog post, you need ADFS running in your environment. Use the following references:
- ADFS federated with the AWS console. For a walkthrough with an AWS CloudFormation template, see Enabling Federation to AWS Using Windows Active Directory, ADFS, and SAML 2.0.
- Verify that you can authenticate with user example\bob for both the ADFS-Dev and ADFS-Production groups via the sign-in page (https://localhost/adfs/IdpInitiatedSignOn.aspx).
- Create an Amazon Cognito identity pool.
Creating a Simple “Fetch & Run” AWS Batch Job

Dougal Ballantyne, Principal Product Manager – AWS Batch
Docker enables you to create highly customized images that are used to execute your jobs. These images allow you to easily share complex applications between teams and even organizations. However, sometimes you might just need to run a script!
This post details the steps to create and run a simple “fetch & run” job in AWS Batch. AWS Batch executes jobs as Docker containers using Amazon ECS. You build a simple Docker image containing a helper application that can download your script or even a zip file from Amazon S3. AWS Batch then launches an instance of your container image to retrieve your script and run your job.
AWS Batch overview
AWS Batch enables developers, scientists, and engineers to easily and efficiently run hundreds of thousands of batch computing jobs on AWS. AWS Batch dynamically provisions the optimal quantity and type of compute resources (e.g., CPU or memory optimized instances) based on the volume and specific resource requirements of the batch jobs submitted.
With AWS Batch, there is no need to install and manage batch computing software or server clusters that you use to run your jobs, allowing you to focus on analyzing results and solving problems. AWS Batch plans, schedules, and executes your batch computing workloads across the full range of AWS compute services and features, such as Amazon EC2 Spot Instances.
“Fetch & run” walkthrough
The following steps get everything working:
- Build a Docker image with the fetch & run script
- Create an Amazon ECR repository for the image
- Push the built image to ECR
- Create a simple job script and upload it to S3
- Create an IAM role to be used by jobs to access S3
- Create a job definition that uses the built image
- Submit and run a job that execute the job script from S3
Prerequisites
Before you get started, there a few things to prepare. If this is the first time you have used AWS Batch, you should follow the Getting Started Guide and ensure you have a valid job queue and compute environment.
After you are up and running with AWS Batch, the next thing is to have an environment to build and register the Docker image to be used. For this post, register this image in an ECR repository. This is a private repository by default and can easily be used by AWS Batch jobs
You also need a working Docker environment to complete the walkthrough. For the examples, I used Docker for Mac. Alternatively, you could easily launch an EC2 instance running Amazon Linux and install Docker.
You need the AWS CLI installed. For more information, see Installing the AWS Command Line Interface.