
As soon as the weather started to heat up I knew we needed to try one of these ‘Water Blobs’! I originally found the inspiration for this project on Pinterest via – Homemade Toast.
I loved their idea of melting the plastic to make a tight seal … sounded a lot easier than fighting with a giant roll of duct tape.
They used an iron to melt theirs but I decided to see if my good old ‘GHD Hair Straightener’ would do the trick – it may as well be used for something … I can’t remember the last time I used it on my hair.
What you’ll need
- A flat section of grass or decking close to a hose (It will NEED to be level or your Blob will just roll down the hill … trust me!!)
- Scissors
- Duct tape
- Baking paper
- Hair Straightener (if you don’t own one you could follow the directions for an iron found here).
- Clear plastic sheeting*
*We bought ours from the local hardware store off the roll. It was 2 meters wide and cost $1.80 per meter (I used 4 meters = $7.20). It is typically used by builders, painters and furniture removalists to protect furniture or flooring.
Firstly I folded my plastic in half to give me a 2 x 2 meter square. I then folded a strip of baking paper in half lengthways (aprox 80cm in length). I placed the folded paper over the join at the fold of plastic.
I then clamped my heated hair straightener over the folded paper and gradually moved along the folded paper as pictured. ***WARNING*** The plastic will be very hot where you have sealed it – wait for it to cool for approx 20 secs before moving the paper along to the next section. You should be able to see clearly where your plastic has been melted together (as pictured).
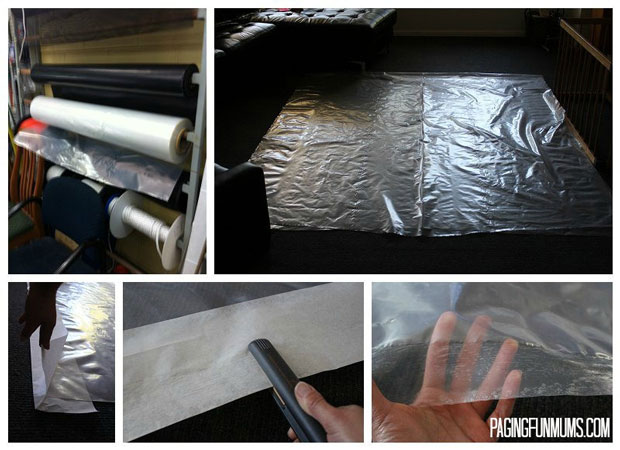
Continue to work your way around the plastic joins until you reach the final corner, you will need to leave a 3cm hole to feed the hose into your plastic pocket. Once completed I gave the plastic a thorough look-over to see if their were any holes – I found one section that had a small hole so I cut some Duct tape to fit and stuck that over the hole (it held fast and never leaked from that spot).
I used my phone to time how long the above took me (nearly 19 mins)– granted this was my first time I think that was fast … I’m sure I could do it twice as fast now I know what I’m doing.
Then came the best part – filling up our giant ‘Water Blob’.
We started by adding some blue food colouring (approx 20ml), then we inserted the hose and watched it fill. The kids enjoyed watching the blue food colouring spread. *It helps to prop the hose up on something like an up-turned tub.

They could barely contain themselves while waiting the whole 10mins it took to fill up! Finally when it was filled I removed the hose and used some Duct Tape to seal the opening … GO TIME!!!
My 18mth old boy was a little unsure at first but it didn’t take him long to start enjoying the squishy, floating and cool sensation.
My 5yo thought (and still thinks) it was the best thing since sliced bread! We invited Jenni and the kids to come and join us for a play and they all loved it just as much!
This article has been republished with permission from Paging Fun Mums. If you want more fun crafts, activities, recipes and ideas, head over to the Paging Fun Mums website or follow them on Facebook.