
One thing that seems to happen to each of my expecting friends, as their baby due date draws closer, is their obsession with decorating the nursery. And I must say, it's pretty contagious. I love hearing about their theme ideas, colour schemes, even the cots on their wish lists. Designing these spaces is like a concrete way of saying, "Welcome, we've been waiting for you, I love you, you're safe and you're home."
And what better way to express this than with a personalised, hand-made piece of art? Follow these steps and you can turn a quote, baby name or meaningful family saying into sweet art for your nursery or kids' rooms.
In honour of all my little nephews and nieces, I've created this DIY tutorial. This example is a quote for new parents, but you can use any words you like.
What you need:
- A letters and numbers stencil
- 1-2 sheets of felt
- Fabric chalk pencils or a ballpoint pen
- Sharp scissors
- Tacky glue or a hot glue gun (one that will glue onto fabric and glass)
- Pom poms (the smaller and more 'squashable', the better)
- A sturdy frame (the one used here is a certificate frame from Officeworks. It is see-through, with two glass panels front and back. You can use any frame that is strong enough – it doesn't have to be see-through. If you are using a regular frame, see extra instructions in Step 4)
- Strong washi tape or masking tape

STEP 1: Choose your words
You're custom making your own art so this is your chance to make it meaningful. Choose words that add love and meaning to the piece. Here are some examples you can use:
- 'Dream big little one!'
- 'Though she be but little, she is fierce' – Shakespeare
- 'Kid, you'll move mountains'
- 'I love you to the moon and back'
- 'Your first breath took ours away'; or
- The names of parents, siblings and baby
- Baby's name and date of birth
STEP 2: Trace the letters
Take your stencil and turn it back to front. Place it over some felt and trace the letters you need onto the felt with a fabric chalk pencil or ballpoint pen. You want your stencil to face the wrong way so the display side of each letter won't have any messy tracing marks.
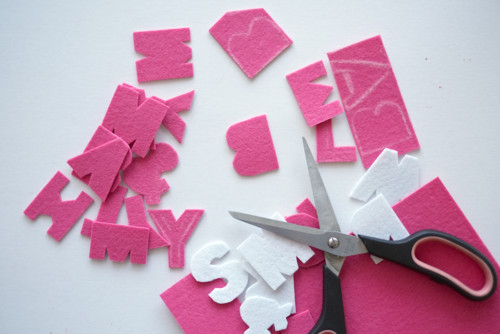
STEP 3: Cut it out
Using scissors, cut out your letters, following the tracing marks you have just made.
TIP: Keep it simple. You don't need to cut out the holes in the middle of the 'O' or 'A', for example. Just cut the outline of the letters. Think of them like solid shapes – it not only looks great, but is much easier, too!
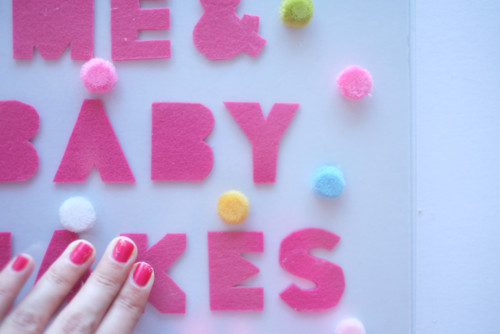
STEP 4: Design your layout
Place the letters onto the frame's backing board. Move them around until you are happy with how they look and the spacing of the words. You can have them lined up, sitting straight, or be playful and make them slightly askew. Try mixing different coloured felt letters in to see if you like how it looks.
TIP: If you are using a frame that is not see-through, cover the backing board with glue and colourful fabric. You can then add your letters on top of that. It'll give you a nice textured background.

STEP 5: Glue it down
Take each letter, add one or two dots of glue to the back, and press down onto the backing board. Leave to dry before moving.
STEP 6: Add pom poms
Choose a handful of small pom poms and scatter them over your artwork.
Make sure the pom poms are evenly spaced around the frame so you can 'sandwich' the artwork into the frame evenly.
STEP 7: Test the frame
Now it's time to test the frame. Before you glue your pom poms down, look ahead to Steps 9 and 10 and do a practise run. You want to be sure that your frame can close with the pom poms inside.
TIP: If your frame won't hold the pom poms because they are too thick, cut circles (or dots) out of your leftover felt and use these instead.
STEP 8: Glue the pom poms
Add a big dot of glue to each pom pom (or felt circle) and place down on the backing board. Leave to dry.
STEP 9: Squash it!
Take the front panel of glass. Really, really, really carefully and gently place it on top of the artwork. As you do this, you will see the pom poms 'squash'.
STEP 10: Secure the artwork
Pick up the whole artwork, turn and place into the frame. Close the tabs and tape around the edges to secure it.

STEP 11: Hang it
Hang your artwork in the nursery. I recommend using removable sticky strips. The strips will add that extra layer of strength to the frame.
Also, if your family grows, you can take down the artwork, open it up and add more names, dates or different coloured decorations.
SHARE YOURS
Have you made or bought artwork for a kid's room or nursery before? Show us a photo or describe it in the Comments.
Upstyle your home with stylish home decor
Browse kids rugs to suit any style
Shop floating shelves to store your artwork on
By Yen Taylor for Houzz
Comments