AWS DevOps Blog
Extending AWS CodeBuild with Custom Build Environments
AWS CodeBuild is a fully managed build service that compiles source code, runs tests, and produces software packages that are ready to deploy. CodeBuild provides curated build environments for programming languages and runtimes such as Java, Ruby, Python, Go, Node.js, Android, and Docker. It can be extended through the use of custom build environments to support many more.
Build environments are Docker images that include a complete file system with everything required to build and test your project. To use a custom build environment in a CodeBuild project, you build a container image for your platform that contains your build tools, push it to a Docker container registry such as Amazon EC2 Container Registry (ECR), and reference it in the project configuration. When building your application, CodeBuild will retrieve the Docker image from the container registry specified in the project configuration and use the environment to compile your source code, run your tests, and package your application.
In this post, we’ll create a build environment for PHP applications and walk through the steps to configure CodeBuild to use this environment.
Run Umbraco CMS with Flexible Load Balancing on AWS
In version 7.3, Umbraco CMS the popular open source CMS introduced the flexible load balancing feature, which makes the setup of load-balanced applications a lot easier. In this blog post, we’ll follow the guidelines in the Umbraco documentation to set up a load-balanced Umbraco application on AWS. We’ll let AWS Elastic Beanstalk manage the deployments, load balancing, auto scaling, and health monitoring for us.
Application Architecture
When you use the flexible load balancing feature, any updates to Umbraco content will be stored in a queue in the master database. Each server in the load-balanced environment will automatically download, process, and cache the updates from the queue, so no matter which server is selected by the Elastic Load Balancing to handle the request, the user will always receive the same content. Umbraco administration doesn’t work correctly if accessed from a load-balanced server. For this reason, we’ll set up a non-balanced environment to be accessed only by the administrators and editors.

Registering Spot Instances with AWS OpsWorks Stacks
AWS OpsWorks Stacks is a configuration management service that helps you configure and operate applications of all shapes and sizes using Chef. You can define the application’s architecture and the specification of each component, including package installation, software configuration, and more.
Amazon EC2 Spot instances allow you to bid on spare Amazon EC2 computing capacity. Because Spot instances are often available at a discount compared to On-Demand instances, you can significantly reduce the cost of running your applications, grow your applications’ compute capacity and throughput for the same budget, and enable new types of cloud computing applications.
You can use Spot instances with AWS OpsWorks Stacks in the following ways:
- As a part of an Auto Scaling group, as described in this blog post. You can follow the steps in the blog post and choose to use Spot instance option, in the launch configuration described in step 5.
- To provision a Spot instance in the EC2 console and have it automatically register with an OpsWorks stack as described here.
The example used in this post will require you to create the following resources:
IAM instance profile: an IAM profile that grants your instances permission to register themselves with OpsWorks.
Lambda function: a function that deregisters your instances from an OpsWorks stack.
Spot instance: the Spot instance that will run your application.
CloudWatch Event role: an event that will trigger the Lambda function whenever your Spot instance is terminated.
Step 1: Create an IAM instance profile
When a Spot instance starts, it must be able to make an API call to register itself with an OpsWorks stack. By assigning an instance with an IAM instance profile, the instance will be able to make calls to OpsWorks.
Open the IAM console at https://console.aws.amazon.com/iam/, choose Roles, and then choose Create New Role. Type a name for the role, and then choose Next Step. Choose the Amazon EC2 role, and then select the check box next to the AWSOpsWorksInstanceRegistration policy. Finally, select Next Step, and then choose Create Role. As its name suggests, the AWSOpsWorksInstanceRegistration policy will allow the instance to make API calls only to register an instance. Copy the following policy to the new role you’ve just created.
{
    "Version": "2012-10-17",
    "Statement": [
        {
            "Effect": "Allow",
            "Action": [
                "opsworks:AssignInstance",
                "opsworks:DescribeInstances",
 "ec2:CreateTags"
            ],
            "Resource": [
                "*"
            ]
        }
    ]
}

Step 2: Create a Lambda function
This Lambda function is responsible for deregistering an instance from your OpsWorks stack. It will be invoked whenever the Spot instance is terminated.
Open the AWS Lambda console at https://us-west-2.console.aws.amazon.com/lambda/home, and choose the option to create a Lambda function. If you are prompted to choose a blueprint, choose Skip. Type a name for the Lambda function, and from the Runtime drop-down list, select Python 2.7.
Next, paste the following code into the Lambda Function Code text box:
import boto3

def lambda_handler(event, context):
    ec2_instance_id = event['detail']['instance-id']
    ec2 = boto3.client('ec2')
    for tag in ec2.describe_instances(InstanceIds=[ec2_instance_id])['Reservations'][0]['Instances'][0]['Tags']:
        if (tag['Key'] == 'opsworks_stack_id'):
            opsworks_stack_id = tag['Value']
            opsworks = boto3.client('opsworks', 'us-east-1')
            for instance in opsworks.describe_instances(StackId=opsworks_stack_id)['Instances']:
                if ('Ec2InstanceId' in instance):
                    if (instance['Ec2InstanceId'] == ec2_instance_id):
                        print("Deregistering OpsWorks instance " + instance['InstanceId'])
                        opsworks.deregister_instance(InstanceId=instance['InstanceId'])
    return ec2_instance_id
The result should look like this:

Step 3: Create a CloudWatch event
Whenever the Spot instance is terminated, we need to trigger the Lambda function from step 2 to deregister the instance from its associated stack.
Open the AWS CloudWatch console at https://console.aws.amazon.com/cloudwatch/home, choose Events, and then choose the Create rule button. Choose Amazon EC2 from the event selector. Select Specific state(s), and choose Terminated. Select the Lambda function you created earlier as the target. Finally, choose the Configure details button.

Step 4: Create a Spot instance
Open the EC2 console at https://console.aws.amazon.com/ec2sp/v1/spot/home, and choose the Request Spot Instances button. Use the latest release of Amazon Linux. On the details page, under IAM instance profile, choose the instance profile you created in step 1. Paste the following script into the User data field:
#!/bin/bash
sed -i'' -e 's/.*requiretty.*//' /etc/sudoers
pip install --upgrade awscli
STACK_ID=3464f35f-16b4-44dc-8073-a9cd19533ad5
LAYER_ID=ba04682c-6e32-481d-9d0e-e2fa72b55314
INSTANCE_ID=$(/usr/bin/aws opsworks register --use-instance-profile --infrastructure-class ec2 --region us-east-1 --stack-id $STACK_ID --override-hostname $(tr -cd 'a-z' < /dev/urandom |head -c8) --local 2>&1 |grep -o 'Instance ID: .*' |cut -d' ' -f3)
EC2_INSTANCE_ID=$(/usr/bin/aws opsworks describe-instances --region us-east-1 --instance-ids $INSTANCE_ID | grep -o '"Ec2InstanceId": "i-.*'| grep -o 'i-[a-z0-9]*')
/usr/bin/aws ec2 create-tags --region us-east-1 --resources $EC2_INSTANCE_ID --tags Key=opsworks_stack_id,Value=$STACK_ID
/usr/bin/aws opsworks wait instance-registered --region us-east-1 --instance-id $INSTANCE_ID
/usr/bin/aws opsworks assign-instance --region us-east-1 --instance-id $INSTANCE_ID --layer-ids $LAYER_ID
This script will automatically register your Spot instance on boot with a corresponding OpsWorks stack and layer. Be sure to fill in the following fields:
STACK_ID=YOUR_STACK_ID
LAYER_ID=YOUR_LAYER_ID

It will take a few minutes for the instance to be provisioned and come online. You’ll see fulfilled displayed in the Status column and active displayed in the State column. After the instance and request are both in an active state, the instance should be fully booted and registered with your OpsWorks stack/layer.

You can also view the instance and its online state in the OpsWorks console under Spot Instance.

You can manually terminate a Spot instance from the OpsWorks service console. Simply choose the stop button and the Spot instance will be terminated and removed from your stack. Unlike an On-Demand Instance in OpsWorks, when a Spot instance is stopped, it cannot be restarted.
In case your Spot instance is terminated through other means (for example, in the EC2 console), a CloudWatch event will trigger the Lambda function, which will automatically deregister the instance from your OpsWorks stack.
Conclusion
You can now use OpsWorks Stacks to define your application’s architecture and software configuration while leveraging the attractive pricing of Spot instances.
Introducing Git Credentials: A Simple Way to Connect to AWS CodeCommit Repositories Using a Static User Name and Password
Today, AWS is introducing a simplified way to authenticate to your AWS CodeCommit repositories over HTTPS.
With Git credentials, you can generate a static user name and password in the Identity and Access Management (IAM) console that you can use to access AWS CodeCommit repositories from the command line, Git CLI, or any Git tool that supports HTTPS authentication.
Because these are static credentials, they can be cached using the password management tools included in your local operating system or stored in a credential management utility. This allows you to get started with AWS CodeCommit within minutes. You don’t need to download the AWS CLI or configure your Git client to connect to your AWS CodeCommit repository on HTTPS. You can also use the user name and password to connect to the AWS CodeCommit repository from third-party tools that support user name and password authentication, including popular Git GUI clients (such as TowerUI) and IDEs (such as Eclipse, IntelliJ, and Visual Studio).
So, why did we add this feature? Until today, users who wanted to use HTTPS connections were required to configure the AWS credential helper to authenticate their AWS CodeCommit operations. Customers told us our credential helper sometimes interfered with password management tools such as Keychain Access and Windows Vault, which caused authentication failures. Also, many Git GUI tools and IDEs require a static user name and password to connect with remote Git repositories and do not support the credential helper.
In this blog post, I’ll walk you through the steps for creating an AWS CodeCommit repository, generating Git credentials, and setting up CLI access to AWS CodeCommit repositories.
Git Credentials Walkthrough
Let’s say Dave wants to create a repository on AWS CodeCommit and set up local access from his computer.
Prerequisite: If Dave had previously configured his local computer to use the credential helper for AWS CodeCommit, he must edit his .gitconfig file to remove the credential helper information from the file. Additionally, if his local computer is running macOS, he might need to clear any cached credentials from Keychain Access.
With Git credentials, Dave can now create a repository and start using AWS CodeCommit in four simple steps.
Step 1: Make sure the IAM user has the required permissions
Dave must have the following managed policies attached to his IAM user (or their equivalent permissions) before he can set up access to AWS CodeCommit using Git credentials.
- AWSCodeCommitPowerUser (or an appropriate CodeCommit managed policy)
- IAMSelfManageServiceSpecificCredentials
- IAMReadOnlyAccess
Step 2: Create an AWS CodeCommit repository
Next, Dave signs in to the AWS CodeCommit console and create a repository, if he doesn’t have one already. He can choose any repository in his AWS account to which he has access. The instructions to create Git credentials are shown in the help panel. (Choose the Connect button if the instructions are not displayed.) When Dave clicks the IAM user link, the IAM console will open and he can generate the credentials.

Step 3: Create HTTPS Git credentials in the IAM console
On the IAM user page, Dave selects the Security Credentials tab and clicks Generate under HTTPS Git credentials for AWS CodeCommit section. This creates and displays the user name and password. Dave can then download the credentials.

Note: This is the only time the password is available to view or download.
Step 4: Clone the repository on the local machine
On the AWS CodeCommit console page for the repository, Dave chooses Clone URL, and then copy the HTTPS link for cloning the repository. At the command line or terminal, Dave will use the link he just copied to clone the repository. For example, Dave copies:

And then at the command line or terminal, Dave types:
$ git clone https://git-codecommit.us-east-1.amazonaws.com/v1/repos/TestRepo_Dave
When prompted for user name and password, Dave provides the Git credentials (user name and password) he generated in step 3.
Dave is now ready to start pushing his code to the new repository.
Git credentials can be made active or inactive based on your requirements. You can also reset the password if you would like to use the existing username with a new password.
Next Steps
- You can optionally cache your credentials using the Git credentials caching command here.
- Want to invite a collaborator to work on your AWS CodeCommit repository? Simply create a new IAM user in your AWS account, create Git credentials for that user, and securely share the repository URL and Git credentials with the person you want to collaborate on the repositories.
- Connect to any third-party client that supports connecting to remote Git repositories using Git credentials (a stored user name and password). Virtually all tools and IDEs allow you to connect with static credentials. We’ve tested these:
- Visual Studio (using the default Git plugin)
- Eclipse IDE (using the default Git plugin)
- Git Tower UI
For more information, see the AWS CodeCommit documentation.
We are excited to provide this new way of connecting to AWS CodeCommit. We look forward to hearing from you about the many different tools and IDEs you will be able to use with your AWS CodeCommit repositories.
DevOps and Continuous Delivery at re:Invent 2016 – Wrap-up
The AWS re:Invent 2016 conference was packed with some exciting announcements and sessions around DevOps and Continuous Delivery. We launched AWS CodeBuild, a fully managed build service that eliminates the need to provision, manage, and scale your own build servers. You now have the ability to run your continuous integration and continuous delivery process entirely on AWS by plugging AWS CodeBuild into AWS CodePipeline, which automates building, testing, and deploying code each time you push a change to your source repository. If you are interested in learning more about AWS CodeBuild, you can sign up for the webinar on January 20th here.
The DevOps track had over 30 different breakout sessions ranging from customer stories to deep dive talks to best practices. If you weren’t able to attend the conference or missed a specific session, here is a link to the entire playlist.
There were a number of talks that can help you get started with your own DevOps practices for rapid software delivery. Here are some introductory sessions to give you the proper background:
DEV201: Accelerating Software Delivery with AWS Developer Tools
DEV211: Automated DevOps and Continuous Delivery
After you understand the big picture, you can dive into automating your software delivery. Here are some sessions on how to deploy your applications:
DEV310: Choosing the Right Software Deployment Technique
DEV403: Advanced Continuous Delivery Techniques
DEV404: Develop, Build, Deploy, and Manage Services and Applications
Finally, to maximize your DevOps efficiency, you’ll want to automate the provisioning of your infrastructure. Here are a couple sessions on how to manage your infrastructure:
DEV313: Infrastructure Continuous Delivery Using AWS CloudFormation
DEV319: Automating Cloud Management & Deployment
If you’re a Lambda developer, be sure to watch this session and read this documentation on how to practice continuous delivery for your serverless applications:
SVR307: Application Lifecycle Management in a Serverless World
For all 30+ DevOps sessions, click here.
Deploy an App to an AWS OpsWorks Layer Using AWS CodePipeline
Deploy an App to an AWS OpsWorks Layer Using AWS CodePipeline
AWS CodePipeline lets you create continuous delivery pipelines that automatically track code changes from sources such as AWS CodeCommit, Amazon S3, or GitHub. Now, you can use AWS CodePipeline as a code change-management solution for apps, Chef cookbooks, and recipes that you want to deploy with AWS OpsWorks.
This blog post demonstrates how you can create an automated pipeline for a simple Node.js app by using AWS CodePipeline and AWS OpsWorks. After you configure your pipeline, every time you update your Node.js app, AWS CodePipeline passes the updated version to AWS OpsWorks. AWS OpsWorks then deploys the updated app to your fleet of instances, leaving you to focus on improving your application. AWS makes sure that the latest version of your app is deployed.
Step 1: Upload app code to an Amazon S3 bucket
The Amazon S3 bucket must be in the same region in which you later create your pipeline in AWS CodePipeline. For now, AWS CodePipeline supports the AWS OpsWorks provider in the us-east-1 region only; all resources in this blog post should be created in the US East (N. Virginia) region. The bucket must also be versioned, because AWS CodePipeline requires a versioned source. For more information, see Using Versioning.
Upload your app to an Amazon S3 bucket
- Download a ZIP file of the AWS OpsWorks sample, Node.js app, and save it to a convenient location on your local computer: https://s3.amazonaws.com/opsworks-codepipeline-demo/opsworks-nodejs-demo-app.zip.
- Open the Amazon S3 console at https://console.aws.amazon.com/s3/. Choose Create Bucket. Be sure to enable versioning.
- Choose the bucket that you created and upload the ZIP file that you saved in step 1.

- In the Properties pane for the uploaded ZIP file, make a note of the S3 link to the file. You will need the bucket name and the ZIP file name portion of this link to create your pipeline.
Step 2: Create an AWS OpsWorks to Amazon EC2 service role
1. Go to the Identity and Access Management (IAM) service console, and choose Roles.
2. Choose Create Role, and name it aws-opsworks-ec2-role-with-s3.
3. In the AWS Service Roles section, choose Amazon EC2, and then choose the policy called AmazonS3ReadOnlyAccess.
4. The new role should appear in the Roles dashboard.

Step 3: Create an AWS OpsWorks Chef 12 Linux stack
To use AWS OpsWorks as a provider for a pipeline, you must first have an AWS OpsWorks stack, a layer, and at least one instance in the layer. As a reminder, the Amazon S3 bucket to which you uploaded your app must be in the same region in which you later create your AWS OpsWorks stack and pipeline, US East (N. Virginia).
1. In the OpsWorks console, choose Add Stack, and then choose a Chef 12 stack.
2. Set the stack’s name to CodePipeline Demo and make sure the Default operating system is set to Linux.
3. Enable Use custom Chef cookbooks.
4. For Repository type, choose HTTP Archive, and then use the following cookbook repository on S3: https://s3.amazonaws.com/opsworks-codepipeline-demo/opsworks-nodejs-demo-cookbook.zip. This repository contains a set of Chef cookbooks that include Chef recipes you’ll use to install the Node.js package and its dependencies on your instance. You will use these Chef recipes to deploy the Node.js app that you prepared in step 1.1.
Step 4: Create and configure an AWS OpsWorks layer
Now that you’ve created an AWS OpsWorks stack called CodePipeline Demo, you can create an OpsWorks layer.
1. Choose Layers, and then choose Add Layer in the AWS OpsWorks stack view.
2. Name the layer Node.js App Server. For Short Name, type app1, and then choose Add Layer.
3. After you create the layer, open the layer’s Recipes tab. In the Deploy lifecycle event, type nodejs_demo. Later, you will link this to a Chef recipe that is part of the Chef cookbook you referenced when you created the stack in step 3.4. This Chef recipe runs every time a new version of your application is deployed.

4. Now, open the Security tab, choose Edit, and choose AWS-OpsWorks-WebApp from the Security groups drop-down list. You will also need to set the EC2 Instance Profile to use the service role you created in step 2.2 (aws-opsworks-ec2-role-with-s3).

Step 5: Add your App to AWS OpsWorks
Now that your layer is configured, add the Node.js demo app to your AWS OpsWorks stack. When you create the pipeline, you’ll be required to reference this demo Node.js app.
- Have the Amazon S3 bucket link from the step 1.4 ready. You will need the link to the bucket in which you stored your test app.
- In AWS OpsWorks, open the stack you created (CodePipeline Demo), and in the navigation pane, choose Apps.
- Choose Add App.
- Provide a name for your demo app (for example, Node.js Demo App), and set the Repository type to an S3 Archive. Paste your S3 bucket link (s3://bucket-name/file name) from step 1.4.
- Now that your app appears in the list on the Apps page, add an instance to your OpsWorks layer.
Step 6: Add an instance to your AWS OpsWorks layer
Before you create a pipeline in AWS CodePipeline, set up at least one instance within the layer you defined in step 4.
- Open the stack that you created (CodePipeline Demo), and in the navigation pane, choose Instances.
- Choose +Instance, and accept the default settings, including the hostname, size, and subnet. Choose Add Instance.

- By default, the instance is in a stopped state. Choose start to start the instance.
Step 7: Create a pipeline in AWS CodePipeline
Now that you have a stack and an app configured in AWS OpsWorks, create a pipeline with AWS OpsWorks as the provider to deploy your app to your specified layer. If you update your app or your Chef deployment recipes, the pipeline runs again automatically, triggering the deployment recipe to run and deploy your updated app.
This procedure creates a simple pipeline that includes only one Source and one Deploy stage. However, you can create more complex pipelines that use AWS OpsWorks as a provider.
To create a pipeline
- Open the AWS CodePipeline console in the U.S. East (N. Virginia) region.
- Choose Create pipeline.
- On the Getting started with AWS CodePipeline page, type MyOpsWorksPipeline, or a pipeline name of your choice, and then choose Next step.
- On the Source Location page, choose Amazon S3 from the Source provider drop-down list.
- In the Amazon S3 details area, type the Amazon S3 bucket path to your application, in the format s3://bucket-name/file name. Refer to the link you noted in step 1.4. Choose Next step.

- On the Build page, choose No Build from the drop-down list, and then choose Next step.
- On the Deploy page, choose AWS OpsWorks as the deployment provider.

- Specify the names of the stack, layer, and app that you created earlier, then choose Next step.
- On the AWS Service Role page, choose Create Role. On the IAM console page that opens, you will see the role that will be created for you (AWS-CodePipeline-Service). From the Policy Name drop-down list, choose Create new policy. Be sure the policy document has the following content, and then choose Allow.
For more information about the service role and its policy statement, see Attach or Edit a Policy for an IAM Service Role.
- On the Review your pipeline page, confirm the choices shown on the page, and then choose Create pipeline.
The pipeline should now start deploying your app to your OpsWorks layer on its own. Wait for deployment to finish; you’ll know it’s finished when Succeeded is displayed in both the Source and Deploy stages.

Step 8: Verifying the app deployment
To verify that AWS CodePipeline deployed the Node.js app to your layer, sign in to the instance you created in step 4. You should be able to see and use the Node.js web app.
- On the AWS OpsWorks dashboard, choose the stack and the layer to which you just deployed your app.
- In the navigation pane, choose Instances, and then choose the public IP address of your instance to view the web app. The running app will be displayed in a new browser tab.

- To test the app, on the app’s web page, in the Leave a comment text box, type a comment, and then choose Send. The app adds your comment to the web page. You can add more comments to the page, if you like.

Wrap-up
You now have a working and fully automated pipeline. As soon as you make changes to your application’s code and update the S3 bucket with the new version of your app, AWS CodePipeline automatically collects the artifact and uses AWS OpsWorks to deploy it to your instance, by running the OpsWorks deployment Chef recipe that you defined on your layer. The deployment recipe starts all of the operations on your instance that are required to support a new version of your artifact.
To learn more about Chef cookbooks and recipes: https://docs.chef.io/cookbooks.html
To learn more about the AWS OpsWorks and AWS CodePipeline integration: https://docs.aws.amazon.com/opsworks/latest/userguide/other-services-cp.html
IT Governance in a Dynamic DevOps Environment
IT Governance in a Dynamic DevOps Environment
Governance involves the alignment of security and operations with productivity to ensure a company achieves its business goals. Customers who are migrating to the cloud might be in various stages of implementing governance. Each stage poses its own challenges. In this blog post, the first in a series, I will discuss a four-step approach to automating governance with AWS services.
Governance and the DevOps Environment
Developers with a DevOps and agile mindset are responsible for building and operating services. They often rely on a central security team to develop and apply policies, seek security reviews and approvals, or implement best practices.
These policies and rules are not strictly enforced by the security team. They are treated as guidelines that developers can follow to get the much-desired flexibility from using AWS. However, due to time constraints or lack of awareness, developers may not always follow best practices and standards. If these best practices and rules were strictly enforced, the security team could become a bottleneck.
For customers migrating to AWS, the automated governance mechanisms described in this post will preserve flexibility for developers while providing controls for the security team.
These are some common challenges in a dynamic development environment:
· Quick or short path to accomplishing tasks like hardcoding credentials in code.
· Cost management (for example, controlling the type of instance launched).
· Knowledge transfer.
· Manual processes.
Steps to Governance
Here is a four-step approach to automating governance:
At initial setup, you want to implement some (1) controls for high-risk actions. After they are in place, you need to (2) monitor your environment to make sure you have configured resources correctly. Monitoring will help you discover issues you want to (3) fix as soon as possible. You’ll also want to regularly produce an (4) audit report that shows everything is compliant.
The example in this post helps illustrate the four-step approach: A central IT team allows its Big Data team to run a test environment of Amazon EMR clusters. The team runs the EMR job with 100 t2.medium instances, but when a team member spins up 100 r3.8xlarge instances to complete the job more quickly, the business incurs an unexpected expense.
The central IT team cares about governance and implements a few measures to prevent this from happening again:
· Control elements: The team uses CloudFormation to restrict the number and type of instances and AWS Identity and Access Management to allow only a certain group to modify the EMR cluster.
· Monitor elements: The team uses tagging, AWS Config, and AWS Trusted Advisor to monitor the instance limit and determine if anyone exceeded the number of allowed instances.
· Fix: The team creates a custom Config rule to terminate instances that are not of the type specified.
· Audit: The team reviews the lifecycle of the EMR instance in AWS Config.
Control
You can prevent mistakes by standardizing configurations (through AWS CloudFormation), restricting configuration options (through AWS Service Catalog), and controlling permissions (through IAM).
AWS CloudFormation helps you control the workflow environment in a single package. In this example, we use a CloudFormation template to restrict the number and type of instances and tagging to control the environment.
For example, the team can prevent the choice of r3.8xlarge instances by using CloudFormation with a fixed instance type and a fixed number of instances (100).
Cloudformation Template Sample
EMR cluster with tag:
{
“Type” : “AWS::EMR::Cluster”,
“Properties” : {
“AdditionalInfo” : JSON object,
“Applications” : [ Applications, … ],
“BootstrapActions” [ Bootstrap Actions, … ],
“Configurations” : [ Configurations, … ],
“Instances” : JobFlowInstancesConfig,
“JobFlowRole” : String,
“LogUri” : String,
“Name” : String,
“ReleaseLabel” : String,
“ServiceRole” : String,
“Tags” : [ Resource Tag, … ],
“VisibleToAllUsers” : Boolean
}
}
EMR cluster JobFlowInstancesConfig InstanceGroupConfig with fixed instance type and number:
{
“BidPrice” : String,
“Configurations” : [ Configuration, … ],
“EbsConfiguration” : EBSConfiguration,
“InstanceCount” : Integer,
“InstanceType” : String,
“Market” : String,
“Name” : String
}
AWS Service Catalog can be used to distribute approved products (servers, databases, websites) in AWS. This gives IT administrators more flexibility in terms of which user can access which products. It also gives them the ability to enforce compliance based on business standards.
AWS IAM is used to control which users can access which AWS services and resources. By using IAM role, you can avoid the use of root credentials in your code to access AWS resources.
In this example, we give the team lead full EMR access, including console and API access (not covered here), and give developers read-only access with no console access. If a developer wants to run the job, the developer just needs PEM files.
IAM Policy
This policy is for the team lead with full EMR access:
{
“Version”: “2012-10-17”,
“Statement”: [
{
“Effect”: “Allow”,
“Action”: [
“cloudwatch:*”,
“cloudformation:CreateStack”,
“cloudformation:DescribeStackEvents”,
“ec2:AuthorizeSecurityGroupIngress”,
“ec2:AuthorizeSecurityGroupEgress”,
“ec2:CancelSpotInstanceRequests”,
“ec2:CreateRoute”,
“ec2:CreateSecurityGroup”,
“ec2:CreateTags”,
“ec2:DeleteRoute”,
“ec2:DeleteTags”,
“ec2:DeleteSecurityGroup”,
“ec2:DescribeAvailabilityZones”,
“ec2:DescribeAccountAttributes”,
“ec2:DescribeInstances”,
“ec2:DescribeKeyPairs”,
“ec2:DescribeRouteTables”,
“ec2:DescribeSecurityGroups”,
“ec2:DescribeSpotInstanceRequests”,
“ec2:DescribeSpotPriceHistory”,
“ec2:DescribeSubnets”,
“ec2:DescribeVpcAttribute”,
“ec2:DescribeVpcs”,
“ec2:DescribeRouteTables”,
“ec2:DescribeNetworkAcls”,
“ec2:CreateVpcEndpoint”,
“ec2:ModifyImageAttribute”,
“ec2:ModifyInstanceAttribute”,
“ec2:RequestSpotInstances”,
“ec2:RevokeSecurityGroupEgress”,
“ec2:RunInstances”,
“ec2:TerminateInstances”,
“elasticmapreduce:*”,
“iam:GetPolicy”,
“iam:GetPolicyVersion”,
“iam:ListRoles”,
“iam:PassRole”,
“kms:List*”,
“s3:*”,
“sdb:*”,
“support:CreateCase”,
“support:DescribeServices”,
“support:DescribeSeverityLevels”
],
“Resource”: “*”
}
]
}
This policy is for developers with read-only access:
{
“Version”: “2012-10-17”,
“Statement”: [
{
“Effect”: “Allow”,
“Action”: [
“elasticmapreduce:Describe*”,
“elasticmapreduce:List*”,
“s3:GetObject”,
“s3:ListAllMyBuckets”,
“s3:ListBucket”,
“sdb:Select”,
“cloudwatch:GetMetricStatistics”
],
“Resource”: “*”
}
]
}
These are IAM managed policies. If you want to change the permissions, you can create your own IAM custom policy.
Monitor
Use logs available from AWS CloudTrail, Amazon Cloudwatch, Amazon VPC, Amazon S3, and Elastic Load Balancing as much as possible. You can use AWS Config, Trusted Advisor, and CloudWatch events and alarms to monitor these logs.
AWS CloudTrail can be used to log API calls in AWS. It helps you fix problems, secure your environment, and produce audit reports. For example, you could use CloudTrail logs to identify who launched those r3.8xlarge instances.

AWS Config can be used to keep track of and act on rules. Config rules check the configuration of your AWS resources for compliance. You’ll also get, at a glance, the compliance status of your environment based on the rules you configured.
Amazon CloudWatch can be used to monitor and alarm on incorrectly configured resources. CloudWatch entities–metrics, alarms, logs, and events–help you monitor your AWS resources. Using metrics (including custom metrics), you can monitor resources and get a dashboard with customizable widgets. Cloudwatch Logs can be used to stream data from AWS-provided logs in addition to your system logs, which is helpful for fixing and auditing.
CloudWatch Events help you take actions on changes. VPC flow, S3, and ELB logs provide you with data to make smarter decisions when fixing problems or optimizing your environment.
AWS Trusted Advisor analyzes your AWS environment and provides best practice recommendations in four categories: cost, performance, security, and fault tolerance. This online resource optimization tool also includes AWS limit warnings.
We will use Trusted Advisor to make sure a limit increase is not going to become bottleneck in launching 100 instances:
Trusted Advisor

Fix
Depending on the violation and your ability to monitor and view the resource configuration, you might want to take action when you find an incorrectly configured resource that will lead to a security violation. It’s important the fix doesn’t result in unwanted consequences and that you maintain an auditable record of the actions you performed.

You can use AWS Lambda to automate everything. When you use Lambda with Amazon Cloudwatch Events to fix issues, you can take action on an instance termination event or the addition of new instance to an Auto Scaling group. You can take an action on any AWS API call by selecting it as source. You can also use AWS Config managed rules and custom rules with remediation. While you are getting informed about the environment based on AWS Config rules, you can use AWS Lambda to take action on top of these rules. This helps in automating the fixes.
AWS Config to Find Running Instance Type

To fix the problem in our use case, you can implement a Config custom rule and trigger (for example, the shutdown of the instances if the instance type is larger than .xlarge or the tearing down of the EMR cluster).
Audit
You’ll want to have a report ready for the auditor at the end of the year or quarter. You can automate your reporting system using AWS Config resources.
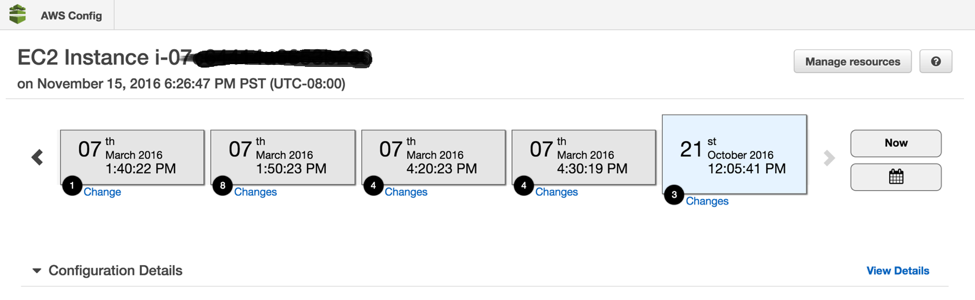
You can view AWS resource configurations and history so you can see when the r3.8xlarge instance cluster was launched or which security group was attached. You can even search for deleted or terminated instances.
AWS Config Resources

More Control, Monitor, and Fix Examples
Armando Leite from AWS Professional Services has created a sample governance framework that leverages Cloudwatch Events and AWS Lambda to enforce a set of controls (flows between layers, no OS root access, no remote logins). When a deviation is noted (monitoring), automated action is taken to respond to an event and, if necessary, recover to a known good state (fix).
· Remediate (for example, shut down the instance) through custom Config rules or a CloudWatch event to trigger the workflow.
· Monitor a user’s OS activity and escalation to root access. As events unfold, new Lambda functions dynamically enable more logs and subscribe to log data for further live analysis.
· If the telemetry indicates it’s appropriate, restore the system to a known good state.
AWS OpsWorks at re:Invent 2016
AWS re:Invent 2016 is right around the corner. Here’s an overview of where you can meet the AWS OpsWorks team and learn about the service.
To ensure that your application operates in a predictable manner in both your test and production environments, you must vigilantly maintain the configuration of your resources. By leveraging configuration management solutions, Dev and Ops engineers can define the state of their resources across their entire lifecycle. In this session, we will show you how to use AWS OpsWorks, AWS CodeDeploy, and AWS CodePipeline to build a reliable and consistent development pipeline that assures your production workloads behave in a predictable manner.
This is a repeat session of the talk from the previous day if you were unable to attend that one.
LD148 – Live Demo: Configuration Management with AWS OpsWorks
12/1/16 (Thursday) 4:50 PM – Venetian, Hall C, AWS Booth
Join this session at the AWS Booth for a live demo and the opportunity to meet the AWS OpsWorks service team.
AWS re:Invent is a great opportunity to talk with AWS teams. As in previous years, you will find OpsWorks team members at the AWS booth. Drop by and ask for a demo!
Didn’t register before the conference sold out? All sessions will be recorded and posted on YouTube after the conference and all slide decks will be posted on SlideShare.net.
Integrating Git with AWS CodePipeline
AWS CodePipeline is a continuous delivery service you can use to model, visualize, and automate the steps required to release your software. The service currently supports GitHub, AWS CodeCommit, and Amazon S3 as source providers. This blog post will cover how to integrate AWS CodePipeline with GitHub Enterprise, Bitbucket, GitLab, or any other Git server that supports the webhooks functionality available in most Git software.
Note: The steps outlined in this guide can also be used with AWS CodeBuild. AWS CodeBuild is a fully managed build service that compiles source code, runs tests, and produces software packages that are ready to deploy. Once the “Test a commit” step is completed the output zip file can be used as an S3 input for a build project. Be sure to include a Build Specification file in the root of your repository.
Architecture overview
Webhooks notify a remote service by issuing an HTTP POST when a commit is pushed to the repository. AWS Lambda receives the HTTP POST through Amazon API Gateway, and then downloads a copy of the repository. It places a zipped copy of the repository into a versioned S3 bucket. AWS CodePipeline can then use the zip file in S3 as a source; the pipeline will be triggered whenever the Git repository is updated.

Architectural overview
There are two methods you can use to get the contents of a repository. Each method exposes Lambda functions that have different security and scalability properties.
- Zip download uses the Git provider’s HTTP API to download an already-zipped copy of the current state of the repository.
- No need for external libraries.
- Smaller Lambda function code.
- Large repo size limit (500 MB).
- Git pull uses SSH to pull from the repository. The repository contents are then zipped and uploaded to S3.
- Efficient for repositories with a high volume of commits, because each time the API is triggered, it downloads only the changed files.
- Suitable for any Git server that supports hooks and SSH; does not depend on personal access tokens or OAuth2.
- More extensible because it uses a standard Git library.
Build the required AWS resources
For your convenience, there is an AWS CloudFormation template that includes the AWS infrastructure and configuration required to build out this integration. To launch the CloudFormation stack setup wizard, click the link for your desired region. (The following AWS regions support all of the services required for this integration.)
For a list of services available in AWS regions, see the AWS Region Table.
The stack setup wizard will prompt you to enter several parameters. Many of these values must be obtained from your Git service.
OutputBucketName: The name of the bucket where your zipped code will be uploaded. CloudFormation will create a bucket with this name. For this reason, you cannot use the name of an existing S3 bucket.
Note: By default, there is no lifecycle policy on this bucket, so previous versions of your code will be retained indefinitely. If you want to control the retention period of previous versions, see Lifecycle Configuration for a Bucket with Versioning in the Amazon S3 User Guide.
AllowedIps: Used only with the git pull method described earlier. A comma-separated list of IP CIDR blocks used for Git provider source IP authentication. The Bitbucket Cloud IP ranges are provided as defaults.
ApiSecret: Used only with the git pull method described earlier. This parameter is used for webhook secrets in GitHub Enterprise and GitLab. If a secret is matched, IP range authentication is bypassed. The secret cannot contain commas (,), slashes (\), or quotation marks (“).
GitToken: Used only with the zip download method described earlier. This is a personal access token generated by GitHub Enterprise or GitLab.
OauthKey/OuathSecret: Used only with the zip download method described earlier. This is an OAuth2 key and secret provided by Bitbucket.
At least one parameter for your chosen method and provider must be set.
The process for setting up webhook secrets and API tokens differs between vendors and product versions. Consult your Git provider’s documentation for details.
After you have entered values for these parameters, you can complete the steps in the wizard and start the stack creation. If your desired values change over time, you can use CloudFormation’s update stack functionality to modify your parameters.
After the CloudFormation stack creation is complete, make a note of the GitPullWebHookApi, ZipDownloadWebHookApi, OutputBucketName and PublicSSHKey. You will need these in the following steps.
Configure the source repository
Depending on the method (git pull or zip download) you would like to use, in your Git provider’s interface, set the destination URL of your webhook to either the GitPullWebHookApi or ZipDownloadWebHookApi. If you create a secret at this point, be sure to update the ApiSecret parameter in your CloudFormation stack.
If you are using the git pull method, the Git repo is downloaded over SSH. For this reason, the PublicSSHKey output must be imported into Git as a deployment key.
Test a commit
After you have set up webhooks on your repository, run the git push command to create a folder structure and zip file in the S3 bucket listed in your CloudFormation output as OutputBucketName. If the zip file is not created, you can check the following sources for troubleshooting help:
- Webhook logs in your Git provider’s interface
- Monitoring and Troubleshooting in API Gateway
- Accessing Amazon CloudWatch Logs for AWS Lambda
Set up AWS CodePipeline
The final step is to create a pipeline in AWS CodePipeline using the zip file as an S3 source. For information about creating a pipeline, see the Simple Pipeline Walkthrough in the AWS CodePipeline User Guide. After your pipeline is set up, commits to your repository will trigger an update to the zip file in S3, which, in turn, triggers a pipeline execution.
We hope this blog post will help you integrate your Git server. Feel free to leave suggestions or approaches on integration in the comments.
Deploying a Spring Boot Application on AWS Using AWS Elastic Beanstalk
In this blog post, I will show you how to deploy a sample Spring Boot application using AWS Elastic Beanstalk and how to customize the Spring Boot configuration through the use of environment variables.
Spring Boot is often described as a quick and easy way of building production-grade Spring Framework-based applications. To accomplish this, Spring Boot comes prepackaged with auto configuration modules for most libraries typically used with the Spring Framework. This is often referred to as “convention over configuration.”
AWS Elastic Beanstalk offers a similar approach to application deployment. It provides convention over configuration while still giving you the ability to dig under the hood to make adjustments, as needed. This makes Elastic Beanstalk a perfect match for Spring Boot.
The sample application used in this blog post is the gs-accessing-data-rest sample project provided as part of the Accessing JPA Data with REST topic in the Spring Getting Started Guide. The repository is located in GitHub at https://github.com/spring-guides/gs-accessing-data-rest.