AWS Mobile Blog
AWS Mobile SDK for iOS version 2.5.0 – Improvements and changes to Swift support
What
Version 2.5.0 of the AWS Mobile SDK for iOS introduces better compatibility for a Swift 3 migration.
This blog walks through improvements and breaking changes with this SDK release that are relevant for Swift developers.
When you open your legacy Swift 2.x project with Xcode 8.0 for the first time, you will be prompted by the Swift Migration Assistant to migrate to Swift 3. The following changes have been made to the AWS Mobile SDK for iOS to better support the migration.
Compatibility Improvements
AWS Mobile SDK for iOS version 2.5.0 now has better support for Auto-Completion, added generics, and improved name translation for AWSTask so that it handles the Xcode 8 Swift Migration Assistant gracefully and predictably.
Here are some examples of the changes that will improve the migration to Swift 3:
- Added more generics support for public APIs. For example, in Amazon Cognito Sync, dataset.getAllRecords() now returns an array of type AWSCognitoRecord instead of an array without a type.
- Improved name translation for AWSTask continueWithSuccessBlock and continueWithBlock. This enables Xcode to distinguish these methods and it avoids returning an ambiguous use of the continue error message. To illustrate, The following is an asynchronous call to list Amazon DynamoDB tables:
Prior to iOS SDK 2.5.0
let dynamoDB = AWSDynamoDB.defaultDynamoDB()

let listTableInput = AWSDynamoDBListTablesInput()

dynamoDB.listTables(listTableInput).continueWithBlock{ (task: AWSTask?) -> AnyObject? in
    if let error = task.error {
       print("Error occurred: \(error)")
       return nil
    }

    let listTablesOutput = task.result as  AWSDynamoDBListTablesOutput
    for tableName in listTablesOutput.tableNames {
        print("\(tableName)")
    }
    return nil
}
After iOS SDK 2.5.0
let dynamoDB = AWSDynamoDB.default()
let listTableInput = AWSDynamoDBListTablesInput()

dynamoDB.listTables(listTableInput!).continueWith{ (task:AWSTask<AWSDynamoDBListTablesOutput>) -> Any? in
	if let error = task.error as? NSError {
		print("Error occurred: \(error)")
		return nil
	}

	let listTablesOutput = task.result

	for tableName in listTablesOutput!.tableNames! {
		print("\(tableName)")
	}

	return nil
}
- When migrating legacy Swift code to iOS SDK 2.5.0, continue to use Swift 2.3 syntax for AWS region and service naming conventions. For example: use .USEast1 instead of .usEast1, and use SNS instead of sNS. We made the decision to go against standard Swift 3 naming practices to provide consistency across all AWS region values and service enums.
Swift 3 sample code has been updated and added where appropriate in our AWS Mobile SDK for iOS Samples GitHub repository, in our API reference documentation, and in the AWS Mobile SDK for iOS Developer Guide. Support for a Swift 3 sample app on AWS Mobile Hub is coming soon.
Questions or Comments?
Raise an issue on GitHub or reach out to us via the AWS Mobile Development Forum.
Create an Android Mobile App with Pinpoint using Mobile Hub
Amazon Pinpoint is a new AWS service that makes it easy to run targeted campaigns to improve user engagement. Amazon Pinpoint helps you understand your users’ behavior so that you can define who to target, what messages to send, and when to deliver them. Amazon Pinpoint tracks how your users interact with your app so you can monitor the impact of your campaigns.
Amazon Pinpoint provides real-time analytics with dashboards for analyzing user engagement, monetization, user demographics, custom events, and funnels so you can understand how users engage with your app. You can analyze and understand your user data by drilling down based on the segments you’ve defined, segmentation attributes, or time.
With Amazon Pinpoint, you can define target segments from various data sources. You can identify segments from app user data collected by Amazon Pinpoint. You can build custom segments from user data collected by other AWS services, such as Amazon S3 and Amazon Redshift. You can also import user segments from third party sources, such as Salesforce via S3.
Once you define your segments, Amazon Pinpoint lets you send targeted notifications with personalized messages to each user in the segment based on custom attributes, such as game level, favorite team, and news preferences. Amazon Pinpoint can send push notifications immediately, at a time you define, or as a recurring campaign. By scheduling campaigns, you can optimize the push notifications to be delivered at a specific time across multiple time zones. Amazon Pinpoint supports rich notifications, so you can send images as part of your push notifications. Amazon Pinpoint also supports silent or data notifications, which allow you to control app behavior and configuration in the background.
Once your campaign is running, Amazon Pinpoint provides metrics to track the impact of your campaign, including the number of notifications received, number of times the app was opened as a result of the notifications, time of app open, push notification opt-out rate, and revenue. You can also export event data reported by your app and run custom analytics using your existing analytics systems.
You can run A/B tests for different messages, track results, and then send the best message to your target segment.
With Amazon Pinpoint there is no minimum fee, no setup cost, and no fixed monthly cost based on your total user pool. You only pay for the number of users you target or collect events from, the messages you send, and events you collect, so you can start small and scale as your application grows.
Now let’s have a look at how you integrate Amazon Pinpoint with your app.
Requirements
Latest version Android Studio: https://developer.android.com/studio/index.html
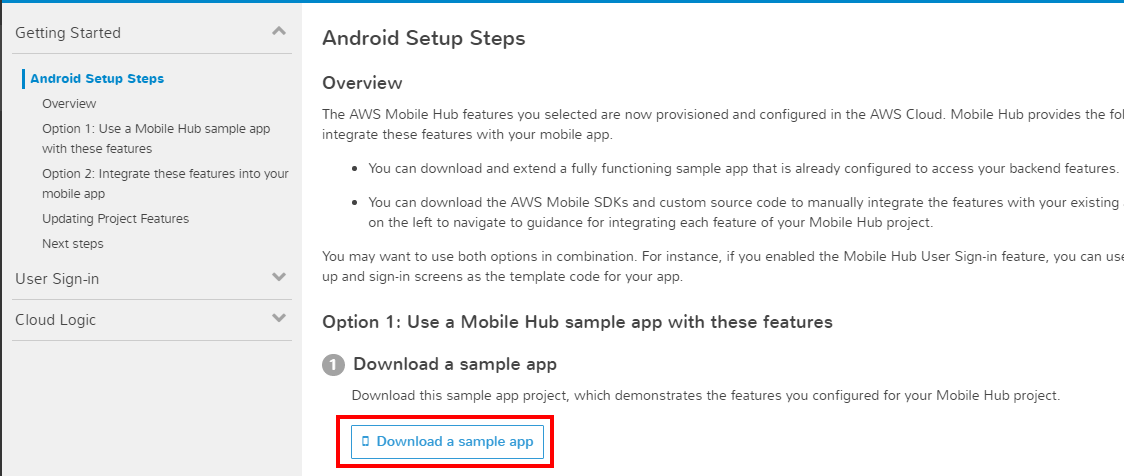
Step 1 – Mobile Hub
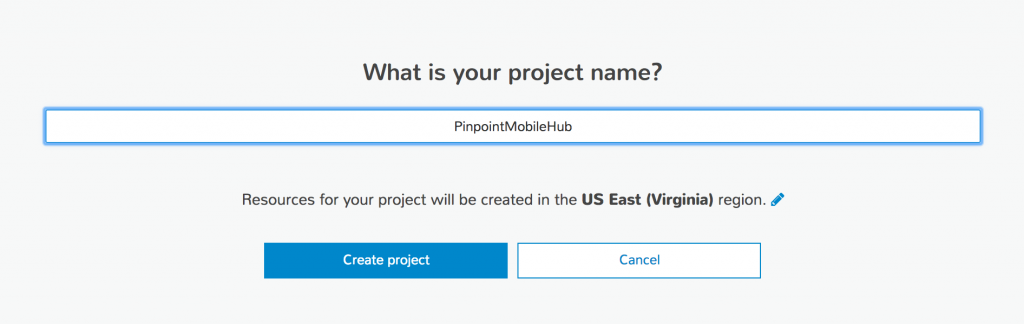
Create a new Mobile Hub project from the AWS Mobile Hub console. In this example, we are naming the project PinpointMobileHub.
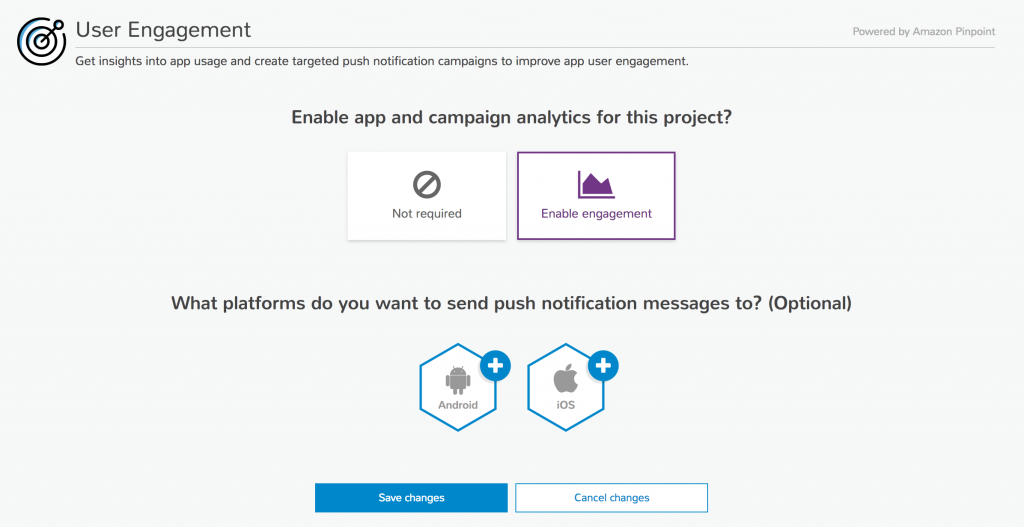
Enable Amazon Pinpoint by clicking User Engagement.

Enable app and campaign analytics by clicking Enable Engagement.
Choose Android and add your API Key and Sender ID.
To provide your API Key and Sender ID, refer to the next section for information on how to get these credentials from your Google Developer Project using Firebase.
Getting Sender ID and API Key
Go to https://console.firebase.google.com. Create a new Firebase project called PinpointMobileHub.
Go to your project settings by clicking on the gear icon next to your project name, and then click on Project settings.
Click on the CLOUD MESSAGING tab. Copy the Sender ID (also called Project Number) and the API Key.
Back to Mobile Hub
Provide your sender ID and server key (API Key).

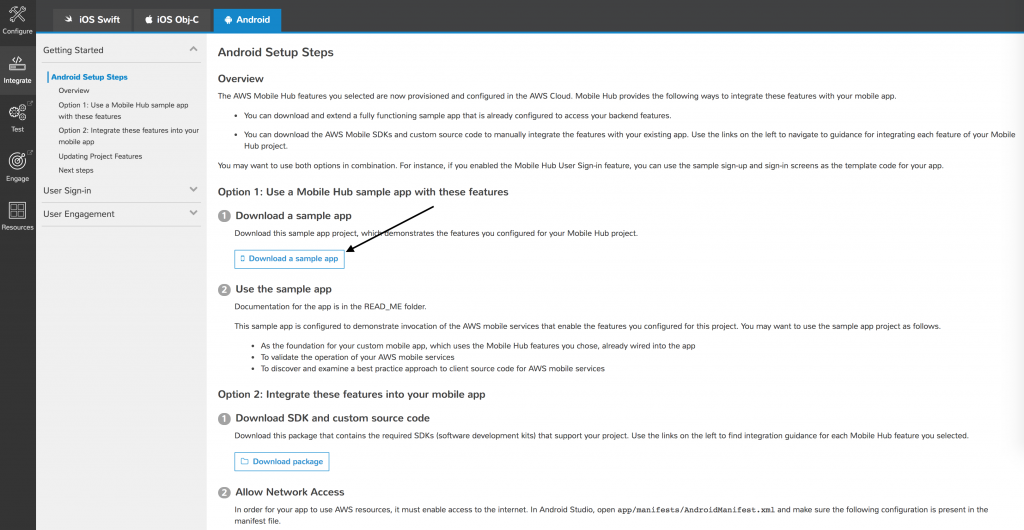
Click Save changes. Click Integrate with your app . You will be redirected to the Integrate feature of Mobile Hub. Click the Android tab to download the Android Mobile Hub sample.
The Android sample contains the Amazon Pinpoint SDK, along with a Demo fragment demonstrating how to record analytics events and how to enrich an endpoint profile with custom attributes so that you can target users based on their preferences.
Mobile Hub Android Sample
Unzip the downloaded file PinpointMobileHub-aws-my-sample-app-android.zip.
Open Android Studio.
Click Open an existing Android Studio project, and navigate to the MySampleApp directory.
Android Studio will open the sample project. Now you should be able to run the sample in your device or on the simulator.
You can verify that your credentials are correct by checking the AWSConfiguration file inside the com.amazonaws.mobile package. Verify that your project contains a value for the GOOGLE_CLOUD_MESSAGING_SENDER_ID key.
Note: The Mobile Hub sample project uses the Google Cloud Messaging SDK and not the Firebase SDK. If you are using the Firebase SDK in your application, Amazon Pinpoint will still work with your project, however, there are some extra steps you will need to take to make it work correctly. See the section on Firebase integration.
Run the application on a simulator or device, if you are running the application on the simulator you need to make sure that you have logged in to Google Account on the simulator so that Push Notifications will work on the simulator. To add an account, go to Settings -> Accounts -> Add account -> Google, and log in to your account.
Demo App Analytics
On the demo application, navigate to the User Engagement section and tap on Demo App Analytics. You will see two buttons on the bottom, the left button records a custom event and the right button records a monetization event.
You can add custom attributes and metrics to an event. The sample code is the following:
final AnalyticsClient analyticsClient = AWSMobileClient.defaultMobileClient().getPinpointManager().getAnalyticsClient();
final AnalyticsEvent event = analyticsClient.createEvent(“DemoCustomEvent”) // A music app use case might include attributes such as: // .withAttribute(“Playlist”, “Amazing Songs 2015”) // .withAttribute(“Artist”, “Various”)
// .withMetric(“Song playtime”, playTime);
.withAttribute(“DemoAttribute1”, “DemoAttributeValue1”) .withAttribute(“DemoAttribute2”, “DemoAttributeValue2”) .withMetric(“DemoMetric1”, Math.random());
analyticsClient.recordEvent(event); analyticsClient.submitEvents();
The sample app records a custom event with event type _monetization.purchase. You can add also custom attributes and metrics to a monetization event. A monetization event must have a price, a product ID, a quantity, and a transaction id. The sample code is the following:
final AnalyticsClient analyticsClient = AWSMobileClient.defaultMobileClient().getPinpointManager().getAnalyticsClient();
// This creates a Google Play monetization event. To create an Amazon monetization // event instead, use AmazonMonetizationEventBuilder. final AnalyticsEvent event = GooglePlayMonetizationEventBuilder.create(analyticsClient)
.withFormattedItemPrice(“$1.00”)
.withProductId(“DEMO_PRODUCT_ID”) .withQuantity(1.0) .withTransactionId(“DEMO_TRANSACTION_ID”).build();
analyticsClient.recordEvent(event); analyticsClient.submitEvents();
Demo user engagement
We will now run through the user engagement and targeting portion of the demo and get a notification sent to the device.
Update an endpoint profile
Amazon Pinpoint is able to segment and target users based on an endpoint profile. The endpoint profile contains information about the device, such as model, make, version, etc., as well as custom attributes or metrics.
To demo the targeting feature of the demo application, navigate to the User Engagement section and tap on Demo User Engagement.
On the User Engagement demo, you will see information about your endpoint profile, such as your current locale, platform, and version. You can also set custom attributes on the endpoint profile. The demo is setting a custom attribute named `season` to signify the favorite seasons of a user.
Go ahead and select your favorite seasons, we will use it later to create a segment that targets devices with those preferences. For this example, we will select all four seasons.
The sample code to update your profile with custom attributes is the following:
.defaultMobileClient().getPinpointManager() .getTargetingClient().addAttribute(“seasons”, Arrays.asList(“winter”,”spring”,”summer”,”fall”)
.defaultMobileClient().getPinpointManager()
AWSMobileClient
.getTargetingClient().updateEndpointProfile();
Creating a campaign
Go to the Amazon Pinpoint console: https://console.aws.amazon.com/pinpoint/home/
Select the PinpointMobileHub application we created in Mobile Hub. It will be named pinpointmobilehub_MobileHub since we created the app in Mobile Hub.
Click New Campaign.

Name your campaign My first campaign, keep the campaign type as a Standard campaign, and click Next step.

Now let’s create a segment to target users that have selected `Fall` as a favorite season. Name this segment `Fall` so that we can reuse it later.
In the section Filter by custom attributes, select fall and click Next step.

Give a title and body to the notification, then click Next step.
Schedule the campaign to be Immediate so that you get the notification right away.
Review your campaign and click Launch Campaign.
If you have the sample app in the foreground, an alert will show up. If the sample app is in the background, a banner will be displayed with the notification. You can also swipe down to see the notification center.
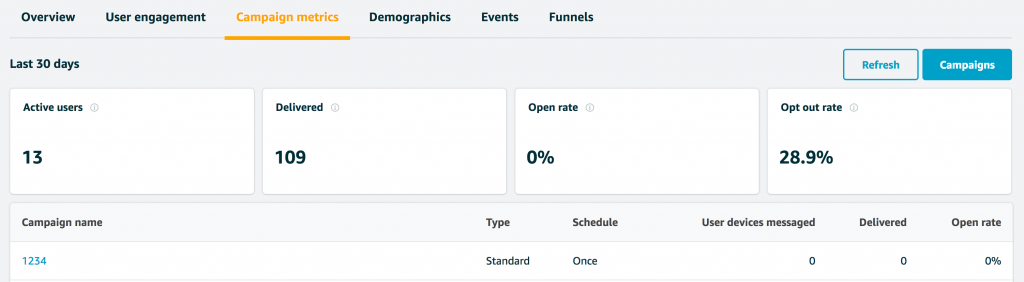
If your app is in the background and you tap on the notification, you will be able to see notification opens metrics in the Amazon Pinpoint console as a Directly Opened metric. Click on the Campaign analytics button.
At this point you should also be able to head over to Amazon Pinpoint Analytics and see the monetization and usage data populated in the console, it may take some time for the data to update.
SDK Integration
First add the Amazon Pinpoint SDK to your Gradle Build.
dependencies {
// … other dependencies go here …
compile(‘com.amazonaws:aws-android-sdk-core:2.3.5’) // add the Amazon Pinpoint SDK dependency
compile(‘com.amazonaws:aws-android-sdk-pinpoint:2.3.5’) }
Initializing the SDK
To initialize the SDK you must instantiate an instance of the PinpointManager class:
try { final CognitoCachingCredentialsProvider cognitoCachingCredentialsProvider =
new CognitoCachingCredentialsProvider( context, ”YOUR_IDENTITY_POOL_ID”, Regions.US_EAST_1,
new ClientConfiguration() final PinpointConfiguration config =
);
new PinpointConfiguration(context, “YOUR_APP_ID”,
Regions.US_EAST_1,
cognitoCachingCredentialsProvider); this.pinpointManager = new PinpointManager(config); //Save instance of pinpointManager
} catch (final AmazonClientException ex) {
Log.e(LOG_TAG, “Unable to initalize Amazon Mobile Analytics. ” + ex.getMessage(), ex); }
Mobile Hub initializes the SDK inside its AWSMobileClient class. You may use that class to manage initialization of AWS SDKs.
Instrumenting Session Data
You must instrument session data manually on Android. You must record session start and stop events in order for Analytics to work. A session must be started before an event is recorded, and they should be stopped once the application goes into the background. Mobile Hub has an example inside its Application class utilizing the AbstractApplicationLifeCycleHelper that provides callbacks to detect when your application goes into the background and comes to the foreground.
The following example is taken from Mobile Hub’s example code:
@Override
public void onCreate() { Log.d(LOG_TAG, “Application.onCreate – Initializing application…”); super.onCreate(); initializeApplication(); Log.d(LOG_TAG, “Application.onCreate – Application initialized OK”);
}
private void initializeApplication() {
AWSMobileClient.initializeMobileClientIfNecessary(getApplicationContext());
// The Helper registers itself to receive application lifecycle events when it is constructed. // A reference is kept here in order to pass through the onTrimMemory() call from // the Application class to properly track when the application enters the background. applicationLifeCycleHelper = new AbstractApplicationLifeCycleHelper(this) {
@Override
protected void applicationEnteredForeground() {
final PinpointManager pinpointManager = AWSMobileClient.defaultMobileClient()
.getPinpointManager(); pinpointManager.getSessionClient().startSession(); // handle any events that should occur when your app has come to the foreground…
}
@Override
protected void applicationEnteredBackground() { Log.d(LOG_TAG, “Detected application has entered the background.”); final PinpointManager pinpointManager = AWSMobileClient.defaultMobileClient()
.getPinpointManager(); pinpointManager.getSessionClient().stopSession(); pinpointManager.getAnalyticsClient().submitEvents(); // handle any events that should occur when your app has gone into the background…
} };
// …Put any application-specific initialization logic here…
}
@Override
public void onTrimMemory(final int level) { Log.d(LOG_TAG, “onTrimMemory ” + level); applicationLifeCycleHelper.handleOnTrimMemory(level); super.onTrimMemory(level);
}
Setting up push notification with GCM
The SDK needs to register the device token received from GCM with the endpoint profile. Implement the GCMTokenUpdateObserver in a class and override the onGCMTokenUpdate method. The following example is taken from Mobile Hub’s example code:
@Override
public void onGCMTokenUpdate(final String gcmToken, final boolean didTokenChange) { if (didTokenChange) {
Log.d(LOG_TAG, “GCM Token changed, registering for Campaign push.”);
// Register the Device Token to receive Campaign Push.
final NotificationClient notificationClient = AWSMobileClient.defaultMobileClient()
.getPinpointManager()
.getNotificationClient(); notificationClient.registerGCMDeviceToken(gcmToken);
} }
On your class that extends the GcmListenerService add the following code inside the onMessageReceived method:
AWSMobileClient.initializeMobileClientIfNecessary(this.getApplicationContext()); final NotificationClient notificationClient = AWSMobileClient.defaultMobileClient()
.getPinpointManager().getNotificationClient(); NotificationClient.CampaignPushResult pushResult =
notificationClient.handleGCMCampaignPush(from, data, this.getClass());
if (!NotificationClient.CampaignPushResult.NOT_HANDLED.equals(pushResult)) { if (NotificationClient.CampaignPushResult.APP_IN_FOREGROUND.equals(pushResult)) {
// You can handle the notification any way you like if the app is in the foreground.
}
return;
}
Add the following declarations to your AndroidManifest.xml. In this example taken from Mobile Hub, we register the PushListernerService to handle messages.
<uses-permission android:name=”android.permission.WAKE_LOCK”/> <uses-permission android:name=”com.google.android.c2dm.permission.RECEIVE” /> <permission android:name=”com.amazon.mysampleapp.permission.C2D_MESSAGE”
android:protectionLevel=”signature” />
<uses-permission android:name=”com.amazon.mysampleapp.permission.C2D_MESSAGE” />
<application
…
<receiver
android:name=”com.google.android.gms.gcm.GcmReceiver” android:exported=”true” android:permission=”com.google.android.c2dm.permission.SEND” > <intent-filter>
<action android:name=”com.google.android.c2dm.intent.RECEIVE” />
<category android:name=”@string/google_cloud_messaging_package” /> </intent-filter>
</receiver>
<!– BEGIN – PUSH NOTIFICATIONS WITH GOOGLE CLOUD MESSAGING (GCM) –>
<service
android:name=”.PushListenerService” android:exported=”false” > <intent-filter>
<action android:name=”com.google.android.c2dm.intent.RECEIVE” /> </intent-filter>
</service>
Setting up push notification with Firebase
The SDK needs to register the device token received from FCM with the endpoint profile. Extend the FirebaseInstanceIdService in a class, and override the onTokenRefresh method.
On your class that extends the FirebaseMessagingService, add the following code inside the onMessageReceived method:
@Override
public void onTokenRefresh() {
// Get updated InstanceID token.
String refreshedToken = FirebaseInstanceId.getInstance().getToken(); AWSMobileClient.defaultMobileClient().getPinpointManager()
.getNotificationClient().registerGCMDeviceToken(refreshedToken); }
NotificationClient.CampaignPushResult pushResult = AWSMobileClient.defaultMobileClient().getPinpointManager().
getNotificationClient().handleFCMCampaignPush( remoteMessage.getFrom(), remoteMessage.getData());
if (!NotificationClient.CampaignPushResult.NOT_HANDLED.equals(pushResult)) { if (NotificationClient.CampaignPushResult.APP_IN_FOREGROUND.equals(pushResult)) {
// You can handle the notification any way you like if the app is in the foreground.
}
return;
}
Add the following declarations to your AndroidManifest.xml. You must register this receiver so that we can launch the app when the user taps on the notification.
<receiver
android:name=”com.amazonaws.mobileconnectors.pinpoint.targeting.notification.PinpointNotificationReceiver” android:exported=”false” > <intent-filter>
<action android:name=”com.amazonaws.intent.fcm.NOTIFICATION_OPEN” /> </intent-filter>
</receiver>
AWS Mobile App Backend with Hybrid Apps
This post was co-authored by Leo Drakopoulos, AWS Solutions Architect.
Today we would like to tell you about a new solutions brief for building serverless mobile backend solutions on AWS, and a step-by-step walkthrough for implementing this pattern, using the Ionic framework on AWS Answers. Like other solutions on AWS Answers, this one was built by AWS Solutions Architects. This solution incorporates best practices for deploying scalable backend services for mobile applications by leveraging AWS managed services.
The Mobile Backend Services brief provides best practices, architectural guidance, and considerations for using managed services on the AWS Cloud to simplify development of RESTful backend services for mobile apps. The walkthrough shows you how to power hybrid mobile applications built using the Ionic Framework. You can use the walkthrough guide to quickly integrate your hybrid mobile application with mobile backend services hosted on AWS. The reference architecture and walkthrough enable you to deploy your Ionic mobile app without having to manage any backend infrastructure. The same general approach can be applied to any framework built using JavaScript, such as PhoneGap/Cordova, Framework 7, etc. Here’s how it looks:

This mobile app backend design applies to both hybrid and native mobile application use cases, including the following:
- User sign in and registration
- Saving and retrieving data from a NoSQL store
- Calling cloud hosted REST APIs from your hybrid mobile application
To enable these use cases, the solution uses Amazon Cognito User Pools to add sign-up, sign-in, and user management for mobile apps. Amazon API Gateway is used to create custom RESTful APIs. These APIs trigger an AWS Lambda function to perform CRUD operations on an Amazon DynamoDB NoSQL data store.
Here is how it works. An Amazon Cognito User Pool authorizer is associated with a RESTful API hosted in Amazon API Gateway. The authorizer authenticates every API call made from a mobile app by leveraging a JSON Web Token (JWT) passed in the API call headers. Amazon API Gateway is natively integrated with Amazon Cognito User Pools so the validation of the JWT requires no additional effort from the application developer. Amazon API Gateway then invokes an AWS Lambda function that accesses other AWS services, which in this case is Amazon DynamoDB. When AWS Lambda is invoked, it assumes an AWS Identity and Access Management (IAM) role. The IAM role determines the level of access that AWS Lambda has to Amazon DynamoDB.
The cost to run this reference implementation in production varies, depending on the scale of your backend services. Some of the services leveraged by the solution are part of the AWS Free Tier, which enables you to get started at a very low cost point. For more information, see AWS Free Tier at https://aws.amazon.com/free/.
The solution brief for the Mobile App Backend is available online or you can download the .pdf version here. You can get started today by downloading the step-by-step walkthrough guide for the reference implementation using the Ionic framework.
Introducing Amazon Lex and Conversational Bots on Mobile Hub
Last week at AWS re:Invent 2016, we announced the availability of conversational bots, a new feature on AWS Mobile Hub that enables you to create speech or text based conversational bots in your mobile app.
This feature uses Amazon Lex, a new service for building conversational interactions into any application using voice and text. With Amazon Lex, the same conversational engine that powers Amazon Alexa is now available to any developer, enabling you to build sophisticated, natural language, conversational bots (chatbots). Amazon Lex is currently in limited preview. Click here to learn more about Amazon Lex and to request access.
The importance of bots and multimodal user interfaces
With the rapid growth of messaging platforms such as Facebook Messenger and voice controlled devices such as the Amazon Echo, app users are becoming familiar with voice and chat interactions via conversational interfaces. Conversational interfaces, sometimes called ‘chatbots’, understand and communicate using natural language, and provide information or help in completing a task through a series of questions and answers. They provide a more intuitive, efficient way of interacting with applications and devices.
Common use cases for conversational bots include:
· Informational bots to build chatbots for everyday consumer requests, such as accessing the latest news updates, game scores, or weather.
· Application bots to build powerful interfaces to mobile applications. Developers can build chatbots that help customers with many basic tasks, such as accessing their bank accounts, booking tickets, ordering food, or calling a cab.
· Enterprise productivity bots to streamline common work activities and improve organizational efficiencies. For example, employees can check sales data via Salesforce and check marketing performance from HubSpot.
· Internet of Things (IoT) bots to create conversational interfaces for entirely new categories of IoT products, such as cars, devices, wearables, and appliances.
Amazon Lex puts high-quality speech recognition and natural language understanding technologies within reach of all developers, in the form of an easy to use AWS service. You supply just a few example phrases and Amazon Lex builds a complete natural language model through which the bot can interact using voice and text. Integration with AWS services allows you to take advantage of the power of the AWS platform for security, monitoring, user authentication, business logic, storage, and mobile app development. Amazon Lex enables you to easily publish your voice or text chatbots to mobile devices, web apps, and chat services such as Facebook Messenger. Once published, Amazon Lex bot processes voice or text input to conduct a conversation with your end-users. As your user engagement increases, Amazon Lex scales automatically so you don’t need to provision hardware and manage infrastructure to power your bot experience.
Creating your first bot
First, request access for your AWS account to be included in the Amazon Lex Limited Preview program. This process might take up to one business day.
Next, choose the Conversational Bots feature in the Mobile Hub console in a new or existing project.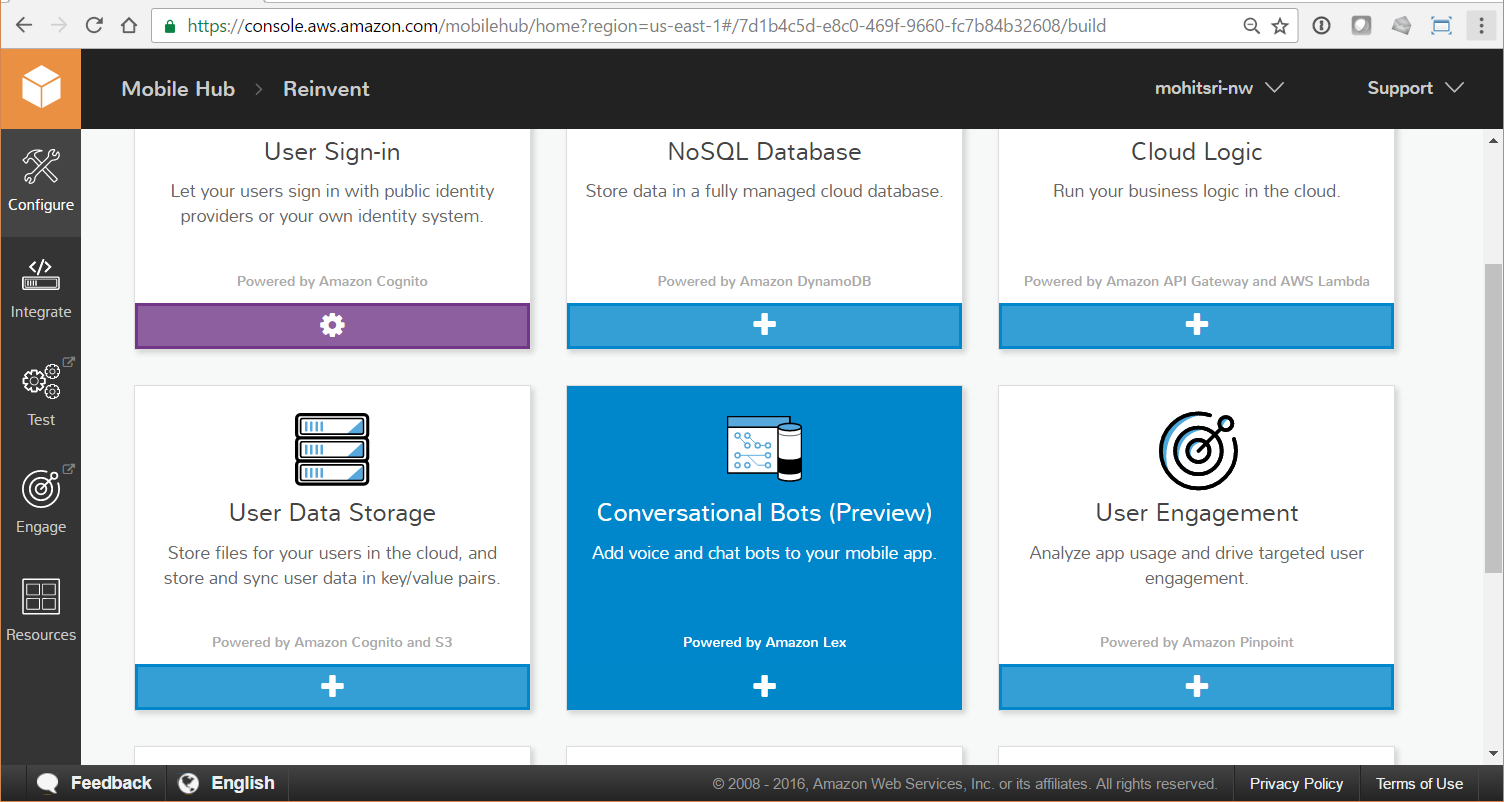
Select one of the three sample bots and click the Create Bot button.
Mobile Hub will create your bot on Amazon Lex with sample intents and utterances. An intent performs an action in response to a natural language user input, while an utterance is a set of spoken or typed phrases that invoke your intent. You can learn more about how Amazon Lex chatbots work from the Amazon Lex Developer guide.
Once you have created a bot, click the Integrate tab in Mobile Hub.
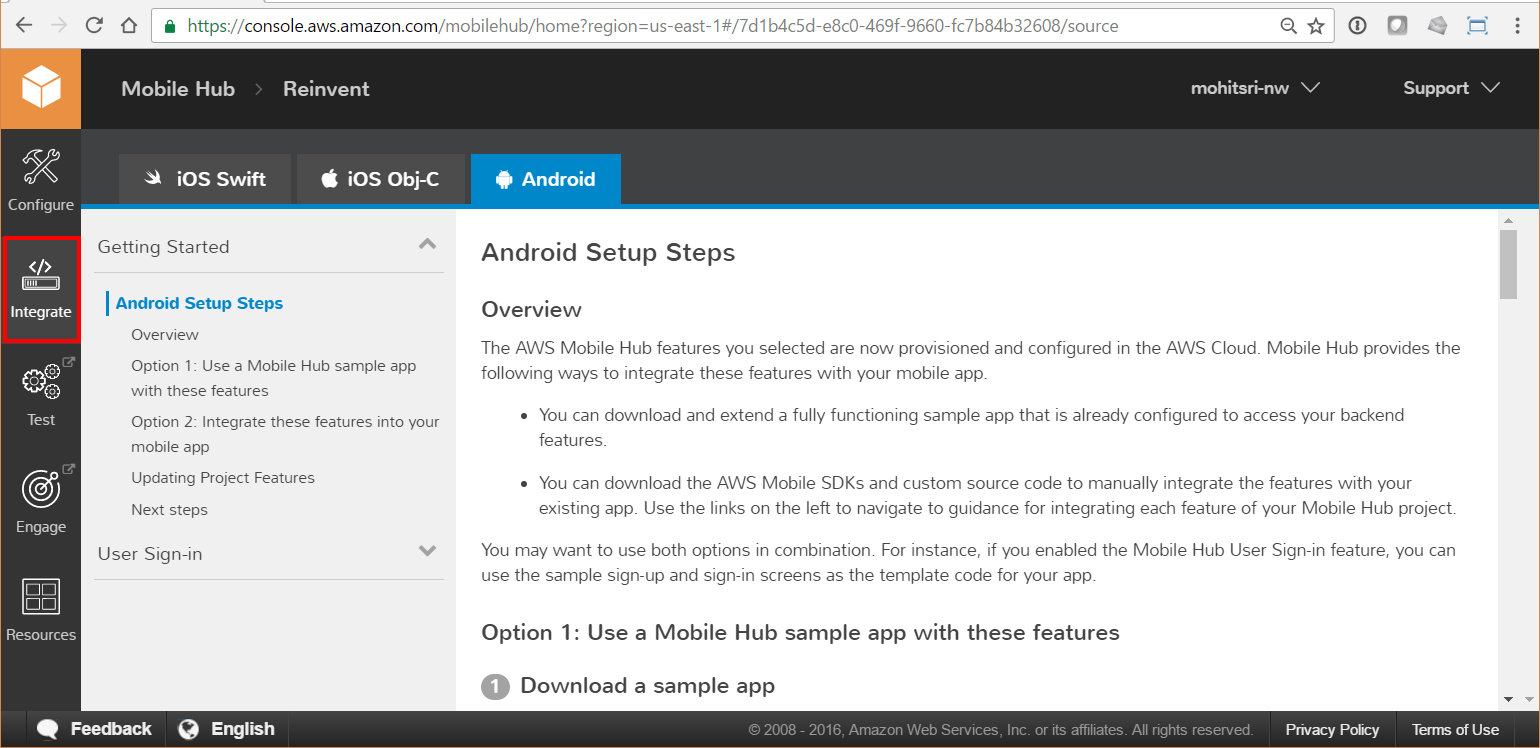
Choose Getting Started on the left navigation menu and then select the platform (iOS Swift, iOS Objective-C, Android) tab that corresponds to your app. Then, choose Download the sample app. We will use Android in this example.
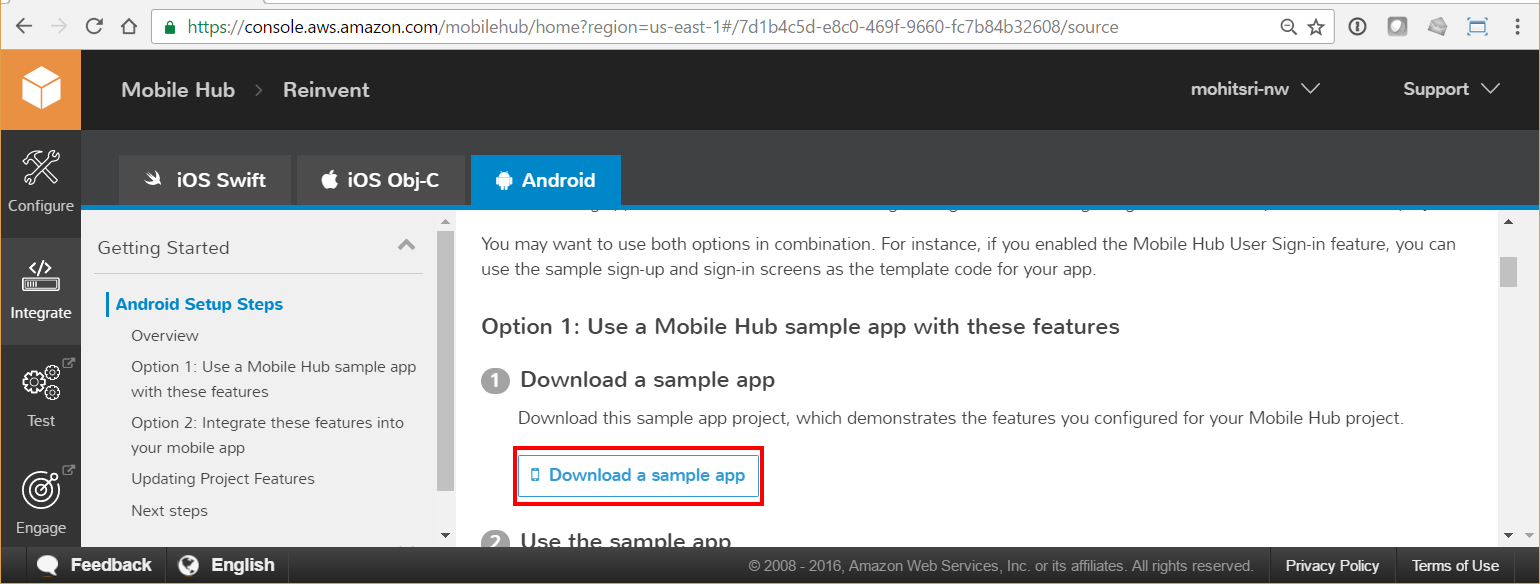
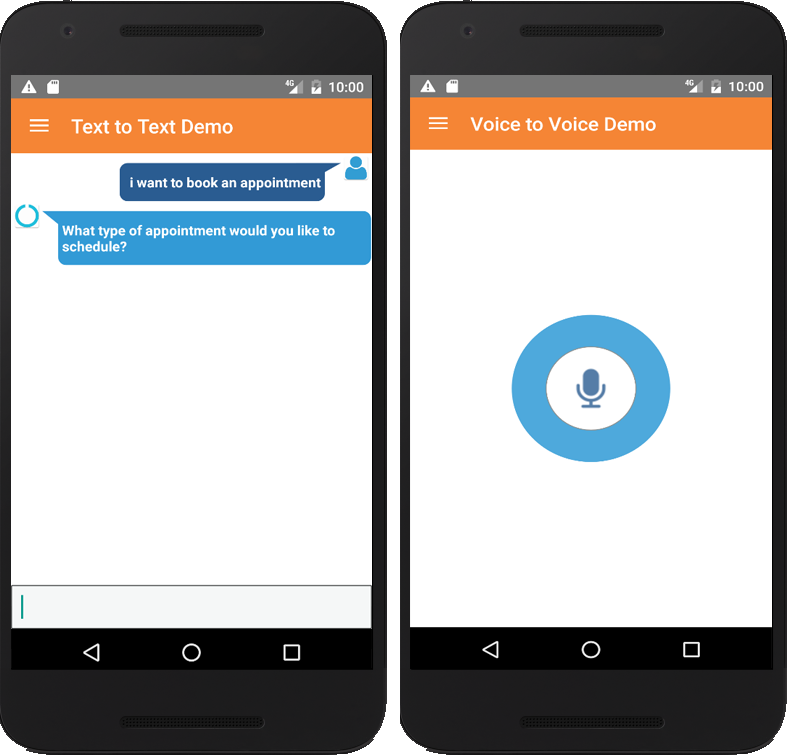
The project you download contains working sample code that is generated based on the selections you made. The code integrates with the backend services Mobile Hub provisioned for you. It implements client code to interact with your bot using voice or chat. Unzip the folder and open the project in Android Studio by choosing the project level build.gradle file. Run the sample app in your emulator and try signing up a user.
Integrating a bot with your app
The easiest way to integrate a bot with your app is to follow the integration instructions in the Integrate tab. You can integrate existing bots you have created on Amazon Lex using the Import a Bot option in the conversational bots feature.
Ensure you have completed the steps in the Getting Started section. This includes allowing network access, including the AWS SDKs, and copying Hub helper and custom code. Next, choose the Conversational Bots section and follow the step-by-step guidance to copy Android or iOS client code for the voice or text interfaces.
So get started today with both these features on AWS Mobile Hub. If you have questions or feedback, please use the comment section or visit our forums.
Introducing Mobile Hub user authentication using SAML Federation or Email and Password sign-in
We are excited to announce two new options for user authentication in mobile apps – Email and Password and SAML Federation. Both features are options in the User Sign-in feature of AWS Mobile Hub. Along with the existing Facebook and Google sign-in options, you can mix and match these new sign-in provider options to setup the authentication flow that your app needs in minutes.
Under the hood, Mobile Hub provisions and configures all the required AWS services on your behalf. That includes Amazon Cognito for authentication, AWS Identity and Access Management (IAM) for access authorization, and service like DynamoDB tables or S3 buckets. Mobile Hub also uses the options you select to dynamically generate working sign-up, sign-in, and password recovery flow code in a Quickstart app you can download and use directly or customize for your app.
In this post, we cover details on each of these new options and how you can apply them in business-to-consumer (B2C) or business-to-employee (B2E) mobile apps.
Email and Password Authentication
The Email and Password option provisions a user directory called a user pool. The user pool stores user identities and profile attributes and is the source of authentication when your users sign-in to your app. Mobile Hub uses Amazon Cognito Your User Pools to manage and validate user identities. You can combine the Email and Password option in addition to the Facebook and Google sign-in options and allow your users to choose the account they prefer to sign-in to your app.
Mobile Hub allows you to configure password policies for your users. You can also choose to enable multi-factor authentication via SMS.
Enabling the user sign-in option
In the Mobile Hub console, choose the User sign-in feature in a new or an existing project.

Choose the Email and Password option. The Mobile Hub console provides you with choices and suggested defaults for configuring the user sign-in experience your user pool. You can configure:
– What identifier the user provides to sign-in/sign-up to your app (email, usernames, and passwords),
– If multi-factor authentication is enabled and whether it is optional or requires
– Password policies (minimum password lengths and character requirements)
Enable SMS-based Multi-factor authentication (MFA) to make logins more secure. With SMS-based MFA enabled, your users will be prompted for their password (the first factor) and for a security code that can only be received on their mobile phone via SMS (the second factor). The user is required to provide a phone number during sign-up.

Choose Create user pool. Mobile Hub will provision your user pool on Amazon Cognito with the configuration you selected.
Next, choose between Optional and Required sign-in. Required means that the user sign-in flow of the Quickstart app Mobile Hub will generate requires sign-in before any usage of the app can occur. Choose Save if you elected to require sign-in.
Running the sample app
Once you have setup your user pool, you can use the Quickstart app to add sign-up, sign-in, and password recovery flows to your app. Choose Integrate the left hand menu of your project.

Choose Getting Started on the left hand menu and and then select the platform (iOS Swift, iOS Objective-C, Android) tab that corresponds to your app. Then, choose Download the sample app.
The project you download contains working sample code generated based on the selections you made that integrates with the backend services Mobile Hub provisioned for you. It implements client sign-up, sign-in, and password recovery flows that can be used directly in your project or as examples for your customization.
Unzip the folder and open the project in Android Studio by choosing the project level build.gradle file. Run the sample app in your emulator and try signing up a user. Then, sign in to the app with the credentials you just created.

Adding sign-in to your own app
The easiest way to add sign-in to your own app is by following the integration instructions in the Integrate tab. Ensure you have completed the steps in the Getting Started section. This includes allowing network access, including the AWS SDKs, and copying Hub helper and custom code. Next, choose the User Sign-in section and follow the step-by-step guidance to copy Android or iOS client code for sign-up and sign-in.
SAML Federation
You can use the SAML Federation option to authenticate users through your own SAML identity provider (IdP) and provide secure access to AWS resources, such as Amazon S3 and Amazon DynamoDB, through Amazon Cognito. Your IdP must support SAML 2.0 (Security Assertion Markup Language 2.0) to federate with AWS.
First, you need to exchange trust between your SAML provider and AWS. To do this, select the SAML Federation option in the User Sign-in feature.

Next, upload the SAML federation metadata document you received from your IdP and create a new provider.
This file typically includes the issuer’s name, expiration information, and a certificate that can be used to validate the SAML assertion response received from the IdP. For Microsoft Active Directory Federation Services (ADFS), you can download the document from:
https://<yourservername>/FederationMetadata/2007-06/FederationMetadata.xml
For more information related to different SAML IdPs, see Integrating Third-Party SAML Solution Providers with AWS.
Next, configure your IdP with AWS certificates and then add SAML authentication and access control to your app. The AWS SAML federation metadata can be found at:
https://signin.aws.amazon.com/static/saml-metadata.xml
After that you can add SAML to your own app. We provide you with step-by-step flow for completing both of these tasks in the Integrate tab.
So get started today with both these features on AWS Mobile Hub. If you have questions or feedback, please use the comment section below or visit our forums.
Streaming videos to millions of mobile app users via Amazon CloudFront CDN
About
Welcome to the second installment of our blog series (the first post is here) showing how to build some of the most popular end-to-end experiences used by mobile apps.
This post is about HTTP Live Streaming (HLS) video content via Amazon CloudFront to your mobile application. You’ll utilize AWS Mobile Hub to enable the App Content – Global CDN feature that provisions an Amazon S3 bucket to store our streaming content and creates an Amazon CloudFront Web Distribution that will cache your video files using your Amazon S3 bucket as the source (origin) in edge locations around the world. This provides fast, low latency access to your content from mobile devices around the world. In addition, you’ll enable the Cloud Logic feature and use AWS Lambda to automatically generate transcoding jobs for videos uploaded to your S3 bucket.
You’ll walk away with a fully functioning mobile application streaming your own encoded HTTP Live Streaming (HLS) video on demand (VOD) directly from your Amazon CloudFront Web Distribution. This a complete end-to-end solution demonstrating a very common mobile cloud video distribution architecture.
There are five steps in this tutorial.
Step 1. Configure the backend AWS resources via AWS Mobile Hub. This consists of creating a project, enabling features App Content Delivery – Global CDN and Cloud Logic for transcoding videos via Amazon Elastic Transcoder.
Step 2. Staging video and provisioning Amazon S3, AWS Lambda, and Amazon Elastic Transcoder pipeline to be used for transcoding a basic HD video into HLS.
Step 3. Upload video to S3 and encoding HLS content
Step 4. Modify the sample app project code generated by Mobile Hub to explore and stream HLS video content from Amazon CloudFront using the transcoded media files stored in S3.
Step 5. Streaming HLS video content from your own app by following the AWS Mobile Hub integration guide customized for your project.
First, we’ll explain briefly what HLS is, how it works, and how to use Amazon Elastic Transcoder to transcode media into the HLS format. We’ll then briefly explain AWS features (Amazon S3, AWS Lambda, and Amazon CloudFront) that you’ll enable within a Mobile Hub project.
What is HLS?
HTTP Live Streaming (HLS) is a protocol that segments media files for optimization during streaming. HLS enables media players to play segments with the highest quality resolution that is supported by their network connection during playback.
In Step 3 you’ll transcode an HD action movie (filmed on a GoPro) into HLS segments, copy those media files to S3, and stream this content from our modified sample app in Step 4.
What is AWS Lambda?
The Cloud Logic feature is powered by AWS Lambda functions. These functions allow you to simply write code without worrying about managing frameworks and scaling of backend infrastructure. You can write your functions in JavaScript, Java, or Python. You’ll be using Lambda to create encoding jobs via Amazon Elastic Transcoder whenever a video is uploaded to your S3 bucket. Learn more about AWS Lambda
Transcoding HLS using Amazon Elastic Transcoder
Transcoding is the process of converting a media file (audio or video) from one format, size, or quality to another. Elastic Transcoder takes input from an S3 bucket, transcodes it, and writes the resulting file to another bucket or folder. You start with one or more input files and create transcoding jobs in a transcoding pipeline for each file. Each job must reference a particular transcoding preset, and in our case will result in the generation of HLS segments and playlists. Our Lambda starter code will be the job creator and is configured with all the HLS transcoding presets available. Learn more about Elastic Transcoder.
What is Amazon S3?
Amazon Simple Storage Service (Amazon S3) provides secure, durable, highly scalable object storage in the cloud. Using the AWS Mobile SDK, you can directly access Amazon S3 from your mobile app. The AWS Mobile SDK allows you to consume the Amazon S3 service in your mobile application via the S3 Transfer Utility. The fully functional iOS sample app generated by Mobile Hub includes the AWS Mobile SDK for iOS and all the helper code for running the demo app. For this tutorial, you’ll create an S3 bucket and use it to store the video content. The S3 bucket acts as the origin (source of distributed content) for your CloudFront Web Distribution. Learn more about Amazon S3 cloud storage and pricing.
What is Amazon CloudFront?
Amazon CloudFront is a global content delivery network (CDN) service that accelerates delivery of your websites, APIs, video content, and other web assets. It integrates with other AWS services to give developers and businesses an easy way to accelerate content delivery to end users with no minimum usage commitments. For this tutorial, you’ll use CloudFront to distribute HLS streaming content to a mobile device. Learn more about Amazon CloudFront and pricing.
Let’s Begin
Step 1 – Configure your backend content delivery
You’ll use Mobile Hub to create a project. Next, you’ll enable the App Content Delivery feature to store our video content on Amazon S3 and Cloud Logic to launch encoding jobs to encode HLS content. We’ll walk you through the steps and follow up with a recap (explain the magic) of what just happened.
1. Launch AWS Mobile Hub console
2. Select Create new mobile project

3. Provide a project name, (e.g. StreamingBlog) and then select Create project.

Note: If you have never used Mobile Hub before, you’ll be prompted to select Get Started and Yes, grant permissions before you can create a new project.
4. Select App Content Delivery.
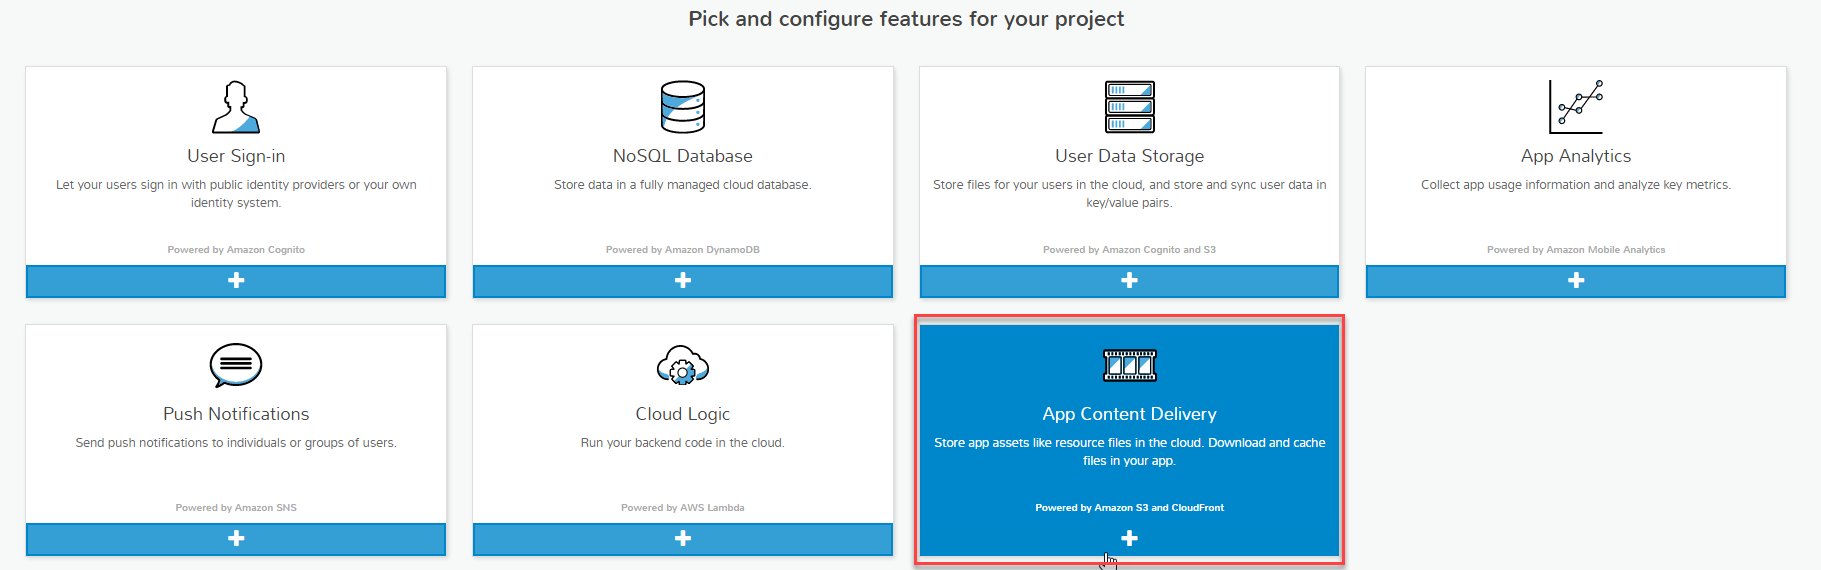
5. Select Global CDN and then choose Save changes.

6. Select Configure more features button so we can enable one additional feature.
7. Select Cloud Logic.

8. Select Create new API.

9. Provide the following properties to create your Cloud Logic API.
- API name: encoder
- Description: Encoding Job Trigger
- Change path to: /encoder
- Change Lambda function name to: encoderHandler
- Select Create API

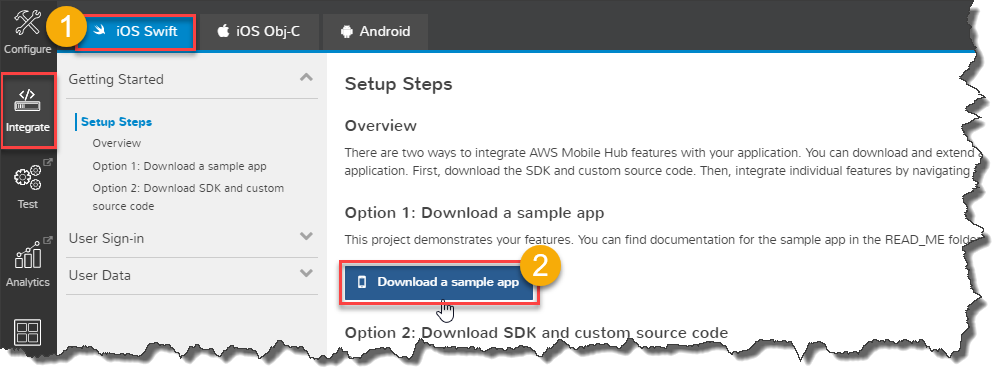
10. Select Integrate from the left panel.

From the integration tab, make sure iOS Swift is selected and that you are in the Getting Started section.
11. Select the iOS Swift tab and select Download a sample app to download your iOS Swift project source code. We’ll run this project in Xcode in a later step. Note: You may have to wait a few minutes for Cloud Logic API finalize deployment before you can download the sample app project code.
Done. You now have all of your AWS resources configured and the custom-built iOS Swift source code project is downloaded and ready.
What did we just do?
First, you created a new project in AWS Mobile Hub. Note that, for each Mobile Hub project created, an Amazon Cognito identity pool is created on your behalf, regardless of which features are enabled. For this tutorial, we are only utilizing Amazon Cognito, giving permission to list the content of the S3 bucket that you are using as the source for streaming media.
After the project was created with the default Amazon Cognito identity pool, you then enabled the App Content Delivery and Cloud Logic features in your Mobile Hub project.
The App Content Delivery feature first creates an Amazon S3 bucket to store media content and creates a policy within the AWS Identity and Access Management (IAM) role that grants your users access to list all content in your Amazon S3 bucket when they launch the app. Within the S3 bucket, Mobile Hub has uploaded five sample images (e.g., example-image-1.png).
The Cloud Logic feature created an “encoder” API with a Node.js Lambda function along with its own IAM role that allows the Lambda function to call other AWS services such as Amazon Elastic Transcoder. This Lambda function will become your HLS Amazon Elastic Transcoding encoding job creator when new videos are uploaded to your origin S3 bucket via an S3 Event.
Finally, you downloaded the generated project source code to run the Mobile Hub sample app demonstrating the features you just configured.
How does the sample app work?
You’ll open the iOS Swift project source project in Xcode to build and run the sample app. Upon first launch of the app, that user is given a unique unauthenticated Amazon Cognito Identity. The user then selects the App Content Delivery feature that lists the sample images from your S3 bucket you just configured. From this demo, the user can choose to Open Remote or Download the sample image. For Open Remote, the image is actually cached from S3, downloaded directly from CloudFront, and viewed in the provided WebViewController. For Download, the app downloads the cached content from CloudFront and caches it locally on the device. You can then open the image offline because it’s now stored on the device.
After running through a few more steps below, you’ll re-launch the app and instead of selecting the sample image, select the HLS master playlist (.m3u8 file) from the list. The app will begin streaming the cached HLS movie natively from your CloudFront Web Distribution using the iOS MoviePlayerController on the device.
Step 2 – Stage Video Content and Encoding Service
In this step, you’ll be doing some backend provisioning to set the stage for storing video content on S3, triggering encoding jobs via Lambda, and creating an Amazon Elastic Transcoder pipeline to transcode our HD video into HTTP Live Streaming (HLS) segments.
This step is broken into five important tasks and we’ll walk you through each one now.
A. Create an Elastic Transcoder Pipeline
Launch the Elastic Transcoder Management Console in the same region as your Mobile Hub project and select Create New Pipeline.
![]()
For the bucket locations, choose the App Content Delivery S3 bucket that was created by Mobile Hub. The field should auto-populate a list of your S3 buckets, taking any guess work away. Leave the default setting for IAM Role and set Storage Class to Standard. Your new pipeline configuration should look something like below. The Notifications and Encryption section can be ignored for this tutorial.

Once you have provided the details, select the Create Pipeline button on the lower right. You just created a new Elastic Transcoder Pipeline.
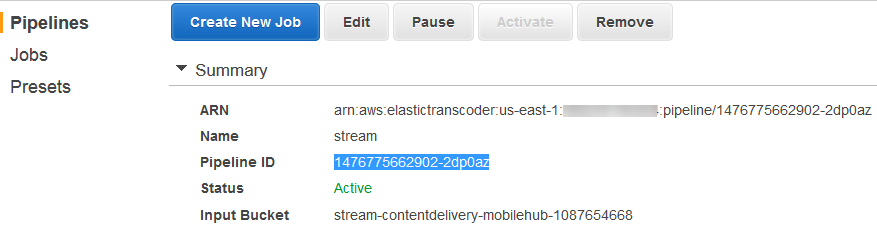
Save for later: Copy the Pipeline ID from the Pipelines Summary as we’ll reference this in your Lambda function in the next task.
B. Modify the “encoder” Lambda function.
You enabled Cloud Logic earlier, which created a Lambda function within your project. You are now going to overwrite that default function code with the provided Lambda code below.
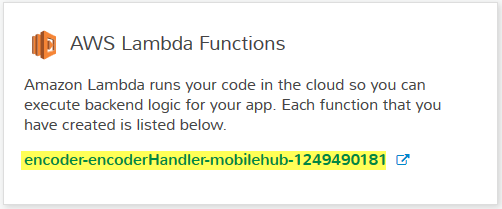
First, go back to your Mobile Hub project and select Resources from the left navigation and then select the “encoderHandler” link from the AWS Lambda Functions card to launch the function in the AWS Lambda console.
The code editor that appears for the encoder function should look something like this.
//
// Copyright 2016 Amazon.com, Inc. or its affiliates (Amazon). All Rights Reserved.
//
// Code generated by AWS Mobile Hub. Amazon gives unlimited permission to
// copy, distribute and modify it.
//

'use strict';
console.log("Loading function");

exports.handler = function(event, context, callback) {
    var responseCode = 200;
    var requestBody, pathParams, queryStringParams, headerParams, stage,
    stageVariables, cognitoIdentityId, httpMethod, sourceIp, userAgent,
    requestId, resourcePath;
    console.log("request: " + JSON.stringify(event));

    // Request Body
    requestBody = event.body;

    if (requestBody !== undefined && requestBody !== null) {

        // Set 'test-status' field in the request to test sending a specific response status code (e.g., 503)
        responseCode = JSON.parse(requestBody)['test-status'];
    }
...
You are now going to overwrite the “encoder” API code from above with the starter code below. Just copy this code below and paste it into the code editor for the encoder function.
//Author: Dennis Hills
//Date: November 8, 2016
//Purpose: HLS Streaming mobile blog
//Requirements: An Elastic Transcoder Pipeline

var aws = require('aws-sdk');
var elastictranscoder = new aws.ElasticTranscoder();

// return filename without extension
function baseName(path) {
   return path.split('/').reverse()[0].split('.')[0];
}

exports.handler = function(event, context) {
    console.log('Received event:', JSON.stringify(event, null, 2));
    var key = event.Records[0].s3.object.key;
    var outputPrefix = baseName(key) + '-' + Date.now().toString();

    var params = {
      Input: {
        Key: key
      },
      PipelineId: '1476775662902-2dp0az', /*Your Elastic Transcoder Pipeline Id*/
      OutputKeyPrefix: 'HLS/' + outputPrefix,
      Outputs: [
        {
          Key: '/output/2M',
          PresetId: '1351620000001-200015', // HLS v3 and v4 (Apple HTTP Live Streaming), 2 megabits/second, Video-only
          SegmentDuration: '10',
        },
        {
          Key: '/output/15M',
          PresetId: '1351620000001-200025', // HLS v3 and v4 (Apple HTTP Live Streaming), 1.5 megabits/second, Video-only
          SegmentDuration: '10',
        },
        {
          Key: '/output/1M',
          PresetId: '1351620000001-200035', // HLS v3 and v4 (Apple HTTP Live Streaming), 1 megabit/second, Video-only
          SegmentDuration: '10',
        },
        {
          Key: '/output/600k',
          PresetId: '1351620000001-200045', // HLS v3 and v4 (Apple HTTP Live Streaming), 600 kilobits/second, Video-only
          SegmentDuration: '10',
        },
        {
          Key: '/output/400k',
          PresetId: '1351620000001-200055', // HLS v3 and v4 (Apple HTTP Live Streaming), 400 kilobits/second, Video-only
          SegmentDuration: '10',
        },
        {
          Key: '/output/aud',
          PresetId: '1351620000001-200060', // AUDIO ONLY: HLS v3 and v4 Audio, 160 k
          SegmentDuration: '10',
        }
      ],
      Playlists: [
        {
            Format: 'HLSv4',
            Name:  '/' + baseName(key) + '-master-playlist',
            OutputKeys: [ '/output/2M', '/output/15M', '/output/1M','/output/600k', '/output/400k', '/output/aud']
        }
      ]
    };

    elastictranscoder.createJob(params, function(err, data) {
      if (err) console.log(err, err.stack); // an error occurred
      else     console.log(data);           // successful response
    });
};
Critical Step: Before saving the Lambda code, change the PipelineId to your Elastic Transcoder Pipeline Id that you copied in the previous task. That is the only code change needed for this Lambda function. Select Save.

C. Enable an S3 event on your S3 bucket to trigger the Lambda function
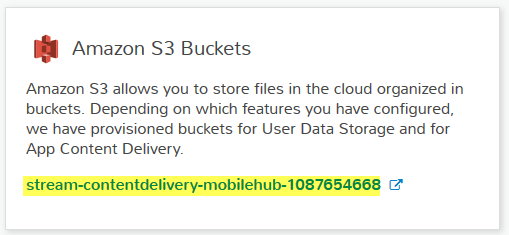
Go back to your Mobile Hub project. Select Resources from the left navigation pane and then select the Content Delivery S3 bucket to launch the S3 AWS Management Console.
You should now be viewing your Content Delivery S3 bucket in the console. You are going to add an S3 event to this bucket that will invoke your encoder Lambda function. The Lambda function will start transcoding any video files uploaded to this bucket automatically.
Configure the S3 event by following the steps shown below.

Select Save.
That’s it for creating an S3 event to trigger the Lambda function.
How does this S3 event work? Whenever you PUT a video (with a suffix matching your filter) into this bucket, S3 triggers your encoder Lambda function and passes the video filename to the function. Lambda then starts the transcoding job(s) to convert the video into HLS segments.
D. Allow Lambda to create Elastic Transcoder Jobs.
By default, your encoder function was created with a limited IAM execution role as it was intended to only return your request back to you for demonstration purposes. Now, we need to allow Lambda to call the Elastic Transcoder Service.
Go back to your Mobile Hub project and select Resources from the left navigation pane and then select the Lambda Execution Role to launch the role in the IAM console.

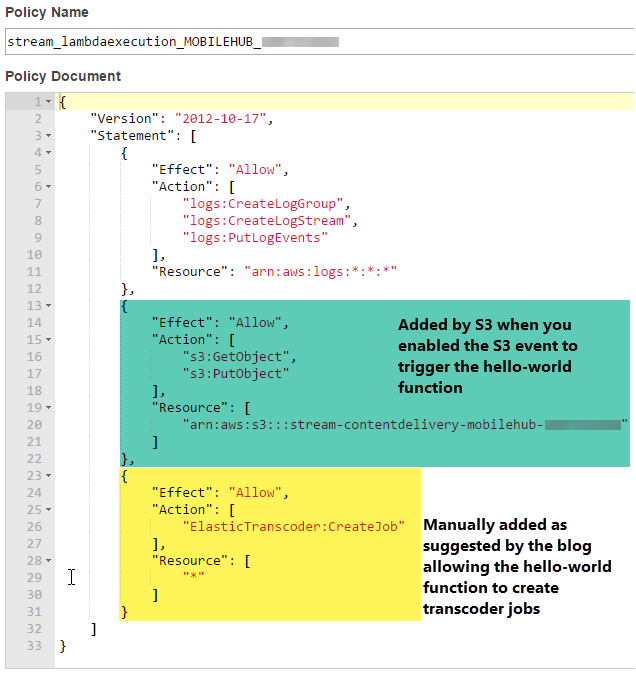
In the IAM console for the Lambda Execution role, select Edit Policy under the Inline Policy section as shown.

Within this policy, we are adding permission to call the Amazon Elastic Transcoder CreateJob API. Copy the statement below and paste it into the policy as shown. The highlighted yellow area is the newly appended action after pasting into the policy document editor for the lambdaexecution policy.
{ "Effect": "Allow",
"Action": [
"ElasticTranscoder:CreateJob"
],
"Resource": "*"
}
Select Apply Policy. Now Lambda has access to create transcoding jobs within Elastic Transcoder when triggered by S3 after a new video is uploaded to your Content Delivery S3 bucket.
E. Grant CloudFront read permissions by adding a bucket policy just for CloudFront.
For this task, you need to edit the origin configuration for your CloudFront Web Distribution so that it has permission to read from your content delivery S3 bucket for caching the newly transcoded files. By default, Mobile Hub creates the Web Distribution so that all objects in the S3 bucket (origin) need to be Public for the distribution to cache those files. Making this change keeps the restricted access to the S3 bucket but allows CloudFront to read objects without you having to manually update the object permissions in the bucket after each PUT or after transcoding.
Start by going to your Mobile Hub project resources and select the CloudFront Web Distribution.

Within the CloudFront console, select the Origins tab, then select the S3 bucket origion, and select Edit.

Configure the Origin Settings as shown in the following image and select Yes, Edit button on lower right (not shown).

Now CloudFront can access all the contents of your S3 bucket and cache upon request, while keeping your S3 content protected. That was the final task for Step 2.
What did we just do in Step 2?
You just completed Step 2 with five important tasks. Congratulations. It was a big step. In the first task, (A), you created and configured an Amazon Elastic Transcoder pipeline. This pipeline sets the stage for encoding jobs that will convert your videos into HLS segments. In the second task, (B), you modified the “encoder” Lambda function by pasting in the starter code and provided your Elastic Transcoder pipeline ID. In the third task, (C), you enabled an S3 event in your Content Delivery S3 bucket to trigger a Lambda function when you PUT new videos in the bucket. In the fourth task, (D), you modified the Lambda IAM execution policy, allowing it to call the Elastic Transcoder APIs. In the final task, (E), you modified the Origin Settings of the CloudFront Web Distribution, restricting access to your S3 bucket and allowing this distribution to read all contents within the S3 bucket to cache when requested.
Now that we have everything configured on the backend for storing, distributing, and encoding media content, you’ll focus on the client-side project code, upload a video, and start streaming!
Step 3 – Upload video to S3 and trigger HLS encoding
In this step, you’ll download a sample video and upload it to your Content Delivery S3 bucket to begin encoding it to HLS for streaming.
1. Download sample 1-minute HD video (approx. 388MB) here. You can skip this step if you want to upload your own video in the next step!
2. Upload the provided video (or your own .mov or .mp4) to your Content Delivery S3 bucket, using the S3 console here.
3. Select Upload.
4. Select Add Files.
5. Select the video you want to upload.
6. Select Start Upload.
Note: It may take several minutes to upload the video via the S3 console. If you have the AWS CLI or another S3 client, feel free to utilize any of those tools to speed up the process of uploading content to your S3 bucket.
What did we just do?
In this step you just uploaded a video to your Content Delivery S3 bucket. When the file upload completed, your S3 PUT event triggered the Lambda function to begin transcoding your video into HLS segments. For a 1-minute video, the transcoding of all the segments and playlists should be done in less than a minute.
What does the transcoding look like? Once transcoding is complete, you’ll see an HLS/ folder in your bucket and within that folder you’ll see a folder with the video filename, appended with a date string. Within that sub folder is the HLS 4 playlist (.m3u8) and an output/ folder containing all the encoded HLS segments.

Here’s what the output folder looks like, containing all the various bitrates, iframes, and playlists.

From the mobile app you are about to configure, you’ll select the master playlist (rafting-playlist.m3u8) from the S3 bucket list demo and the transcoded video will automatically begin streaming the cached video from CloudFront.
Step 4 – Modify sample app and stream HLS content
In this final step, you just need to make one small modification to the iOS Swift project source code so that it sees the .m3u8 file type as a video file. Remember downloading the source project in Step 1?
Start by opening the project code in Xcode on your Mac.
1. Unzip the iOS Swift project code you downloaded previously.
2. Open the sample app project in Xcode by double-clicking on the Xcode project, MySampleApp.xcodeproj, which is in the project folder.

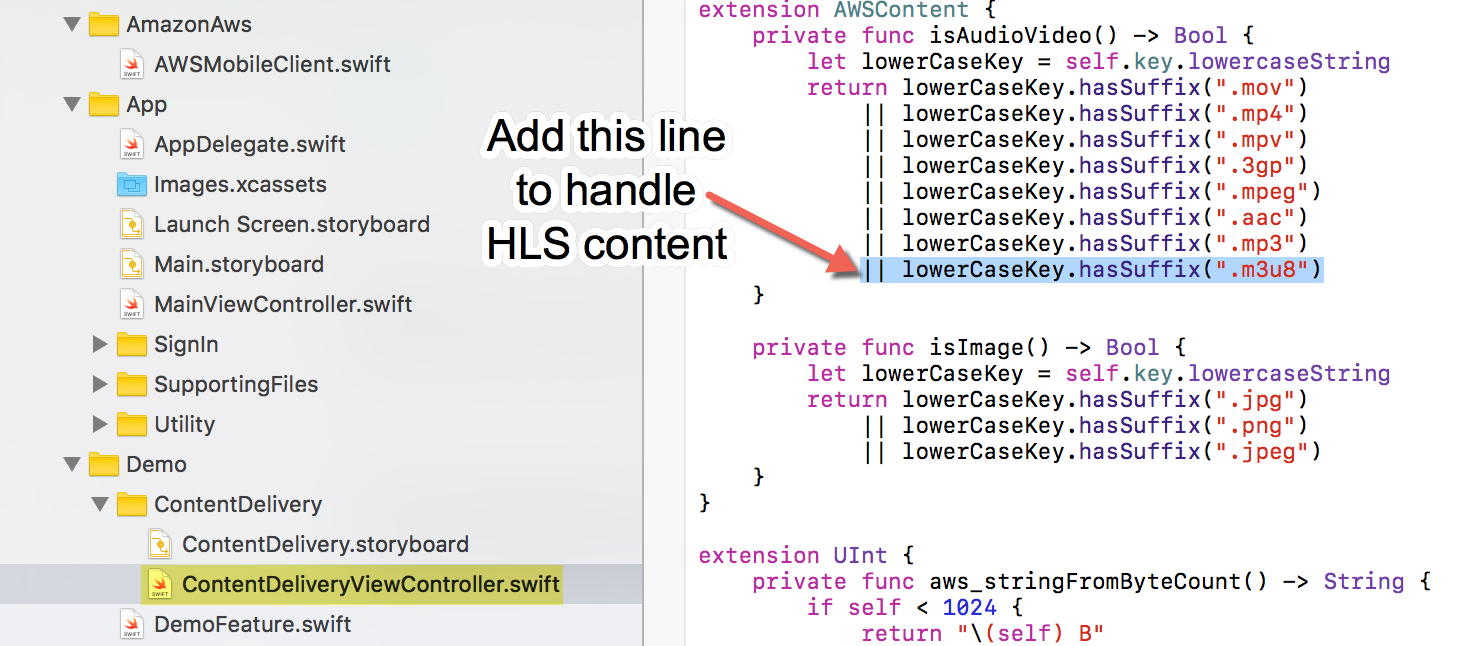
3. Expand the project folders and open the ContentDeliveryViewController.swift class. Add the highlighted line as shown to your isAudioVideo() function. This allows the app to identify your HLS 4 playlist as video content.
4. Select build/run within Xcode to build and run the sample app.
5. At the main screen of the sample app, select App Content Delivery and then Demo Content Delivery.


7. Select the HLS/ folder and the newly encoded video folder.
8. Tap on the HLS playlist (.m3u8 file) and choose Open Remote.

The app will automatically start streaming the video choosing the correct bitrate for your connection speed. The app is using the default iOS MPMoviePLayerViewController and it does all the heavy lifting to determine the best way to stream the video content.

The magic is that you should experience the same playback quality and smoothness regardless of the network the device is connected to. Switching the app from Wi-Fi to cellular, the built-in player will auto-adjust and begin or continue playing the same video using one of the different bitrate variants you provided when transcoding the original source mp4 video into HLS.
Now, to really see the power of HLS encoded video, play around with the app connection (switching from Wi-Fi to cellular) and see how it performs.
More cool stuff to play with: To highlight the power of HLS streaming content from CloudFront, just select the original .mp4 video source and the app will automatically start playing the movie. If you have a modern device and great bandwidth, you may not notice much. However, try the same source video on another older device or over a slower connection. Doing this, you’ll see the device will have a hard time playing the video without lag, artifacts, or other unbearable viewing experiences. Repeat the same process by selecting the HLS master playlist and you should notice a significant difference in playability.
Planning to integrate this feature into your own app? No problem! In the next step, we’ll walk you through the Mobile Hub integration guide, helping you integrate all the code from the sample app into your own app.
Step 5 – Streaming HLS content to your own app
You just configured backend content delivery and ran our generated sample app to demonstrate the end-to-end functionality of this common mobile feature. To get the same functionality in your own app, use the Mobile Hub integration instructions specific to each mobile project you create.
Let’s get started.
Go back to your Mobile Hub project in the console and select Integrate. The integration instructions from Mobile Hub walk you through Getting Started. The instructions then describe each feature you enabled in your Mobile Hub project and how to integrate each of them into your own app.
Here’s a quick overview of Getting Started and additional instructions for integrating this project into your own application.
The Mobile Hub Getting Started integration instructions include:
- Download the Mobile SDK for iOS and custom source code provided
The download provides the latest SDK, Mobile Hub helper code, and example source code to get you started. - After downloading the SDK and helper code, drag and drop the Sdk folder contained in the download into your own project within Xcode. This assumes you already have an iOS Swift project of your own; if not, create a new one and follow along.
- Add the AWS SDKs as Embed Frameworks.
- Add Run Script phase to your project as directed.
- Copy the AmazonAws folder from the helper code to your project and add a group for it. This source code contains a customized helper framework that simplifies the use of all the SDKs that are required to support your project.
It also contains the AWSMobileClient.swift file, which bootstraps the app and creates an identity manager to establish the user identity with Amazon Cognito. - Copy the AWS dictionary from the integration Info.plist into your own project Info.plist. The AWS dictionary provides the CognitoIdentity poolId and region for your project.
- Add AWS iOS SDK dependencies, libsqlite3.tbd and libz.tbd, under Linked Frameworks and Libraries as directed.
- Set up your Application Delegate by returning the AWSMobileClient singleton as shown in the guide.
You are now done with the Getting Started section.
After you complete Getting Started, you can select App Content Delivery in the left panel of the integration instructions. Here, you just need to do the following:
- Copy the ContentManager key from the AWS dictionary in the integration Info.plist into your own project’s Info.plist. The AWS dictionary already provides all the CognitoIdentity pool IDs for your project as well as your Content Delivery S3 bucket and region.
- View or copy the example upload/download source code provided.
That’s it! You should now be able to run your own application and connect it to your AWS resources like we demonstrated using the sample app generated by AWS Mobile Hub.
Conclusion
You just configured a backend app content delivery feature via AWS Mobile Hub; generated a fully functional sample iOS app that demonstrates opening and streaming videos directly from your Amazon CloudFront CDN; and then walked through integrating the client code into your own app by connecting to the same backend resources demonstrated in the sample app.
Thanks and happy coding!
Customizing Amazon Cognito User Pool Authentication Flow
Introduction
Modern authentication flows incorporate new challenge types, in addition to a password, to verify the identity of users. For example, these challenge types include CAPTCHAs or dynamic challenge questions. With Amazon Cognito Your User Pools, we now have a flexible authentication flow that you can customize to incorporate additional authentication methods and support dynamic authentication flows that are server driven. First, we generalize authentication into two common steps, which are implemented through two APIs (InitiateAuth and RespondToAuthChallenge). In this flow, a user authenticates by answering successive challenges until authentication either fails or the user is issued tokens. With these two steps, which can be repeated to include different challenges, we support any custom authentication flow. Second, we provide the ability to customize your authentication flow with AWS Lambda triggers. These triggers issue and verify their own challenges as part of the authentication flow.
In this post, we provide detail on the two APIs and their inputs and outputs as we demonstrate how you can customize Your User Pools authentication flow to contain additional challenges such as CAPTCHAs.
New APIs
InitiateAuth
This API kicks off the authentication flow. It explicitly indicates to Amazon Cognito how you are trying to authenticate, along with initial authentication parameters that are passed to the pre-authentication Lambda trigger. With a successful call, the response provides either tokens (for an authenticated user) or a challenge.
The InitiateAuth API has the following inputs:
AuthFlow String
The name of the auth flow is determined by the service. The following are supported: USER_SRP_AUTH, REFRESH_TOKEN_AUTH, CUSTOM_AUTH, ADMIN_NO_SRP_AUTH. USER_SRP_AUTH and REFRESH_TOKEN_AUTH were previously available through other APIs but they are easier to use with the new APIs. For a custom authentication flow, the CUSTOM_AUTH value is provided. For more information on the flows, see Custom Authentication Flow in the Amazon Cognito Developer Guide.
AuthParameters Map of String, String
Key/value pairs containing all of the inputs necessary to initiate this authentication method (e.g., USERNAME=johndoe, SRP_A=AB009809). Based on authentication flow and a combination of some parameters missing, authentication can be failed.
[ClientMetadata] Map of String, String
Optional field. Key/value pairs containing inputs that aren’t authentication parameters but are inputs to the pre-authentication Lambda trigger. Using this Lambda trigger, you can implement custom validations to accept/deny the request, based on, for example, the user context.
ClientId String
The app clientId for the app attempting to authenticate.
RespondToAuthChallenge
Used to respond to challenges, which can include multiple rounds until the user successfully authenticates (and Amazon Cognito issues tokens) or fails. You have control over how many challenge rounds are presented to the user. This can be decided based on the challenges already answered. With each call, the response is either a successful authentication when tokens are issued, a new challenge, or failure of the authentication.
The RespondToAuthChallenge API has the following inputs:
ChallengeName String
Name of the challenge being responded to.
Session String
An encrypted session received by the client in the previous step that the client must pass back as-is. The session contains state information about the current authentication. It cannot be replayed and it expires after 3 minutes.
ChallengeResponses Map of String, String
Key/value pairs containing all of the parameters necessary to respond to the challenge (e.g., captchaAnswer=AZ235F).
ClientId String
ClientId trying to authenticate.
InitiateAuth and RespondToAuthChallenge outputs
A successful call to either of the APIs results in tokens that indicate that the authentication flow is complete, or a challenge with a session and parameters.
AuthenticationResult containing Tokens
If this is the last step in the authentication flow, the result contains ID, access and refresh tokens. For more information, see Using Tokens with User Pools in the Amazon Cognito Developer Guide.
ChallengeName String
Name of the next challenge. For example, possible values can be CUSTOM_CHALLENGE, if a custom challenge needs to be answered, or PASSWORD_VERIFIER, if password verification is required.
Session String
An encrypted session received by the client in the previous step that the client must pass back as-is. The session contains state information about the current authentication. It cannot be replayed and it expires after 3 minutes.
ChallengeParameters Map of String, String
Key/value pairs containing all of the parameters necessary to prompt the user for the returned challenge (e.g., captchaUrl=https://xyz.com/captcha/123415).
Diving into the custom authentication flow
To provide you control over the authentication flow, we introduced a flow of CUSTOM_AUTH type and provided you with Lambda triggers you can use to implement this custom authentication flow. The flow can be broken down into the following decisions that you can customize through Lambda triggers:
- Analyze the challenges a user has answered so far (successfully or unsuccessfully) and then succeed the authentication (and generate tokens), fail authentication, or prompt the user with a new challenge. This is called the Define Auth Challenge Lambda trigger.
- Generate a challenge that consists of parameters used to challenge the user and valid answers that can be used when the challenge is answered. This is called the Create Auth Challenge Lambda trigger.
- Verify if the answer provided by the user is valid. This is called the Verify Auth Challenge Lambda trigger.
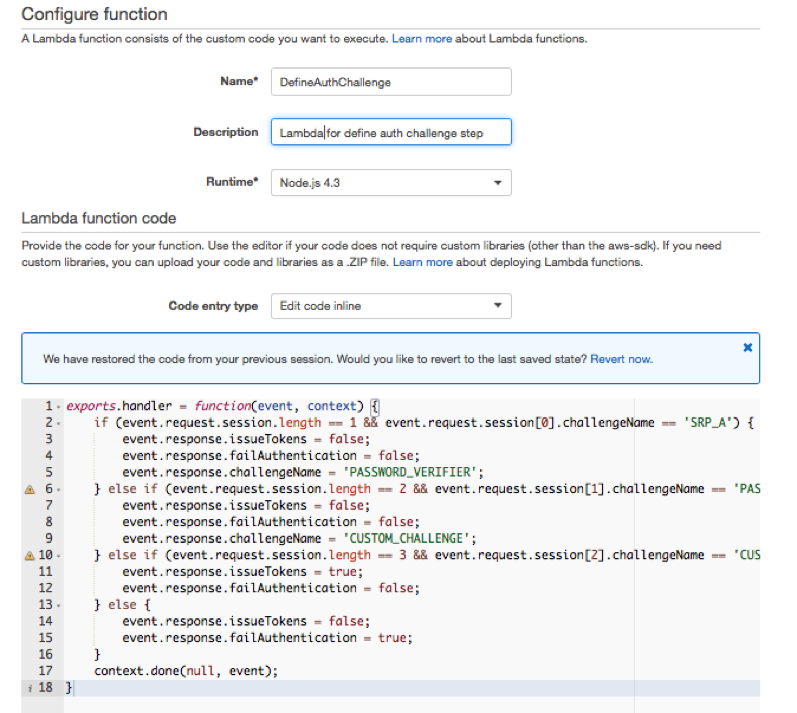
Lambda triggers can be entered as code in the AWS Lambda console as shown.
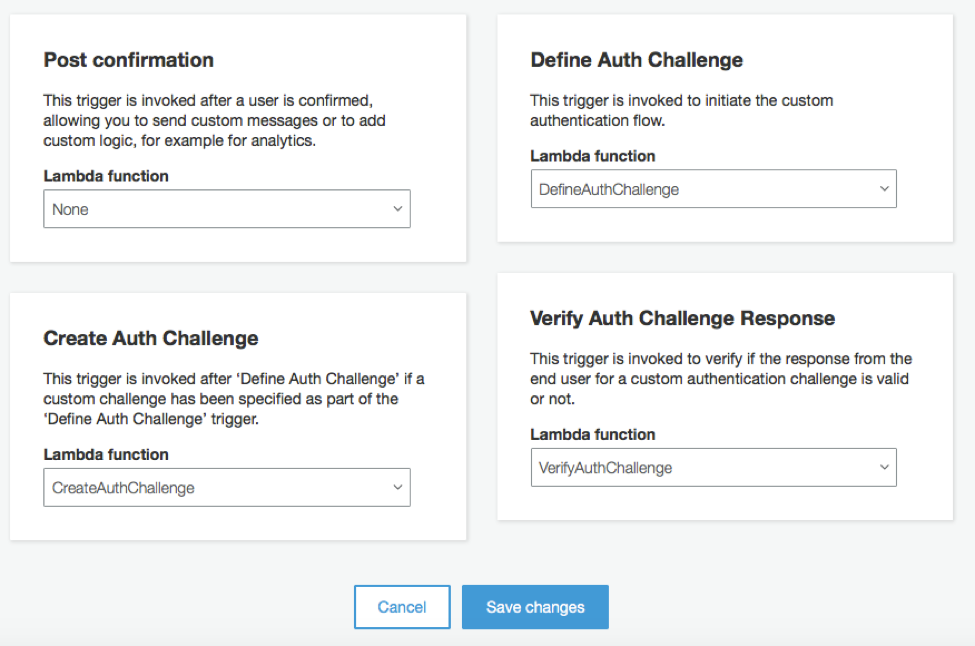
You can configure Lambda triggers in the Amazon Cognito console on the User Pools Triggers page as shown next. When a Lambda trigger is selected in the Amazon Cognito console, the necessary execution rights are created automatically by the console.
When an app initiates a flow of CUSTOM_AUTH type, Amazon Cognito executes the Define Auth Challenge Lambda trigger to issue a challenge type. This can be a standard (built-in) challenge, such as SRP, that can be handled by the Amazon Cognito service. Or it can be a custom challenge handled by a Lambda trigger that you supply (CUSTOM_CHALLENGE type). In general, this process takes as input the past challenges answered by the user and their result. If the challenge issued is of custom type, Amazon Cognito calls a Lambda trigger to create and issue the challenge. The Lambda trigger passes back the challenge parameters and valid answers. This process is shown in the following two diagrams.

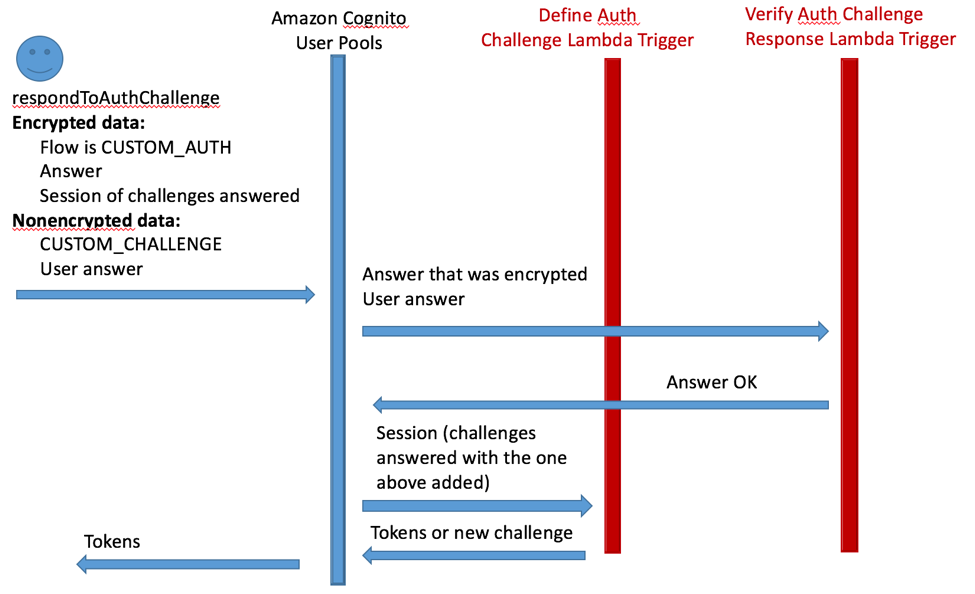
Amazon Cognito User Pools passes the challenge and an encrypted piece of session information back to the client SDK. The client SDK gathers the answers to the challenge and passes back the answers and the encrypted session data as it received it. Amazon Cognito User Pools decrypts the data and calls a Lambda trigger to check if the answers match. Amazon Cognito User Pools then calls the Lambda trigger with the challenges answered so far (adding the challenge just answered). The Lambda trigger can issue a new challenge, issue tokens, or fail authentication, and the process can repeat accordingly. We dive deep into the Lambda contract specifications next.
Lambda Trigger contract specifications
There are three Lambda triggers mentioned previously. We provide detail on the different parameters the Lambda triggers take as inputs and the valid outputs. All three of these Lambda triggers also receive all of the user’s attributes as inputs.
DefineAuthChallenge: The challenges (state machine) Lambda trigger
This Lambda trigger has as input the unencrypted session challenge answering information (it was decrypted by the service after it was passed to and from the client). The trigger then returns a challenge name or a Boolean value that indicates whether Amazon Cognito should issue tokens or not.
Inputs
session List of ChallengeResult objects
This is a list containing ChallengeResult objects that indicate whether the challenge was successfully answered. A ChallengeResult object contains a challenge name (challengeName), a Boolean value with the challenge answering result (challengeResult), and challenge metadata that you populate when you generate a challenge (challengeMetadata).
Outputs
challengeName String
Amazon Cognito returns a new challenge name that the client must answer. Alternatively, Amazon Cognito can issue tokens or fail authentication using the following parameters. If you want to generate a challenge with the Create Auth Challenge Lambda trigger, your trigger must output a challengeName of CUSTOM_CHALLENGE.
issueTokens Boolean
Indicates whether tokens should be issued to the user, which means the user was authenticated.
failAuthentication Boolean
Indicates whether the user’s authentication attempt should be terminated because of a failure to authenticate.
Example Lambda Trigger
This example Lambda trigger issues tokens if SRP_A, PASSWORD_VERIFIER, and CUSTOM_CHALLENGE challenges were passed; otherwise it fails the authentication.
exports.handler = function(event, context) {
    if (event.request.session.length == 1 && event.request.session[0].challengeName == 'SRP_A') {
        event.response.issueTokens = false;
        event.response.failAuthentication = false;
        event.response.challengeName = 'PASSWORD_VERIFIER';
    } else if (event.request.session.length == 2 && event.request.session[1].challengeName == 'PASSWORD_VERIFIER' && event.request.session[1].challengeResult == true) {
        event.response.issueTokens = false;
        event.response.failAuthentication = false;
        event.response.challengeName = 'CUSTOM_CHALLENGE';
    } else if (event.request.session.length == 3 && event.request.session[2].challengeName == 'CUSTOM_CHALLENGE' && event.request.session[2].challengeResult == true) {
        event.response.issueTokens = true;
        event.response.failAuthentication = false;
    } else {
        event.response.issueTokens = false;
        event.response.failAuthentication = true;
    }
    context.done(null, event);
}
CreateAuthChallenge: The challenge generator Lambda trigger
This Lambda trigger takes a challenge name as input and then generates challenge parameters based on that challenge.
Inputs
challengeName String
The name of the challenge the Lambda trigger has been requested to issue.
session List of ChallengeResult objects
This is a list containing ChallengeResult objects that indicate whether the challenge was successfully answered. A ChallengeResult object contains a challenge name (challengeName), a Boolean value with the challenge answering result (challengeResult), and challenge metadata that you populate when you generate a challenge (challengeMetadata).
Outputs
publicChallengeParameters Map of String, String
The Lambda trigger returns a map of public challenge parameters. This map is sent to the client unencrypted so that the client can present the challenge to the user; for example, a CAPTCHA URL.
privateChallengeParameters Map of String, String
The Lambda trigger returns a map of private challenge parameters that it generates. This output is labeled “private” and the client cannot see it. For example, it might be used to hold CAPTCHA answer or other valid answers for the challenge.
challengeMetadata String
Metadata about the challenge. This data is put in the session of challenge results when this challenge is answered.
Example Lambda trigger
The following Lambda trigger generates the publicChallengeParameters and privateChallengeParameters maps, with the URL to a CAPTCHA in the public map and the valid answer to the CAPTCHA in the private map. The two pieces usually come from an external service.
exports.handler = function(event, context) {
    if (event.request.session.length == 2 && event.request.challengeName == 'CUSTOM_CHALLENGE') {
        event.response.publicChallengeParameters = {};
        event.response.publicChallengeParameters.captchaUrl = 'url/123.jpg'
        event.response.privateChallengeParameters = {};
        event.response.privateChallengeParameters.answer = '5';
        event.response.challengeMetadata = 'CAPTCHA_CHALLENGE';
    }
    context.done(null, event);
}
Verify Auth Challenge: The response verifying Lambda Trigger
This Lambda trigger verifies the answers to the challenges. It gets acceptable answers to the challenge, provided by the previous Create Auth Challenge Lambda trigger, and compares them to the client provided answer.
Inputs
privateChallengeParameters – Map of String, String
This input is the same as described previously for the Create Auth Challenge Lambda trigger. Amazon Cognito forwards the map of private challenge parameters from the Create Auth Challenge Lambda trigger to the Verify Auth Challenge Lambda trigger. These parameters include valid answers for the challenge.
challengeAnswer String
The answer provided by the user to the challenge.
Outputs
answerCorrect Boolean
Indicates whether the answer provided to the challenge was correct.
Example Lambda trigger
The following Lambda trigger checks if the challengeAnswer value is equal to an answer entry in the privateChallengeParameters map to determine if the challenge was answered correctly.
exports.handler = function(event, context) {
    if (event.request.privateChallengeParameters.answer == event.request.challengeAnswer) {
        event.response.answerCorrect = true;
    } else {
        event.response.answerCorrect = false;
    }
    context.done(null, event);
}
Client SDK considerations
The client SDKs expose a new callback that requests input from users in the case of custom challenges. The challengeParameters parameter is used to present the challenge to the user and the user’s response is passed back in the challengeResponses parameter to the RespondToAuthChallenge API call. Here is an example in JavaScript to complement the example Lambda triggers described previously. As can be seen in the following, the JavaScript SDK provides a customChallenge callback while the Android and iOS SDKs provide similar callbacks.
var authenticationData = {
    Username : 'username',
    Password : 'password',
};
var authenticationDetails = new AWSCognito.CognitoIdentityServiceProvider.AuthenticationDetails(authenticationData);
var poolData = {
    UserPoolId : '...', // Your user pool id here
    ClientId : '...' // Your client id here
};
var userPool = new AWSCognito.CognitoIdentityServiceProvider.CognitoUserPool(poolData);
var userData = {
    Username : 'username',
    Pool : userPool
};
var cognitoUser = new AWSCognito.CognitoIdentityServiceProvider.CognitoUser(userData);
cognitoUser.setAuthenticationFlowType(‘CUSTOM_AUTH’);
cognitoUser.authenticateUser(authenticationDetails, {
    onSuccess: function (result) {
      console.log('access token + ' + result.getAccessToken().getJwtToken());
    },

    customChallenge: function (challengeParameters) {
      //gather user responses in challengeResponses based on challengeParameters
      cognitoUser.sendCustomChallengeAnswer(challengeResponses, this);
    },

    onFailure: function(err) {
      alert(err);
    },
});
Security considerations
The custom user pool authentication flow works in parallel with all other user pool authentication flows, unless you specify otherwise. If you want to implement a custom flow that presents more challenges than, for example, USER_SRP_AUTH, you should choose Only allow Custom Authentication in the Amazon Cognito console, or include the CUSTOM_AUTH_FLOW_ONLY enum in the ExplicitAuthFlows user pool client property.

Conclusions
As you can see, you can customize your authentication flow using the AWS Mobile SDKs. This enables you to create an experience that is designed to provide security and a user-friendly experience for your users. We’d like to hear how you plan to use this feature in your applications, so feel free to leave a comment to share other uses for this feature.
If you have comments or questions, please leave a comment, visit our forums, or post on Stack Overflow.
How to Store Your App Photos in the Cloud Using Amazon S3 [tutorial and code samples]
About
Welcome to the first installment of our blog series showing how to build some of the most popular end-to-end experiences used by mobile apps. In each installment, you’ll see how you can build these experiences – including the client (iOS and Android) and the backend (AWS services) – in just a few minutes. We’ll typically use AWS Mobile Hub to accomplish this; Mobile Hub simplifies many of the steps you would normally have to go through, including authenticating users, securely configuring backend services, running backend code, and generating reference iOS and Android apps that use these features. We’ll then dive deeper, showing you how to integrate the experiences into your own applications and explaining what is happening within Mobile Hub.
Through the series, we’ll touch on a number of AWS services, including Amazon Cognito, Amazon S3, Amazon DynamoDB, and AWS Lambda. We welcome your suggestions in the comments for additional experiences or AWS services we should highlight!
Let’s get started with our first installment. This first post is about uploading photos to and downloading photos from the cloud from a mobile application. You’ll walk away with a fully functioning mobile application connecting to your AWS backend resources.
There are three steps in this tutorial.
Step 1. Configure the backend AWS resources via AWS Mobile Hub. This consists of creating a project, enabling a single feature called User Data Storage, and building/downloading the iOS Swift sample app source code project.
Step 2. Explore uploading to and downloading photos from Amazon S3 using the sample app generated by Mobile Hub.
Step 3. Store and Retrieve Photos from your own app by following the AWS Mobile Hub integration guide customized for your project.
First, we’ll explain briefly what Mobile Hub is and the AWS features (Amazon S3 and Amazon Cognito Identity) that we’ll enable within a Mobile Hub project.
What is AWS Mobile Hub
AWS Mobile Hub simplifies the process of building, testing, and monitoring mobile applications that make use of one or more AWS services. It can help you skip the front- and back-end heavy lifting of manually creating cloud service configurations and integrating them into your client. The mobile app features supported includes user authentication, data storage, backend logic, push notifications, content delivery, and analytics—all from a single, integrated console.
There is no charge for Mobile Hub; you only pay for the AWS services used. For example, after you complete this tutorial, you are only charged for the objects stored in your S3 bucket. Learn more about AWS Mobile Hub features.
What is Amazon Cognito Federated Identity
Amazon Cognito Federated Identities enable you to create unique identities for your users and authenticate them with identity providers. With an identity, you can obtain temporary, limited-privilege AWS credentials to synchronize data with Amazon Cognito Sync, or directly access other AWS services. Amazon Cognito Identity supports public identity providers—Amazon, Facebook, Google, and SAML identity providers—as well as unauthenticated identities, which is what we’ll be utilizing in this tutorial. Learn more about Amazon Cognito Federated Identities.
What is Amazon S3
Amazon Simple Storage Service (Amazon S3) provides secure, durable, highly scalable object storage in the cloud. Using the AWS Mobile SDK, you can directly access Amazon S3 from your mobile app. The AWS Mobile SDK allows you to consume the Amazon S3 service in your mobile application via the S3 Transfer Utility. The fully functional iOS sample app generated by Mobile Hub includes the AWS Mobile SDK for iOS, S3 Transfer Utility, and all the helper code for running the demo app used for this tutorial. Learn more about Amazon S3 cloud storage and pricing.
Let’s Begin
Step 1 – Configure the backend
We’ll use Mobile Hub to create a project and then enable the User Data Storage feature to store and retrieve photos from Amazon S3. We walk you through the steps and follow up with a recap (explain the magic) of what just happened.
1) Launch AWS Mobile Hub console
2) Select Create new mobile project.

3) Provide a project name, S3Blog, and then select Create project.

Note: If you have never used Mobile Hub before, you’ll be prompted to select Get Started and Yes, grant permissions before you can create a new project.
4) Select User Data Storage.

5) Select Store user data and then choose Save changes.

6) Select Integrate from the left panel

7) From the integration tab, make sure iOS Swift is selected and that you are in the Getting Started section.
8) Select Download a sample app to download your iOS Swift project source code (zipped project folder). We’ll run this project in Xcode in just a minute.

Done. You now have all your AWS resources configured and the custom-built iOS Swift source code project is downloaded and ready.
What did we just do?
First, we created a new project in AWS Mobile Hub. Note that, for each Mobile Hub project created, an Amazon Cognito identity pool is created on your behalf, regardless of what features are enabled. Amazon Cognito Identity is being used in our app to obtain temporary, unauthenticated, limited-privilege credentials to directly access Amazon S3 from a mobile app.
In a future blogpost, we’ll discuss the Mobile Hub User Sign-in feature where Amazon Cognito provides authenticated identities through Amazon Cognito User Pools and public identity providers—Amazon, Facebook, Google, and SAML. for this tutorial, just know that we’ll be using Amazon Cognito unauthenticated identities to demonstrate this topic.
After the project was created with the default Amazon Cognito identity pool, you then enabled the User Data Storage feature in your Mobile Hub project. This feature first creates an Amazon S3 bucket to store user photos and creates a policy within the AWS Identity and Access Management (IAM) role that grants your user’s access to Amazon S3 when they launch the app. Within the S3 bucket, a /Public folder was created with access permissions set to allow all users of your app to view and upload files stored there. There’s also a /Private folder created, which we’ll discuss in the next blog post. This folder is used to store private data for each user when authenticated through the User Sign-in feature of Mobile Hub.
Here’s how the sample app works:
The user launches the app and immediately that user is given a unique unauthenticated Amazon Cognito Identity. The user then selects the User Data Storage demo feature to upload a photo from his or her photo library to the /Public folder within the S3 bucket. The unique unauthenticated Amazon Cognito Identity given to that user provides limited-privilege credentials to directly access the /Public folder of your S3 bucket.
Now that we have created file storage that is designed for scalability, let’s go demo the app!
Step 2 – Running the Sample APP
Now for the fun part. In the previous step 1, you configured the AWS resources you needed, built the sample app project code, and downloaded it to your Mac. At the end of this walkthrough, we’ll go into how Mobile Hub guides you in integrating these features into your own app.
For now, we’ll now describe how to open the sample project code in Xcode and run the iOS sample app on a physical iOS device or simulator. It’s that simple.
The iOS sample app provides a demo for retrieving files from your S3 bucket and uploading photos from your iOS device photo library. Mobile Hub has placed a sample image to get started.
1) Unzip the iOS Swift project code you downloaded previously

2) Open the sample app project in Xcode by double-clicking on the Xcode project, MySampleApp.xcodeproj, which is in the project folder.

3) Select build/run within Xcode to build and run the sample app.

When the sample app is first launched, a function called is called to retrieve an ID generated by the Amazon Cognito Identity service. The function invokes that manages access to Amazon Cognito. The following method illustrates how to retrieve an app user’s identity
4) At the main screen of the sample app, select User Data Storage and then Demo User File Storage feature.


You are now in the User File Storage demo and you’ll see example-image.png, which Mobile Hub provided to get started. You can now download the example image from Amazon S3 to your device.
5) To download an image from the list, select the file and then choose Download from the action item list as shown.
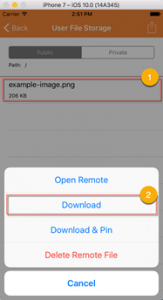
Here’s the sample function that is used to download files from Amazon S3 to the mobile app.

You should now see a green check mark next to the example image, which indicates that it has been downloaded from Amazon S3 and cached locally in the app.
Now you can upload an image to Amazon S3 from your camera roll.
6) To upload a photo from your photo library to Amazon S3, select the action icon on the upper right of the screen and then choose Upload from within the User File Storage demo of the sample app.
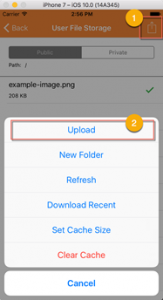
7) The app will request access to your photo library. Select OK.

8) Now the app has access to your camera roll and you can select a photo to upload to Amazon S3. Here, you can select a waterfall image.

9) After you select an image, you are prompted to give your file a name. Give it a name and make sure you add .png to the end as shown so the app can recognize this as an image. Select Done and you’ll see the activity indicating the image is being uploaded to Amazon S3.

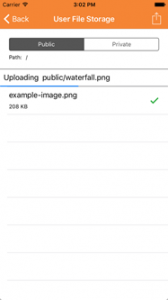
After the image upload completes, it’ll show in the list but without the green check mark, which indicates it’s now in the cloud (stored in your S3 bucket) but not cached locally in the app.
Here’s the sample iOS Swift function code used for uploading images from your app to Amazon S3.

What did we just do?
We just provisioned AWS backend resources consisting of an Amazon Cognito ID and Amazon S3 bucket using AWS Mobile Hub. We then built and launched the generated sample app. The app demonstrates the User Data Storage feature by uploading photos from your iOS device to Amazon S3 and downloading photos from Amazon S3 to your iOS device.
Are you done playing? We hope you enjoyed this tutorial. Stay tuned for the next installment where we’ll build on this idea and add user sign-in for more private storage and user data sync.
Are you interested in looking behind the curtain? To see that image you uploaded in the S3 bucket that was created for you, choose the Resources button on the left-hand navigation of the Mobile Hub console, choose the link in the tile labeled Amazon S3 buckets to open the Amazon S3 console, then choose the Public folder.
Planning to integrate this feature into your own app? No problem! In step 3, next, we’ll walk you through the Mobile Hub integration guide, helping you integrate all the code from the sample app into your own app.
Step 3 – Store and retrieve photos from your own app
You just configured a backend file storage and ran our generated sample app to demonstrate the end-to-end functionality of this common mobile feature. However, what you really need is the same functionality in your own app. Mobile Hub provides integration instructions specific to each mobile project you create. Let’s get started.
Go back to your Mobile Hub project in the console and select Integrate. The integration instructions from Mobile Hub will first walk you through Getting Started and then describe each feature you enabled in your Mobile Hub project and how to integrate each of them into your own app.
Here’s a quick overview of Getting Started and additional instructions for integrating this project into your own application.
The Mobile Hub Getting Started integration instructions include:
Download the Mobile SDK for iOS and custom source code provided
- The download provides the latest SDK, Mobile Hub helper code, and example source code to get you started.

- After downloading the SDK and helper code, drag and drop the Sdk folder contained in the download into your own project within Xcode. This assumes you already have an iOS Swift project of your own; if not, create a new one and follow along.
- Add the AWS SDKs as Embed Frameworks.
- Add Run Script phase to your project as directed.
- Copy the AmazonAws folder from the helper code to your project and add a group for it. This source code contains a customized helper framework that simplifies the use of all the SDKs that are required to support your project.It also contains the AWSMobileClient.swift file, which bootstraps the app and creates an identity manager to establish the user identity with Amazon Cognito.
- Copy the AWS dictionary from the integration Info.plist into your own project Info.plist. The AWS dictionary provides the CognitoIdentity poolId and region for your project.
- Add AWS iOS SDK dependencies, libsqlite3.tbd and libz.tbd, under Linked Frameworks and Libraries as directed.
- Set up your Application Delegate by returning the AWSMobileClient singleton as shown:
You are now done with the Getting Started section.
After you complete Getting Started, you can then select User Data Storage in the left panel of the integration instructions. Here, you just need to do the following:
- Copy the AWS dictionary from the integration Info.plist into your own project Info.plist. The AWS dictionary already provides all the CognitoIdentity pool IDs for your project as well as the S3 bucket and region.
- View or copy the example upload/download source code provided. The idea is to use this code in your own UIViewController.
That’s it! You should now be able to run your own application and connect it to your AWS resources like we demonstrated using the sample app generated by AWS Mobile Hub.
Conclusion
We just configured a backend data storage feature via AWS Mobile Hub, generated a fully functional sample iOS app demonstrating uploading and downloading photos to and from S3, and then walked through integrating the client code into your own app, connecting to the same backend resources demonstrated in the sample app.
Thanks and happy coding!
Using webpack with the Amazon Cognito Identity SDK for JavaScript
This blog post is aimed at developers of all experience levels who develop and deploy JavaScript based applications (whether server-side with Node.js or client side) that incorporate the AWS SDK, the Amazon Cognito Identity SDK for JavaScript and who also use the popular webpack module bundler.
In July 2016, Amazon Web Services launched Amazon Cognito User Pools, a feature that makes it easy for developers to add sign-up and sign-in functionality to mobile and web applications. To help developers easily realize the power of user pools within their own applications, we also released the Amazon Cognito Identity SDK for JavaScript.
Amazon Cognito User Pools allows you to easily add user sign-up and sign-in to your mobile and web applications. The fully managed user pool can scale to hundreds of millions of users and you can have multiple directories per AWS account. Creating a user pool takes just a few minutes and allows you to decide exactly which attributes (including address, email, phone number as well as custom attributes) are mandatory and even optional when a new user signs up for your application or service. Your application can also specify the desired password strength, whether the use of Multi-Factor Authentication (MFA) is required, and verify new users via phone number or email address to further enhance the security of your application.
If you are new to the Amazon Cognito Identity SDK for JavaScript this AWS blog post is a great place to start.
Why Use Asset & Module Bundling with the Amazon Cognito Identity SDK for JavaScript
Today, modern web applications for both mobile and desktop have to provide the user with a secure, fast, responsive, and native-app-like experience. There is no doubt that modern browsers are extremely powerful and cater to a vast array of possible implementation approaches. Many of the more popular implementations rely heavily on the deployment of a JavaScript application through some form of asset packaging and/or module bundling. This allows a developer to take their JavaScript application and create one or more files that can be loaded by the client browser by using script tags.
There are many schools of thought on how you can achieve this packaging , including task runners such as Grunt and Gulp, and bundlers such as Browserify. However, there is a general consensus that asset packaging is not only about improving load times—it enables the modularization of your application while ensuring testability and robustness.
Using webpack with the Amazon Cognito Identity SDK for JavaScript
In the many requests we get to provide more detail on how to integrate the Amazon Cognito Identity SDK for JavaScript within a webpack environment, we’re specifically asked how to ensure that webpack correctly manages the following third-party dependencies:
- JavaScript BN library for BigInteger computation (jsbn)
- an extension to jsbn the with the rest of the jsbn methods including most public BigInteger methods (jsbn2)
- the Stanford JavaScript Crypto Library (sjcl)
Throughout these examples, the following bower libraries are used by bower.json
"aws-cognito-sdk": "https://raw.githubusercontent.com/aws/amazon-cognito-identity-js/master/dist/aws-cognito-sdk.js",
"amazon-cognito-identity": "https://raw.githubusercontent.com/aws/amazon-cognito-identity-js/master/dist/amazon-cognito-identity.min.js",
"sjcl": "https://raw.githubusercontent.com/bitwiseshiftleft/sjcl/master/sjcl.js",
"jsbn": "https://raw.githubusercontent.com/andyperlitch/jsbn/master/index.js",
For all the reasons we gave earlier for the importance of asset packaging to development processes, and unless your application is extremely small, the use of an asset packaging tool such as webpack is almost always recommended. Of course, one could simply pull in all of these dependencies using tags. However, this would pollute global namespace, and not provide the most optimal resource management and loading approach. Many developers start with a standard webpack.config.js file that has a standard babel loader, as shown here.
{
  /** test for file ending in js or jsx
   * exclude node_module and bower_components - we dont want to babel these
   * use the babel loader
   * apply the react and es2015 (es6) transformations **/

  test: /.jsx?$/,
  exclude: /(node_modules|bower_components)/,
  loader: 'babel',
  query: {
    presets: ['react', 'es2015']
  }
}
It’s important to remember that this configuration doesn’t take into account that some of third-party dependencies used by the Amazon Cognito Identity SDK for JavaScript currently do not use the Universal Module Definition (UMD) pattern for JavaScript.
The UMD pattern attempts to offer Asynchronous Module Definition (AMD) based compatibility with the most popular script loaders of the day such as RequireJS and CommonJS.
This is a pattern that webpack relies on, and so we must make some changes to how webpack loads these modules. Without these changes, you may encounter errors such as the following.
amazon-cognito-identity.min.js:19 Uncaught ReferenceError: BigInteger is not defined
Such an error may be encountered when making a call to AWSCognito.CognitoIdentityServiceProvider.CognitoUser property authenticateUser This is an example of where we can make use of the webpack imports and exports loader capability to overcome this error.
Using webpack Loaders
According to the webpack documentation "loaders allow you to preprocess files as you require() or “load” them. Loaders are kind of like “tasks” are in other build tools, and provide a powerful way to handle front-end build steps. Loaders can transform files from a different language like, CoffeeScript to JavaScript, or inline images as data URLs"
In order to resolve the lack of UMD compatibility, you will rely to two specific loaders, import and export.
Using the Export Loader
In the case of the Amazon Cognito Identity SDK for JavaScript, we need to ensure we export theAWSCognito variables into the scope of the module that requires/imports (for ES6) them.
{
  test: /aws-cognito-sdk/index.js/,
  loader: 'exports?AWSCognito'
}
Using the exports loader has the effect of exporting a module method within bundle created by webpack. As a result, both AWSCognito and AWS are now accessible when required or import(ed) (for ES6).
var AWSCognito = require('aws-cognito-sdk')

/*** EXPORTS from export-loader ***/
module.exports = AWSCongito
More information about the exports loader can be found here
Using the Import Loader
The import loader is mostly used to inject (import) variables into the scope of another module. This is especially useful if third-party modules are relying on global variables like BitInteger or sjcl as is the case with Amazon Cognito Identity SDK for JavaScript.
If you don’t use the webpack loader, the following is generated within the bundle.
__webpack_require__(431);       // refers to jsbin
__webpack_require__(432);       // refers to sjcl
Beacuse neither jsbin or sjcl export anything, any calls that rely on these modules will result in an error.
To resolve this, we can use the following webpack loader configuration:
{
  test: /amazon-cognito-identity/index.js/,
  loader: 'imports?jsbn,BigInteger=>jsbn.BigInteger,sjcl'
},
{
  test: /sjcl/index.js/,
  loader: 'imports?sjcl'
}
This injects the following into the bundle (in this case bundle.js) created by webpack.
/*** IMPORTS FROM imports-loader ***/
var jsbn = __webpack_require__(431);
var BigInteger = jsbn.BigInteger;
var sjcl = __webpack_require__(432);
As a result, jsbn, BigInteger and sjcl are all imported from their respective modules into Amazon Cognito Identity SDK for JavaScript.
More information about the import loader can be found here
Next Steps
We encourage you to download the Amazon Cognito Identity SDK for JavaScript and start building your application. Coupled with webpack, and by following the guidance in this blog, you we hope you have a smooth development experience.
If you have any comments or questions, please free to comment below, reach out via email (teichtah@amazon.com) or raise an issue here.
References
This blog post makes reference to the following third party resources
- webpack – https://webpack.github.io/
- webpack documentation – http://webpack.github.io/docs/what-is-webpack.html
- webpack exports loader – https://github.com/webpack/exports-loader
- webpack imports loader – https://github.com/webpack/imports-loader
- JavaScript BN library for BigInteger computation – http://www-cs-students.stanford.edu/~tjw/jsbn/jsbn.js
- jsbns – http://www-cs-students.stanford.edu/~tjw/jsbn/jsbn2.js
- Stanford JavaScript Crypto Library – https://github.com/bitwiseshiftleft/sjcl
- RequireJS – http://requirejs.org/
- CommonJS – http://www.commonjs.org/
Announcing the AWS SDK for React Native
- Amazon S3 to store user data, including photos and videos, in the cloud. It uses the TransferUtility, which simplifies file transfers between your app and the cloud.
- Amazon DynamoDB to store data into a NoSQL database.
- AWS Lambda to run serverless code in the cloud without the need for backend infrastructure.
- Amazon SNS to send and receive push notifications.
Getting Started with the SDK
- Download the packages from Github.
- Add the services that you need into your
package.json. - Run
npm install.
package.json that uses AWS Lambda.
% cat package.json
{
  "name": "sample",
  "version": "0.0.1",
  "scripts": {
    "start": "node node_modules/react-native/local-cli/cli.js start"
  },
  "dependencies": {
    "aws-sdk-react-native-core": "../aws-sdk-react-native-core-0.0.1.tgz",
    "aws-sdk-react-native-lambda": "../aws-sdk-react-native-lambda-0.0.1.tgz",
    "react": "15.3.1",
    "react-native": "0.32.0"
  }
}
Contributing to the SDK