by Jeff Ianello, EVP, SeatGeek Open Partnerships at SeatGeek. After more than a decade spent working on the team and league side of sports business, Jeff joined SeatGeek to help build the future of live event ticketing.
It’s five minutes until tipoff of a sold out game when my phone rings. If you’ve ever worked in a box office, you know that a phone call right before tipoff is never a good thing. If you haven’t, I can tell you that it almost always means there’s a problem.
All too often, that problem is that fans are walking up to customer service to tell them that their tickets couldn’t scan. They purchased from one of the largest ticket marketplaces in the world, but one who wasn’t partnered with our team. We explored further and found that these tickets were double sold. In some cases, the seller intentionally defrauded users by intentionally pushing the same ticket to multiple markets. Other times, it was merely an accident or a misunderstanding of marketplace policies.
Either way, the buyers got the short end of the stick. We received angry emails the next day from the fans who couldn’t get in. Twitter was ablaze. The fans’ feelings about our club, of whom they are lifelong supporters, were tarnished. On what should have been one of the most exciting nights of the year, I was left frustrated as an executive.
When I led ticketing for the Phoenix Suns, this was an altogether too familiar experience. In a 19,000 person building, only a handful of double sold tickets may occur each game, but when it happens, a fan’s night can be ruined. Even when marketplaces such as SeatGeek and StubHub provide replacements, some of the magic of the experience is lost and both the team and marketplace’s brands can be damaged. More importantly, the prospect of a bad experience looms the next time that fan thinks about buying a ticket. Will this be the one percent chance where the tickets won’t work? This friction causes some fans not to buy tickets. When that happens, we all lose.
After the Suns, I joined the NBA league office where I worked closely with every team’s ticketing department. The NBA, like other leagues, has multiple primary ticketing companies. Each primary ticketing company has their own “preferred” secondary site. Spectra and AXS partner with StubHub, Ticketmaster owns their own resale, and Veritix uses Flash Seats. Each “preferred” reseller carries “verified” tickets. When a customer buys through one of these preferred platforms, a new barcode is created. The old barcode is no longer valid, while the new one guarantees entry.
What I didn’t learn, but what I realized when I came to SeatGeek, is that none of this has to happen in an age of APIs. APIs are the glue that hold networks together; the way that information systems talk to one another to perform functions such as displaying airfares on travel sites, processing online credit card payments, or in this case, re-issuing a barcode when someone buys a resale ticket. All the legacy ticketing company has to do is expose this functionality to more than one party.
This led me to a realization even more insidious. Ticketing companies want fraud. It is only the existence of unverified tickets that makes verified tickets a valuable asset. Barcode verification can help prop up a ticketing company’s exchange or be an asset that can be sold for millions of dollars to the highest bidder. That status quo benefits ticketing companies at the expense of fans, marketplaces, and teams. They can’t keep that secret any longer.
As I talk to colleagues around the industry, there’s a growing frustration that barcode validation is being held hostage as a way to extract money. I expect in the next three years, the pendulum will swing the other way. Leagues will mandate that all barcodes must be re-issued across every site. Fans are the lifeblood of teams. Why would a team or league want their fans to buy fraudulent tickets when it is completely avoidable?
The time has come for teams and leagues to stand up for fans and demand that primary ticketing companies give up the fabricated spectre of unverified tickets. Instead, by making use of readily available technology to verify tickets for fans – regardless of where the purchase was made – we can all help ensure that when the lights go down, or the team steps out on the court, fans who’ve put their dollar down are there to enjoy the show.
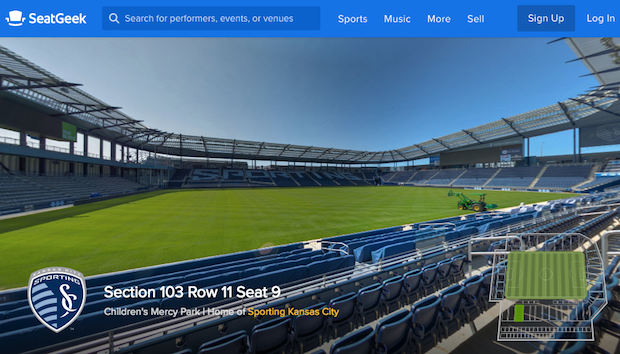
Great technology at SeatGeek helps us give fans as much information as possible before making a purchase. Features such as Deal Score, which ranks tickets by quality in addition to price, and our interactive maps, which are detailed beyond any others in the industry, make the ticket-buying experience easy by giving customers a full understanding of what they are purchasing upfront. Today we’re thrilled to launch Pano, a new product feature that offers the absolute best way for fans to check out what their view at an event will look like before purchasing a ticket.
Pano is an immersive stadium experience that allows fans to digitally interact with and explore a venue. Built in partnership with our first primary ticketing client, Sporting Kansas City, Pano allows fans to see the view of the SKC field at Children’s Mercy Park from every section in the stadium. It offers full 360-degree views from each vantage point and the ability to click around the venue to “fly over” to a different area of the stadium and compare another view.
To build Pano, our team took photos from hundreds of locations around Children’s Mercy Park and used them to create a digital model of the venue. From those flat images, software helped us understand the depth of the images in a way that would truly represent each view and be most helpful to fans. Essentially, we created a three-dimensional world using photos of the stadium, which allows the customer to easily navigate and compare views from all across the venue.
The result is a much more immersive, and more realistic, experience than you see anywhere else on the market. It has the power to take all of the guesswork out of the process of buying a ticket, and is a powerful tool that enables fans to truly experience what they’re buying before they purchase.
This past summer, we launched SeatGeek Open, our vision for the future of ticketing. Like everything we do at SeatGeek, each piece of Open that’s being built has the fan experience in mind, from barcode verification that can eliminate fraud, to elegant APIs allowing for smooth ticket-buying integrations within fans’ favorite websites and apps. Expect to see additional venues released under Pano for future SeatGeek Open clients.
Stay tuned for a more technical look at the behind-the-scenes development of Pano.
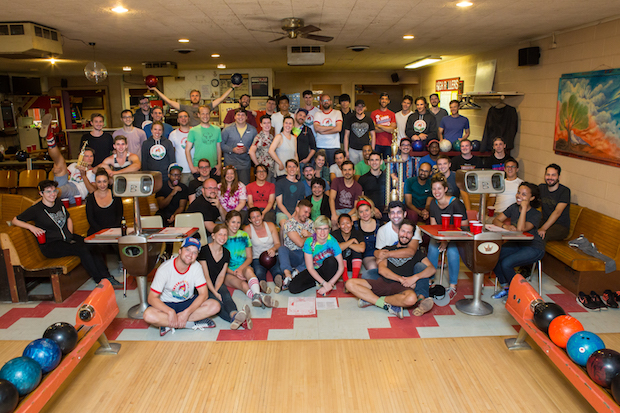
Making SeatGeek a great place to work is serious business for our team, and it’s one of the things we’re most proud of as a company. We’re thrilled that Glassdoor has recognized us as one of the top five Best Places to Work in 2017.
The best thing about being included on the Glassdoor list may be that unlike some other, similar awards, there was no self-nomination process. Instead, it’s entirely based on feedback SeatGeek employees have voluntarily and anonymously shared as company reviews on Glassdoor over the past year.
Being part of the SeatGeek team has its perks. We frequently hold team outings and organize an annual retreat, our kitchen is fully stocked with more snacks and caffeine than most humans can handle, and a monthly ticket stipend helps employees attend the best live events New York City has to offer.
But while those perks are fantastic and make working at SeatGeek fun, what we’re really proud of - and believe is more unique - is that SeatGeek is an amazing place to contribute, grow, and build something special. There’s a belief here in the power of live entertainment to improve lives and make people happier, and a genuine passion for building a product that enables great experiences.
As the team continues to grow, we’re fortunate to have found people that continue to embody SeatGeek’s company values. Just as our product encourages transparency to our users - in the form of things like Deal Score, which labels listings as both good values as well as bad - we value and practice transparency internally, by doing things such as presenting board meeting decks to employees, regularly requesting feedback on company performance, and communicating company news early and often.
While we operate in ticketing, SeatGeek is first and foremost a technology company, and our work reflects that. People at SeatGeek love to build things, and we leverage technology to do so faster and better. While our competitors see technology as a disturbance and a challenge to overcome, we embrace it as our competitive edge. An obsession with quality - every pixel, every line of copy, every customer interaction - makes the difference between good and amazing.
The people at SeatGeek that bring these values to life are our most valuable asset, and are what we hear about most often when employees talk about their favorite parts of working here. Feel free to browse examples of the feedback those employees shared on Glassdoor about what it’s like to work at SeatGeek.
If this sounds interesting to you, come work with us at SeatGeek! We have a number of roles open across engineering, marketing, business development, and more.
This post is the first of a two-part series on using Vault in production. Both posts are slightly redacted forms of internal documentation. This post will cover why we chose our specific workflow, and the second post will cover day-to-day usage of Vault.
Problems
Sensitive credentials and keys are stored in certain code repositories (Github).
Anyone with access to Github has access to these credentials.
Anyone who has checked out code has these sensitive credentials on their hard drive.
Key rollovers are a very difficult, manual process.
Sensitive credentials and keys are stored in plain text.
Anyone who can see these credentials can use them.
Shared credentials and keys are used in numerous places.
Generating a meaningful audit log is difficult.
Goals
Encrypt sensitive credentials and keys at rest.
Store sensitive credentials and keys in a central, remote, network accessible location.
Gate and audit access to sensitive credentials and keys.
Provide a unique identifier to each user/agent (per auditing purposes).
By leveraging Vault, we can meet all of our goals.
1. Encrypt sensitive credentials and keys at rest.
Vault encrypts data all stored data at rest.
2. Store sensitive credentials and keys in a central, remote, network accessible location.
Vault is a highly available secret management solution that is network accessible via its HTTP API or via running a local client.
3. Gate and audit access to sensitive credentials and keys.
4. Provide a unique identifier to each user/agent (per auditing purposes).
Vault allows for per user, per machine, or per app credentials controlling access as granularly as needed or desired. In addition, all requests and key usages are recorded in Vault’s logs or syslog which can be shipped to a centralized logging solution.
Implementation Strategy
While Vault provides the primitives and tools, we still need to form a process that understands and works with SeatGeek both now and in the future. With encryption and auditing handled, our job is to store and provide access to secrets as well as manage tokens.
NOTE: The following assumes knowledge about specific Vault features, general AWS knowledge, and SeatGeek’s Base AMI.
Storing Secrets
At SeatGeek (and most other software shops), the two most common types of secrets are the following:
Per Enviroment
This includes secrets that the same for every machine or application, but differ based on the current environment. They are also commonly or can be used by all machines or applications, which is important to note.
Examples: New Relic, PagerDuty
Per Application
This includes secrets that differ between applications, where an application is the combination of itself and the environment in which in runs. This also includes secrets that are not common to every application, regardless if one value is always used.
The reasons for using this backend are simplicity and flexibilty. It allows for arbitrary key-value pairs to be stored, encrypted, and retrieved from Vault without the need or use of third party services.
The generic secret backend allows for key-value pairs to be written under the namespace secret, and can be associated with various ACL’s. The currently used schema is of the following form:
1
secret/ENVIRONMENT/APP/KEY value=VALUE
Here, the top level under the secret namespace is ENVIRONMENT, with each APP getting its own bucket per ENVIRONMENT in which KEYs are written. Vault KEYs can contain a dictionary of key-value pairs themselves, and so the secret VALUE is written to the key value.
NOTE: bucket == namespace
The following environments exist:
1234
production
staging
management
test
Each app will have a bucket created when it is configured to launch in a given environment. Additionally, for our per environment secrets there is a common bucket under each ENVIRONMENT namespace.
Examples of secrets in the wild:
12
Staging New Relic key
secret/staging/common/NEW_RELIC value=THISITHEKEY
12
Production API Spreedly Token
secret/production/api/SPREEDLY_TOKEN value=THISISTHETOKEN
Accessing Secrets
The basic premise here is a client authenticates and is granted a token. That token, among other things, is associated with a role and corresponding set of authorizations in the form of policies or permissions.
Authentication
At SeatGeek (for the time being), there are two Vault clients we need to worry about:
Developers
These are people who write code at SeatGeek. Developers should be granted enough access to be able to do their jobs while keeping our sensitive information secure and our applications running.
Machines
These includes any servers running with SeatGeek infrastructure. Machines should be able to self-authenticate in order to retrieve necessary secrets for provisioning and running applications.
NOTE: This workflow differs for Admins who are granted root tokens, no permission restrictions here.
To provide these levels of access, two different Vault authentication strategies will be used specifically github authentication and app-id authentication.
The github authentication strategy was chosen here as we are already using it as a means of authenticating people for internal applications, and so some user grouping has already been done.
The app-id authentication strategy is used for roughly the same reasons as the generic secret backend. It is the simplest and most flexible to implement without relying on other systems.
Successful authentication via either of these methods results in a Vault token, which can be used to retrieve secrets.
Our github authentication includes simply allowing anyone in the SeatGeek Github organization on the team-developers team to be able to request and retrieve a Vault token. This is done by making a Vault login request with a Github personal access token. While this does not include everyone who writes code, it handles the majority of users for now.
Our app-id strategy reserved for machine authentication is highly dependent on AWS and our newer infrastructure strategies. When an AWS machine boots up, it can be configured to run with an IAM Role. This role is unique per application per environment, and also includes an id which can be retrieved from an instance’s metadata on the machine itself. Using this information, all SeatGeek IAM roles are whitelisted within Vault against their matching app and associated with a IP Range that corresponds environment’s VPC IP Range. This is our user-id in Vault terms. Machines can then make a Vault login request with the app they are responsible for running (applied during configuration management) and their IAM Role Instance Profile ID (attachment id). Assuming all pieces line up (IP address, app id, IAM Role Instance Profile ID), a Vault token is granted.
Additionally and only for machine authentication, there is a ENVIRONMENT-base-ami role that all machines can authenticate as. This allows for all machines on boot to be able to retrieve environment secrets via Vault’s app-id strategy without knowing which app is to be deployed. This is/would primarily be used to be able to test the Base AMI in isolation in our environments.
In both of these app-id authentication scenarios, the user-id is the machine IAM Role Id. However, when applications authenticate, the user-id is app-IAM_ROLE_ID. user-id’s must be unique, and this allows for us to have two user-id’s for a give IAM Role along with the appropriate configuration.
In the latest release of Vault, the app-id strategy has been deprecated in favor a new app-role strategy. Ultimately we will migrate from app-id to app-role with roughly the same implementation but are currently held back by the version of Vault (0.6.0) and the vault-ruby (0.6.0) gem we are using.
Authorization
Vault implements authorization via its own ACL’s or policies. These provide a set of permissions which can be scoped to various operations within Vault, typically indicated by namespaces. In the case of obtaining secrets, that namespace is secret. Additionally, these ACL’s can be associated with the various authentication strategies. A more generic way to think of it is a client authenticates and is granted a token. That token, among other things, is associated with a role and corresponding set of policies (same as other authentication/authorization strategies).
The current policies are used to control access to Vault secrets:
As far as developer authorization, all Github users are granted staging-read-only and testing-read-write, which if not obvious, means that any secret under the staging namespace can be read, and free reign with the testing namspace. production read-only access will be granted on a per application bases to service owners, and be implemented via Github teams.
As far as machine authorization, machines are granted the ENVIRONMENT-APP-read-only and ENVIRONMENT-common-read-only. As such, machines can access the common bucket and their app bucket within their ENVIRONMENT, nothing else. Cross ENVIRONMENT and cross app secret access is currently disabled and discouraged, although this might be revisited in the future.
Important to note here is the inability for non-Admins to write or update anything in Vault. These permissions are currently restricted to members of the Operations team, but this will surely be revisited in the future.
Token Managment
As of now, Vault tokens last forever once granted. This is a temporary measure that allows for simplicity of use, but additionally tooling will allow for this be changed.
Causes for Concern
Admins are granted root tokens
Developer authentication and authorization is reliant on Github
Machine credentials can be used on other machines within an IP Range
Assumptions are made around machines running a single application
Tokens last forever and be reused if retrieved
Vault is not using TLS
Metrics are not currently sent anywhere
No ui solution for managing secrets
Not possible to easily assume an application’s environment
Strategic Improvements
Admin Tokens
Currently, Admins are granted root tokens without permission restricitons. The latest version of Vault (0.6.2) has changed the ways in which root tokens are created/used, and as such, these could be substitued for Admin tokens or tokens with equivalent or slightly less permissions granted.
Developer Authentication/Authorization
With a centralized login system, developers would be able to authenticate with means other than Github potentially being more flexible and less dependent on a 3rd party. Permission granularity could also be provided on a per user basis allowing for trusted production access (ex: service owner access).
Machine Authentication
While we are already leveraging AWS for machine authentication, there are improvements in Vault to make this simpler and more secure. This integration would tie us tighter to AWS infrastructure, but it is doubtful we would run servers elsewhere, and if so we have an existing strategy.
These improvements involve allowing machines to one time authenticate with AWS dynamic metadata, addressing the issue of credential (re)use on different machines. Machines can be currently whitelisted by IAM Role or AMI.
App Authentication
We currently have a decent strategy for machine authentication, but our application authentication lacks flexibility. Specifically we assume that a single machine is running a single application and as such has a single IAM Role with the appropriate permissions for that application. This does not work if multiple applications coexist on a single machine, or if an application is broken up into tiers.
A way to combat this is to have application authentication use a different mechanism than machine authentication. This will require a revisit but will most likely leverage Vault’s Cubbyhole to multi-application scoped tokens via one time tokens.
Token Management
Tokens last forever currently, and should have leases and TTL’s. This would involve additional work to renew token leases as necessary.
TLS
TLS is disabled on our Vault cluster as it is addressed only within our internal network. With the requirement of TLS for all HTTP 2.0 connections, this will be revisited in the future and most likely with Vault serving as an internal CA.
Metrics and Monitoring
We are still in the early stages of adoption and use, but Vault has support for shipping application stats via a few means including StatsD.
Web UI
Either writing or adopting an existing open source solution would be extremely beneficial, as it would remove the burden of managing secrets from the Operations team while also allowing developers more control over how their applications are configured.
Locally Assuming App Roles
There is currently no way to run a command locally using the credentials in staging/production for a given application. Something like a .env file writer or a foreman-style command runner for our application manifests could go a long way in allowing developers to run services locally while simulating an environment.
Vault differentiates itself from other secret management services with its high availabilty option, and we leverage the Consul backend to deliver that. The Consul client is already configured to run on all of our machines (with default port mappings), with our Vault servers being no different. This also means that all data is stored encrypted in Consul, and so the Consul install should also be highly available.
As Vault is run within our internal network (and for other reasons), TLS is disabled. While this is desireable, we need to do additional work to make internal TLS usage a reality. Vault is also running on the standard default port of 8200 and listening on all network interfaces.
At SeatGeek, our mission is to help you see more live events. While we are very proud of how easy it is to find and buy tickets for events you already have in mind, we believe there is quite a bit we can improve when it comes to discovering new events. This blog post discusses what we’ve tried in the past, a couple features we’ve recently launched, and our larger vision for improving event discovery moving forward.
The Past
Our first major attempt at improving event discovery goes back to 2011 when we launched a calendar-based “Pandora for Live Events” called Columbus. This feature recommended events based on your favorite teams and performers. Despite our best efforts, Columbus wasn’t the big hit we expected. It had low usage numbers and didn’t translate well into a mobile-first world, so we decided to sunset1 this feature several years ago.
The Present Recent Past
Since then, our event discovery experience has consisted of primarily:
Search
Location based recommendations
The ability to keep track of your favorite teams and performers
Here is how we surfaced these features in our mobile apps not too long ago:
This version was useful when you had a specific event in mind or if you were a power user with dozens of tracked performers, but left a majority of people yearning for more. It wasn’t useful for answering more general types of questions such as:
Are there any good comedy shows in New York tonight?
What are the most popular shows in San Francisco?
What are some affordable Broadway shows when I visit New York in 3 weeks?
What rock concerts are playing in Los Angeles this weekend?
Said differently, this version was good at search, but had room for improvement for browsing and general discovery:
Where to Start?
Once we decided to focus on improving event discovery, we next needed to figure out where to start. The ideas were endless: social integrations, date filters, price filters, genre filters, semantic search, ability to sample songs, ability to upvote and downvote recommendations, a notifications tab, revamped onboarding, and countless others. In addition to all these ideas, there was an equally large number of ways to implement each idea. Do we want to have one feed similar to Facebook? Multiple lists on the screen like Netflix? A card approach that focuses on gathering preferences for every event? We knew we wanted to take an iterative approach where each feature stands on its own but also builds towards an ambitious long term goal2, but it wasn’t immediately clear where we should begin, how these items would fit together, and what exactly the long term goal would be.
Larger Vision
After carefully reviewing our options, we decided to guide our approach by looking at the relationship between types of user input (specific objective v general objective v little to no objective at all) with the different levels of personalization complexity required to return relevant results for a given feature.3
Search
For example, the bottom left of this chart describes search functionality, where there is a specific input (“Yankees tickets,” “Along Came Polly,” “Sweetgreen”) and a small amount of personalization needed to return a relevant result:
Browse
Moving up and to the right leads you to browsing features, where inputs are more general in nature compared to searching for a specific team or event. The more general nature of these inputs (“Comedy shows this weekend,” “Coffee in Nolita,” “A romantic comedy”) requires a bit more work to return relevant results.
List Based Discovery
Moving up and to the right again puts us in the discovery realm (“Find me something fun to do,” “Find me a good movie to watch right now,” “Find me a good place to eat”). For discovery based features, like Netflix’s homepage, there is no explicit input initially, which makes it a bit harder to return relevant results (in the case of Netflix both relevant lists and relevant shows or movies within each list). List based discovery offers many different types of recommendations, making it a bit easier to provide at least one relevant result.
Feed Based Discovery
While it’s no easy task to return relevant list based recommendations, there’s another level of personalization complexity required to surface 1-2 highly relevant pieces of content just by opening the app, as is exemplified by Facebook’s News Feed and Spotify’s Discover Weekly. This requires a sophisticated personalization strategy to do well.
Looking at the relationship between user input and personalization complexity helped us answer the questions mentioned above related to where we should begin, how these items would fit together, and what exactly the long term goal would be. We’d start by focusing on the browse experience because it would require minimal personalization complexity. We’d then move towards a list based discovery experience, and ultimately aim for the ambitious goal of having a feed based discovery experience that would show people extremely relevant content simply by opening the app:
The Present
Based on this high level plan, we recently launched several new features that improve the search and browsing experience. These include
The ability to find events for a specific date or date range
The ability to browse and search by specific categories and genres (Music, Sports, Comedy, Theater, etc.)
The Future
Over the next several months we are going to continue to improve the browse and discovery experience. While we have a general idea about what we think will work best, we plan to run experiments at every step along the way to understand what users actually find most useful. There are plenty of apps that provide great discovery experiences (Netflix, Facebook, Spotify), but that doesn’t necessarily mean their approach will translate well for the types of items people are searching for on SeatGeek. Here’s a preview of a couple future experiments:
We hope these new features help you find more events to attend with your friends! As always, we’d love to hear any feedback or suggestions you have to improve the app!
As you know, iOS gives us a few different ways to create our user interfaces. Here at SeatGeek, we build our views in code. We’ve found that using auto layout together with the Masonry library makes it pretty easy to write our layout code, and pretty easy to maintain it later. Readability aside, though, auto layout does come with some complexities and gotchas that can be frustrating at first. This blog post is a list of some stuff we wish we’d known when we started.
Helper libraries:
Masonry provides a nice DSL for creating auto layout constraints in code
SnapKit is the Swift equivalent, pretty much exactly the same thing
UIView subclasses:
For custom UIView subclasses that use auto layout, usually we need to override +requiresConstraintBasedLayout to return true. If you do everything perfectly and see an empty screen, it could be because this is missing.
Intrinsic content size:
The native UIView subclasses provided in iOS, like UILabel or UIImageView, usually know how big they should be, so you often need only specify position when laying them out.
Our own custom UIView subclasses can also have intrinsic content size, if we set up constraints to drive it. For example, it’s pretty common to drive intrinsic height by relating the top subview’s top edge to the view’s top edge, the bottoms and tops of the succeeding views to each other as we go down, and then the bottom subview’s bottom edge to the view’s bottom edge.
Or, our views can have their content size driven by the containing view’s layout. For example, it’s common for the container to control the width, since we don’t usually have horizontal scrolling. We often still have the widths of the subviews fully related as in the height example above, but in this case, rather than the subviews driving the instrinsic width of their container, the container drives the widths of the subviews.
It’s very common to have both approaches: the container drives the width from outside, but the subviews drive the height (or the contentSize.height, for a scroll view, see below) from the inside.
Using intrinsic content size results in a lot less layout code — often you’ll see only relative / absolute positioning to locate the subviews. Really, subview size is often an internal detail, and it’s nice not to be hard coding it everywhere a reusable view is used.
Of course, we do often constrain subview sizes, especially widths. For example with a UILabel, I’d often set the width, but use its intrinsic height based on the font.
As discussed above, custom UIView subclasses we make can also have intrinsic size. We get this for free if we use auto layout. Otherwise we can override -intrinsicContentSize to make it easy for auto layout clients.
Scroll views:
For scroll views, we usually want the container to specify the frame, so we set up constraints that do that. Then we want the contentSize.width to be determined by the container (usually the same as the frame width), but we want the scroll view’s contents to drive the height.
contentSize.height is easy — just make sure that you have constraints as discussed above to determine the height. Typically the intrinsic heights of the subviews together with vertical spacing constraints to the scroll view do it.
contentSize.width usually requires a trick. If you just relate the scroll view width to its container, that sets the scroll view’s frame, not the content size width. The solution I’ve usually used is to constrain contentSize.width by relating a subview of the scroll view to the containing view. If there is no suitable subview handy, I’ll add a dummy view only for that purpose.
12345678910111213
[self.viewaddSubview:self.scrollView];[self.scrollViewmas_makeConstraints:^(MASConstraintMaker*make){make.edges.equalTo(self.view);}];UIView*dummyView=[UIViewnew];[self.scrollViewaddSubview:dummyView];[dummyViewmas_makeConstraints:^(MASConstraintMaker*make){make.left.right.equalTo(self.scrollView);make.left.right.equalTo(self.view);}];// We go on to add the subviews to the scroll view, with horizontal and vertical constraints
Content compression resistance and hugging:
Sometimes we need to give auto layout a little more information to know which fields are OK to stretch beyond their instrinsic size, and which ones are not. For example: you have an image with a label to the right of it. The left of the image is related to the left of the container, the right to the left of the label, and the right of the label to the right of the container. You want the image to be its natural size, and the label to stretch to the full available width, even if the text is currently shorter. If iOS stretches the image horizontally instead of the label, you can add this code:
Unfortunately, multiline labels sometimes don’t behave the way you’d expect unless you set preferredMaxLayoutWidth. The problem with setting that width at constraint creation time is that you give up dynamic layout update if the container width changes. One solution is to use a UILabel subclass containing a small fix. There’s been such a subclass at the last 3 places I’ve worked:
To center groups of views, normally we wrap them in a container view and center that.
Changing layout later on:
Since auto layout is a bit more flexible than autoresizing masks, often an initial set of constraints is all you ever need. If the view’s bounds are changed, iOS will automatically update the layout using the existing constraints. In these cases, you can create the constraints just one time in -viewDidLoad or a UIView initializer.
Every once in a while, you may need different constraints when the view is in different states. A common example is when a view that affects the layout of other views is hidden or shown. In that case, you can create the constraints in the -viewDidUpdateConstraints or -updateConstraints methods. When a state change that affects the constraints occurs, just call -setNeedsUpdateConstraints on the view. However, this means your constraint creation code will be run multiple times, so it needs to be idempotent —- see the next section.
Writing idempotent constraint code:
Whenever our constraint creation code may be run more than once, we need to be careful not to add on a new set of duplicate constraints each time, some of which may be in conflict, spew warnings to the console, and cause your layout to be chaotic as iOS breaks constraints randomly to get a set it can satisfy.
First, never use -mas_makeConstraints in code that may run more than once. Use either -mas_updateConstraints (if you always make the same constraints but their constant values change), or -mas_remakeConstraints (if you make different constraints for different states). Very rarely as a last resort, you might need to save the objects returned by these Masonry methods and invoke -uninstall on each.
You might wonder why we need to use those different Masonry methods. Why can’t we can’t just clear all the constraints out of our view before adding them again with -mas_makeConstraints? It turns out this is tricky, because some of the constraints that you manage in -viewDidUpdateConstraints or -updateConstraints are actually owned by subviews. It’s not easy to remove just the constraints you’re about to re-add. Some constraints that your containing view manages (which you should NOT remove) may actually be owned by your view. Similarly, some constraints that your view manages (which you should remove) may actually be owned by subviews. You only want to clear the constraints that your view manages, that you’re going to add again. Masonry provided the above methods to make that easy.
Couple gotchas with the UIViewController -viewDidUpdateConstraints method: (1) it’s often called more than once even when you didn’t call -setNeedsUpdateConstraints, and (2) sometimes you need to set up your constraints earlier in -viewDidLoad for everything to work nice. Because of this, I got in the habit of always making my constraints in a helper method -addOrUpdateConstraints, and always making them idempotent as above. I call the helper from -viewDidLoad, and add a call from -viewDidUpdateConstraints if necessary. That also keeps -viewDidLoad from getting too cluttered up.
Gotcha with the UIView -updateConstraints method: the super call must be made, and is supposed to go at the end.
Animations:
When you invoke -setNeedsUpdateConstraints on a view, or update a constant value inside a constraint directly, iOS will mark the view as needing layout, and set new frames using the updated constraints when it gets around to the next layout pass. The frames are not updated synchronously. If you need frames to update at a certain time, for example within an animation block, invoke -layoutIfNeeded on the view. Constraints are not animated, frames are, just like always.
Gotchas:
Sometimes table header views behave strangely if auto layout is used, on iOS 7 & 8 at least. For those cases and other rare times where auto layout just doesn’t seem to work right, I usually time box it and fall back to another method like programatically setting frames in -layoutSubviews / -viewDidLayoutSubviews.
Let us Know
We hope some of these tips prove helpful. We’re curious what useful techniques you’ve discovered, so feel free to let us know in the comments!
Earlier this week Apple released a major upgrade to Messages as part of iOS 10. In addition to being able to send different styles of texts and respond to messages with reactions, iOS 10 also allows developers to create app extensions that let users interact with apps directly within Messages. Going to live events is an incredibly social activity, making iMessage Apps and SeatGeek a perfect match.
Looking for a fun event to go to tonight? Want to send your friend an extra ticket at the last minute? No problem, the SeatGeek iMessage App allows you to easily share events and send tickets to friends, all without leaving your conversation.
Sharing Events
Our iMessage app makes it easy to browse and share events with your friends. By default, we suggest popular events in your area. If you’re a regular SeatGeek user, we suggest events you’re tracking and upcoming events by your favorite performers:
You can also search for any event you have in mind:
Sending Tickets
In addition to sharing events, our iMessage app allows you to quickly send tickets to your friends. All you need to do is tap “Send Tickets” and you will be shown tickets for all upcoming events you’ve purchased on SeatGeek. Tapping on an individual ticket will then send it to your friend. No more waiting at the gate for your friend that is perpetually late.
Find More Fun
We hope our iMessage app makes it easier to see more live events with your friends. Try it out yourself by downloading it on the App Store!
Listening Suggestions is a new feature of the SeatGeek app for Android, available now on the Play Store. Listening Suggestions shows you a rich notification when you’re listening to an artist or band that has a concert coming up nearby in the next few months.
We’re all super pumped about this feature. Jack—our CEO—often talks about how experiences, more than anything else, are a meaningful part of a person’s happiness. That’s why we created Listening Suggestions, and built it the way we did. We wanted to create something that didn’t just let people know about concerts nearby, but did it in a way that could truly wow a person. Strong colors and artist imagery come together with useful information to create a truly interesting notification to let you know about an artist’s show. We’re incredibly excited to see more people take advantage of it!
Turn it on!
Once you enable Listening Suggestions in the Android app—either via the dialog that pops up when you open the app, via Settings, or from the notification that comes up when you play music—you’ll be on your way to getting great event recommendations for artists you listen to.
The notification is silent, so it won’t disrupt your listening experience, but is easy to notice when it shows up. Tap the notification to view and buy tickets in the SeatGeek app, or track the event right from the notification.
Google Play Music & SoundCloud
Listening Suggestions works out of the box with Google Play Music and SoundCloud. All you have to do is listen to music, and we’ll let you know when an artist has an event coming up!
Spotify
If you’re using Spotify, you’ll have to enable a special setting within the Spotify app to have this work for you. Don’t worry, it’s not too difficult. Within Spotify’s settings, turn on “Broadcast Device Status”.
With that finished, just go back to doing what you always do. Listen to awesome music, and when we find a show, you’ll know immediately.
The updated Android app is out today in the Play Store, so check it out and let us know what you think! (Sorry iPhone users, this is an Android-only feature)
We recently announced partnerships with Major League Soccer and Sporting Kansas City. Today we’re announcing SeatGeek Open, the platform behind it all.
Fifty years ago fans had to queue in line at the box office – cash in hand – to pay money for a ticket. Throughput was a function of box office attendants. The Internet made it much easier to sell a ticket; you needed one server to handle an on-sale and not a bunch of attendants. But, in the last 20 years not much has changed in the ticketing world. SeatGeek Open brings ticketing to the 21st century. We provide the technical infrastructure where any site can function as a box office.
The core premise of SeatGeek Open is in the name: openness. This is in stark contrast to the closed nature of the ticketing industry today. Teams and artists will be able to distribute their tickets wherever they choose. We’re letting anyone tap into our APIs and use them for free. Imagine renting an Airbnb in New York City and seeing the option to buy tickets to the upcoming Drake show at Barclays Center. Or perhaps you are shopping for your favorite team’s merchandise on Amazon and want to add tickets to your cart. SeatGeek Open makes it possible.
Stripe and Braintree empower app developers by reducing the messy world of payments to clean, well-documented APIs. SeatGeek Open does the same for ticketing. Developers can integrate tickets into their app with a few hours of work. Our open APIs encourage other developers to build new services which will enable teams to run more effectively. Rightsholders will be able to choose from dozens of services like pricing, analytics, marketing automation, and CRM.
Most importantly, SeatGeek Open means a better experience for fans. Every ticket they purchase (primary or secondary) on any site will be verified. The closed ecosystem perpetuated by Ticketmaster forces fans to stumble through a clunky user experience to buy a ticket. A distributed box office forces every ticket seller to step their game up. Fans have myriad choices of where to buy tickets, and it’s incumbent on us to build the best experience for the fan.
Our partnership with TopTix enabled SeatGeek Open. We wanted an API-driven inventory management partner who sold tickets at scale. In six months our software will be live at Sporting Kansas City, proving the benefits of open distribution.
In technology, the only thing constant is change. Ticketing has been an exception and SeatGeek is changing that.
In July, we outlined a fundamental problem with the ticket industry. In a word, the ticket industry is closed. It should be open. Industry leaders loved our post, but they questioned “so what are you going to do about it?” We’re proud to announce a partnership with Major League Soccer and a radically open ticketing system for soccer fans.
Our partner, MLS, is a young league. In fact, MLS celebrated its 20th birthday this year. With an unrelenting focus on the fan, MLS is now the ascendant sports league. We see this in our data. MLS sales are quadrupling year over year with the highest rates of mobile utilization and last-minute purchasing of any league. To accelerate their rapid growth, MLS needed a novel approach to ticketing, one that focused squarely on the fan.
MLS has a young, mobile-focused fan, the type of audience that other leagues covet. Soccer fans spend time in dozens of mobile apps: from e-commerce sites like SeatGeek, Uber, and AirBnb to social media platforms like Facebook, Snapchat, YouTube, and Twitter. We are building a new type of ticket distribution, one that will empower dozens of sites and apps to sell tickets on behalf of a team. The premise is simple – put the tickets where the fans are.
Fans won’t have to wait long. Through a partnership with TopTix, we will be powering Sporting Kansas City in 2017 with our new, radically open platform. SKC’s tickets will be listed on dozens of existing and emerging ticketing and non-ticketing platforms. SeatGeek users will have access to secondary and primary tickets for Sporting Kansas City. Users will be able to purchase tickets in a few taps, and if they cannot make an event, re-selling tickets is dead simple using SeatGeek Marketplace.
Our ticketing service will revolutionize how Sporting Kansas City (and other teams) run their business. Rather than relying exclusively on their marketing to drive sales, SKC can put inventory in the hands of other companies, elevating their brand via new channels. Even more, SKC will better understand which fans are attending their games by gathering purchase data from dozens of sources their tickets sell on. Sporting Kansas City is an undisputed leader in technology and innovation. They immediately understood the power of open distribution, and we couldn’t be more excited to launch with them.
1996 – the year of the first MLS game – also marks another noteworthy event in our industry’s history. Ticketmaster sold its first ticket over the Internet. Yet, the Internet’s great promise of openness never affected the ticketing industry the way it transformed other industries. Innovation and change stagnated. Twenty years later, SeatGeek and Major League Soccer will have a chance to rewrite a new future, one that gives unprecedented control to rightsholders and access to fans.


