It’s late in the afternoon after a full day of actions in a week long campaign. People are starting to feel weary and sluggish under the baking hot sun and the exhaustion of thinking is only made worse by the sniping and grizzling everyone seems to be using against each other. The day’s almost at an end and all you want to do is sit down in the shade, take off your shoes and drink some water. Everyone else in the affinity group seems keen to get out of there as soon as possible and go to the pub, but you also want to raise with the group a concern about the action and you’re not sure that people want to listen.

*

It’s 1 o’clock in the morning at an overnight encampment, cool air feeling like it’s freezing your damp clothing. The night has been fairly uneventful, save for a small but loud argument a few hours ago, and your body is nagging you to sleep. The next buddy team is due to come on shift and mind the first aid tent until the morning soon and you’re waiting for them to arrive.

*

Today you have been taking part in a solidarity vigil against the forced deportation of a refugee from a detention centre. The vigil has progressed very smoothly, with no incidents and a good atmosphere amongst those who have attended. Yet, in listening to the speeches you couldn’t help but feel upset and a little disturbed by what you heard and it has started to make you feel quite stressed and anxious. On the outside, you seem okay – you don’t want to feel like you’re letting other people down. After all, you’ve been at these sorts of actions many times before without a problem, why start to worry now?

*

Each of the situations described above are not unusual situations to find yourself in when participating in protests. Long days and nights with little rest and even less sleep can grind even the most hardy down, while personal and political concerns can suddenly flare and become vitriolic. In order to deal with these issues and, if possible, prevent them from getting out of control we encourage affinity groups and even individuals to debrief after actions.

Debriefing is a process by which people come together after an incident or event to discuss what has happened and to come to a common understanding of what has just occurred. It is a useful opportunity to check in with other people and make others aware of how you are feeling, and to flag concerns or issues that arose during the incident; perhaps its primary use is being the first step in recognising and acting against Critical Incident Stress if there has been a traumatic incident. Through debriefing, questions such as “Did I/we do the right thing?”, “Is it okay to feel like this?”, “Should I/we have done more?” can be directly addressed and resolved, rather than leaving them to fester in the back of our minds.

It is important to keep in mind that trauma is subjective: different people may be affected by one situation in radically different ways depending on earlier traumas, coping techniques and a whole range of other factors. Hence the third example, above: in this case it is not seeing an act of violence, suffering or seeing a physical injury that has caused the trauma. Instead, repeated exposure to stories of severe suffering has taken its toll and the person in the example is experiencing emotional distress. You may also note that the example does not specify that the person is acting as a Street Medic: this process obviously has its benefits for medics (as the nature of our work at protests places us at a higher risk of encountering traumatic situations), but it is something that all protesters and affinity groups should consider and embrace. Trauma is by no means monopolised by Street Medics.

So, the advantages of debriefing amongst affinity groups are two-fold: to maintain and strengthen the affinity of the group, and to look out for the mental welfare of affinity group members.

How to debrief

Melbourne Street Medic Collective’s practice when it comes to debriefing is to debrief after every action, with an open invitation for non-medics to also attend. Sometimes this means debriefs are very short and quickly over and done with. Other times it has proved the opportunity for concerns to be aired, openly and without prejudice, and either quickly resolved or deferred upon agreement to a more convenient and appropriate time and setting.

We have also found it most effective to conduct debriefings as soon after the event/incident as possible and will generally move to a quiet area to debrief once the action has begun to wind up, so long as there are no immediate concerns/incidents to be dealt with.

Once assembled, someone volunteers to facilitate/chair the debrief and we conduct a check-in: taking it in turns to greet the group, describe how we’re feeling (“I’m all good”, “I feel like shit”, “I’m okay but I was pretty stressed for a while when the cops were getting aggro”, etc.) and briefly – i.e., one or two sentences – describe how we feel the action went.

For Street Medic collectives it is often useful to follow check-ins with any report-backs about incidents during the action (mostly because these may have been referenced during the check-in). Otherwise, a call is made for anyone to raise any concerns or points of praise for the action. This can be conducted in a similar manner to the check-in, with input from each person in the group, or input can be received through a general call-out to the group.

If a point is raised, it is important to remember that this process is intended to be constructive and that we need to be respectful of one another, even if the issue is of a personal nature.

Concerns should be raised without attacking a person, and responses called for after the first person has been given time to raise and explain their concern. Responses should be directed at the issue, not the person, and the discussion managed in such a way as to prevent digression or rambling. Here, active listening and non-violent communication skills are invaluable.

If needed, a two-minute time limit on speaking can be used and a speaker’s list employed to ensure the conversation is open to all and not dominated by a few key voices. Here, the role of the facilitator is key and to that end we have included some information about facilitation skills below.

Discussion should be directed towards finding a resolution but, if this is not possible (after all, Rome wasn’t built in a day) within the current debriefing space, the group should aim towards setting another date and time in the near-future to further discuss and hopefully resolve the issue. If for some reason this cannot be arranged, emphasis should be put on trying to organise this as soon as possible in the following days.

To recap:

1. After the action, find a quiet place away from the action.
2. Nominate a facilitator.
3. Conduct check-ins (How are you feeling/How do you think the action went?).
4. Make any report-backs.
5. Ask group members if they have any issues they want to raise or any general comments on the action.
6. If needed, agree on a date and time to follow up from the debrief.

http://melbsmc.org/wp-content/uploads/2014/12/facilitating_group_agreements.pdf

http://melbsmc.org/wp-content/uploads/2014/12/facilitating_difficult_behaviour.pdf

Scroll down to find downloadable versions of this post.

TEAR GAS DECONTAMINATION

If you’re helping others, wear gloves – the chemicals will quickly contaminate other people and materials!

Decontamination:

  1. Remove contaminated clothing and wipe off any remaining chemicals with gauze/rags.

  2. Spray vegetable or mineral oil on any skin exposed to the gas (NOT THE FACE) and wipe off with new gauze/rags.

  3. Wipe skin down again with new gauze/rags and rubbing (isopropyl) alcohol.

Aftercare:

  • Shower with cold water and scrub your skin with soap. Hot water opens pores, which may let chemicals penetrate more deeply.

  • Don’t take a bath – you don’t want to soak in the chemicals!

  • Position yourself so that contaminated water from your hair does not run all over your skin – especially your face!

For your clothes:

  • Place contaminated clothes in a sealed plastic bag until you can wash them or dispose of them.

  • Clothes contaminated with tear gas can be hung out in the wind. It may take several days before the smell is gone.

  • Wash clothes with a strong detergent-based soap (this is not a time for eco-friendly, detergent-free products).

  • Coats, furniture, rugs and other items can be exposed to air or steam cleaned; some recommend adding 5-10% baking soda to the steam water.

The effects of tear gas and pepper spray are usually temporary.

Seek medical attention if you experience any of the following:

  • Severe or ongoing breathing problems

  • Ongoing eye irritation

  • Skin rash

  • Symptoms that persist, worsen, or reappear.

Many people feel fatigued or ill after chemical exposure. This is a good time to take extra good care of yourself. Drink a lot of water, eat nutritious food, and get enough sleep. Many different herbs can help detoxify the body-ask an herbalist for recommendations.

Download A4 version for printing and sharing.

Download A5 version for printing and sharing.

Download Quarter-pane (4 A5 copies to a sheet) version for printing and sharing.

Download Letter version for printing and sharing.

Melbourne Activist Sam Castro sustained injuries protesting Victoria's "Anti-Protest Laws".

Melbourne Activist Sam Castro sustained injuries protesting Victoria’s “Anti-Protest Laws”.

 MelbSMC believe the best way to avoid injuries is to Be Prepared and to look out for each other. But, protest is struggle and unfortunately people will still get hurt by forces resistant to social justice & change. That is why being able to document injuries is an important skill for all activists, and especially so for groups who traditionally are singled out for acts of repression (such as people of colour, the homeless, transgender activists and even medics).

What follows are some tips on how to document these injuries:

At the protest:

  • Remember to seek medical advice as soon as possible!


  • Keep all evidence (bag bloody clothes to put in the freezer when you get home, save projectiles etc)


  • Talk to a Legal Observer who will record the time of the incident and may be able to talk to some of the witnesses.
Injured Protester

Ask a Street Medic for help. We maintain confidentiality at all times & can assess the severity of your injuries.

At the hospital or clinic:


  • If it is not a life-threatening injury consider visiting a GP or a clinic you trust.


  • Record the names of all treating doctors/ healthcare professionals who see your wound(s)


  • If appropriate – tell hospital staff how you were hurt.


  • Wounds like broken ribs, concussion or torn ligaments don’t show up when photographed so ask the medical staff to write up all your injuries in detail.


  • Ask for a copy of your notes, x-ray, scans (you might not be allowed them but ask anyway).

At home:

  • Take photos as soon as possible – severe injuries may heal quickly depending on your physical health and nutritional status.


  • Get a trusted friend to take a picture of your whole body before zooming in for detailed shots of the injured area


  • Stand in front of an uncluttered, neutral coloured wall.


  • Take images from an assortment of angles and think about who might be scrutinizing these photos at a latter date


  • To get perspective take photos with a ruler or something of standard size (like a coin) next to the injury.

bruisecoin

  • Use the ‘Date & Time’ tagging function on a digital camera to show the injury changing over a period of time.


  • Darker skin may not show up injuries so take photos in a well lit place, and be careful with a flash as this may bleach out, or reflect off the skin and make the bruising look lighter than it actually is.


  • Keep a diary of the injury as it heals and how it effects your quality of life.


  • Remember bruises will darken and grow over time.


  • Store all your paperwork, images and evidence in a secure place.


  • Keep all follow-up care or Doctor appointments!


  • Debrief frequently with your friends, loved ones or affinity group.


Cecily McMillan shows the hand-shaped bruise on her right breast, which she testified was made by NYPD Officer Grantley Bovell when he accosted her from behind.

Cecily McMillan shows the hand-shaped bruise on her right breast, which she testified was made by NYPD Officer Grantley Bovell when he accosted her from behind.

This pro-tip will show you how to treat a penetrative foreign object.

Foreign Object embedded/penetrating in the body (e.g. arms, legs, head, eye)

These will generally be in the major wound category and Medical attention will always be required, I would strongly recommend as soon as someone approaches you with an embedded object in them to either call an ambulance or get them to hospital.

***DO NOT REMOVE OR MOVE THE OBJECT***

***DO NOT PUT PRESSURE ON THE OBJECT***

We cannot see what damage has been caused internally by the object so we cannot remove it, and pressure should not be placed on it for the same reason. The only time you would consider trying to move the object by shortening it would be if the object is unmanageable in it’s current form (e.g. the person has impaled themselves on a long branch).

Follow the tips below for any embedded/penetrating object

**Creating Padding**

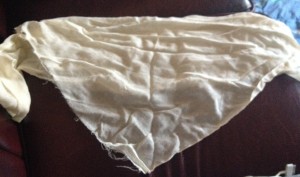
-Take a triangle bandage and stretch it out

IMG_2714

– hold onto the long ends and start to twirl it so it looks more like a rope.

IMG_2713

– Loosely wrap it around your hand, this will provide you with the donut shape.

IMG_2721 IMG_2724

Don’t worry about how pretty it looks, it just needs to hold its shape so that we can fit it over the object and bandage it in place with one of the other bandages.

– Place the donut over the protruding object without placing pressure on the object itself

IMG_2749 IMG_2752

– Using a bandage, start wrapping over the triangle bandage while avoiding direct pressure to the embedded object.

IMG_2757 IMG_2761

This would be the same treatment anywhere on the body, including the eye. Be sure to seek urgent medical attention, and keep the injured person calm and still so that they don’t cause further damage to the limb. If you find yourself in a situation where you don’t have bandages, items of clothing or material can be substituted for the bandages shown here.

There are different types of Foreign objects that you may need to treat in the field including eyes, ears, and embedded/penetrative wounds. For this pro-tip we will cover eye and ear complaints that you may face and our next pro-tip will cover the embedded/penetrative wound treatment.


Foreign Object in the Eye:

Dust/Grit/Eyelash/Insect

  • Flush the eye using clean water (if you are out in the bush – best to use water from a water bottle instead of a stream or creek).
  • Tilt the head back
  • Rinse the eye (use a sport water bottle with a push top or an eye drop bottle).

If there is an object that is protruding out of the eye (e.g. glass or a stick) please refer to our next pro-tip on how to treat it.


Chemical Burn

If a chemical has been introduced to the eye it should be treated as a serious medical problem.

  • Remove any contact lenses (these will hold the chemical in and cause greater problems if they are not removed quickly)
  • Rinse with flowing water for 15 -20 minutes.
  • Cover the eye with a patch
  • Seek further medical assistance, pain is not an indicator of damage with eyes unfortunately, so it is best to seek immediate medical support for any chemical burns. Be sure to find out what chemical it was that they got in their eyes as this may effect the treatment they receive.


Pepper Spray

In the event of pepper spray be sure to flush the eyes thoroughly if available use LAW mix (50% Liquid antacid and 50% Water) as it has been shown to be more effective than other treatments such as water and milk.

  • Get the person to lay down/lean back
  • Ask them to remove any contacts they may be wearing as this traps the pepper spray
  • Rinse their face first quickly with water to remove residue that may be sweated/rubbed back into the eyes after treatment
  • Using a spray bottle/sports bottle flush the eye from the tear duct outwards. You may need to hold their eyes open for them.
  • If using LAW mix be sure to advise the person that they will only see whiteness for 30seconds and then their vision should return.

Street Medics of Tahir treating Pepperspray http://m4t.wikidot.com/contrib:en-law


Foreign Objects in the Ear:

Insect

If you find that an insect has gone into your ear DO NOT try to pull it out with tweezers or stick your finger in your ear. As it is an unknown insect you do not want to make it sting/bite you.

  • Turn the head so that the ear with the insect in it is facing upwards

**If the insect doesn’t leave itself at this point in time**

  • Pour some (warm if possible) oil into the ear (if oil isn’t available you can try to this with water), this should cause the insect to float out of the ear.

***If the insect does not come out of the ear once it has been flushed with the oil, seek medical attention***


Object in the Ear

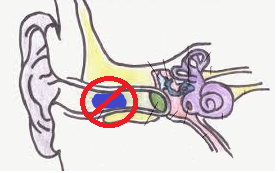
If the object is in the outer canal (protruding from the ear) you may try to remove the object with Tweezers (do not use your fingers)

ear2

If the object is a fair way into the ear, or the depth of the object is unknown, seek medical attention before trying to remove the object.

ear

• You’re shoved to the pavement at a protest. You try to get back up but a cherry-red DM accidentally steps on your pinkies.

• On a picket an over zealous police officer grabs your hand to break the line.

• A politically neutral bee stings you as you try to swot it from your face.

 gollum-n-the-ringA swollen finger is a perfectly normal body response to any of the above situations, but a tight fitting ring could cause all manner of problems. Constricting rings can lead to more intense swelling, poor lymphatic drainage, and even total loss of circulation to the poor affected digit.

Street Medics don’t as a rule carry ring cutters. That said, we appreciate that you’re attached to both your finger and your ring. That is why we’re keen to get that band of unyielding metal off your pinky as soon as possible.


Some things we as Street Medics might do as to help are:

Apply ice and elevate asking you to hold your hand above your heart.

-We might lube your finger up (real good) with soap & water and ask you to twist the ring off yourself.

-If we suspect a fracture suggest you go to the Emergency Department and get an X-ray. In ED they are more likely to take an orthopaedic ring cutting device to your beloved ring.

-But, back in the field there’s also a near magical way of removing a ring using only a piece of string and it looks like this:  (Though, this method does require a bit of practice.)

And remember, street medics really do care about blood perfusion to your fingers and thumbs. That is why, if we have any doubts suggest you remove the ring straight away. We NEVER remove people’s rings without consent, but if you are insistent you won’t remove the ring, we will politely & non-judgmentally explain we are worried about tissue and nerve damage to the digit.

After the accident and up to 24 hours later,  look out for changes in the fingers’ colour, temperature & sensation. If the finger turns pale or blue, gets cold or painful, see a medical practitioner as soon as possible.

Ring01

Street Medic’s are constantly adding supplies to their first-aid kits. In fact, over time we can accrue so much equipment, accessories, back-up supplies, rare & exotic devices and unnecessary medical baggage that our packs become a manual handling risk in themselves!Oversized kit

So, to go against the current of all those other blog posts indulging us to stuff our first-aid kits with all manner of sexy equipment, I have decided to write one about removing stuff from that over-sized, pregnant kit of yours!

1: LATEX SUCKS: About 1% of the population experiences hypersensitivity to latex. 1% might not sound much, but in Australia that equates to roughly 240,000 people with a latex allergy. Reactions to latex can range from minor skin irritation to hay-fever like symptoms … to full blown anaphylactic shock potentially resulting in death!

Street Medics always obtain consent before assisting a casualty, but in the heat of a direct action it is generally not possible to gain a full & concise medical history. Therefore it becomes us to limit the probability of exposing our comrades to potential harm … thus it is best practice when packing a first-aid kit  to assume everyone has a Latex Allergy.

Only use vinyl or Nitrile gloves and check all your bandages, band-aids and plasters for a Latex-Free stamp. If in doubt about a piece of kit … ditch it.

2: STAINY BETADINE: Betadine and other iodine-containing topical treatments can be very irritating to the skin, and in some cases can cause tissue damage – in particular to people with a shellfish allergy. Another problem with Betadine is that it stains, which can make skin assessment later on particularly challenging.

So throw out all those old Betadine lotions in your first-aid kit and replace them with Chlorhexidine – or better yet good old fashioned Saline! In the field it is probably best to liberally irrigate wounds with normal saline and leave the antiseptic washes to later.

3: IMPROVISED BURN GELS: Stuff like petroleum jelly, toothpaste and even butter may have a certain DIY appeal when it comes to treating burns, but they really have no place in a Street Medics’ first-aid kit. Extensive burns are a medical emergency and need to be referred to a hospital as quickly as possible. In the Emergency Department they will have to take a brush to your improvised burn treatment in order to assess the wound beneath it. Ouchie!

So, out on an action – and if safe to do so – gently cool minor burns under running water. Severe burns that need hospital treatment will require dressing in clean, sterile non-stick gauze.

4: POINTY THINGS: Protests and civil disobedience really are not places where you want to be caught carrying 10 inch Acupuncture needles! The same could be said about suture sets. It’s great that you’re skilled in suturing wounds, but then again – even if you know what is the right kind of suture to use – is an urban demonstration the ideal locale to be sewing shut a gaping wound when there is a ambulance parked a few blocks away?

It is even advisable to think twice about the kind of bandage scissors you pack. Small blunt tip scissors are ideal  and practical.

Bd0nTsiCMAAZ98O.jpg_large

Bd0nTsiCMAAZ98O.jpg_large

In Melbourne we are rarely blessed with terrifically hot weather but, on occasion, we find ourselves sweltering in the heat of a 40°C+ day. Such hot weather poses a risk to protesters due to the possibility of dehydration or heat stress, and this can be compounded by particular methods of protest. Activists engaged in lock-ons or pickets may be unwilling or unable to leave the site, meaning they may be exposed to direct sun and wind for long periods of time and have difficulties getting water, food or relieving themselves. In order to ensure that they can engage in effective political action as long as possible, activists must come prepared with the right supplies and attitude to last the day.

Essential supplies:

  • Bottle of water (600mL – 1L);
  • A small snack, such as a museli bar or packet of lollies;
  • A hat;
  • Sunscreen, SPF30 or above;
  • Light, loose-fitting clothing that covers as much skin as possible.

Essential attitudes:

  • Rest Well, Rest Often. Get as much rest as possible before and after actions. Recharging your batteries helps to prevent burn-out and will lessen stress during actions.
  • Know your limits. By the time you’re feeling nauseous from the heat or feeling the burn from sunburn you have pushed yourself too far. Talk with your fellow activists about what you feel comfortable doing, how you’re feeling and about rotating out to ensure that everyone can stay healthy and happy. You may notice that in hot weather, police commanders will rotate their officers out either in teams, couples or individually to allow them to drink water, have a snack and sit out of the sun for a while: this enables them to maintain their presence all day, and similar actions should be taken by protesters where possible.
  • Sunscreen or Fry, Water or Die. In Australia, the risk of sunburn is very high, even on cloudy days. On 35°C+ days, the likelihood of getting sunburned after an hour in the sun is almost guaranteed and burns will take several days to recover from, even with care. Dehydration, as well as making you feel irritable, nauseous and dry-lipped, can lead to cramps, fainting and further medical problems. The body needs to take in at least 30 – 60mL of water an hour to produce the necessary urine for basic kidney function and this should be kept in mind during prolonged actions.

Street medics will often bring supplies of water and sunscreen to actions, but this is intended as a measure of last resort or treatment. Carting bulk supplies of water to and around actions comes with a physical and financial cost that many of us are unable to bear for very long. If long term actions or actions during extreme heat are planned, we encourage activists to prepare themselves accordingly and perhaps come together to organise a separate water affinity group who can make it a priority to ensure that activists are adequately hydrated and sun-screened.

For more information, check out Pro-Tips 12 (Dehydration) and 20 (Keeping Cool in the Heat) and the Victorian Government’s Better Health resources on Heat Stress and Heat Illnesses.

One of the most important contributions Street Medics can make to a demonstration or a direct action is being The Calm in the Crowd.  Here’s MelbSMC’s approach to remaining calm during an emergency and passing that sense of self-control onto other people.

1) PREPARE!!!!

In my experience confidence comes from three sources;

        – Experience

        – Prior preparation

        – Arrogance

I recommend the first 2 sources

2) Take a moment to ground yourself.

This was the topic of Pro Tip 8, give it a read.

3) Acknowledge the pace and meet it.

Every emergency has a pace you must meet, experience, training and staying alert will help you identify it.  Once you start looking you’ll discover that very few emergencies require split second decision making.

Once you’ve identified the pace try not to exceed it and you’ll usually have all the breathing room you need.

4) Your best is all that is expected.

Trust and respect are earned through consistency, openess, collaboration and commitment.  Not infallibility.

6) You’re not alone….. unless you are.

Don’t take on everything if you don’t have to.

8) Focus on the task at hand.

Just concentrate on the one thing you’re currently doing.  Whether it’s bandaging a wound, marshaling a crowd or planning your next steps.

9) Who’s emergency is it?

This may sound callous to some but, ask yourself “who’s emergency is this?”  The answer is usually “not mine”

Then knuckle down and help the best you can.

10) Learn to acknowledge your feelings.

Sounds simple but it’s a skill that takes practice to develop.

Negative emotions tend to loose there grip on you once greeted.

11) Learn to acknowledge when the feelings of others are affecting you.

Fear and anxiety are astonishingly contagious.  However I find its grip is much looser once I’m aware it’s coming from outside.

images

Often it’s the little skills that we overlooked in training that interrupt effective first aid.  In my experience the classic underdeveloped “little skill” is finding pulses.

So here is my run down on how to effectively find and utilize pulses.  However before I start I would like to point out that this is written for lay first responders and, as such, I will dispense with unnecessary detail or distinctions regarding anatomy or clinical findings.  I strongly encourage all my readers to pursue these details if they feel inclined but remember as street medics we aim to empower each other act effectively, not brow beat each other with minutiae.

 Why check pulses?

An effective first responder checks pulses to simply observe their presence and their rate.  The presence of a pulse informs you that the the heart is beating and that the blood vessels are effectively conducting blood into the limb with the pulse.

The absence of a:

  • central pulse [carotid or femoral] implies that the heart is not effectively beating.
  • peripheral pulse [radial or foot] implies that either;

A fast pulse [greater that 100 beats per minute] can occur with:

  • Shock
  • Pain
  • Fever
  • Dehydration
  • Blood loss
  • Certain drug, poison or venom intoxications
  • And many other conditions

A slow pulse [less than 50 beats per minute] can occur with:

Detecting pulses is essential in many scenarios, but most important for detecting shock early and assessing limb fractures for compromised blood supply.


Basic Principles

Finding pulses can be difficult, even on healthy skinny people.  To maximize you chances of locating the pulse follow the following principles

  1. PRACTISE on everyone who’ll let you.  If you have a sick person in front of you it’s too late for practice.
  2. Use the pads of you fingers instead of their tips, this increases the surface area you have to sense with.
  3. Search for the pulse with as many finger pads on the area as possible.
  4. Feel for pulses where the artery runs over a bone, this way your fingers press the artery against a hard surface that the pulse can “bounce” off.
  5. If you’re confident that your finger pads are in the right spot but you can’t feel the pulse don’t move your fingers off the area right away, first try;
    • Altering the pressure you are using.
    • Rocking your finger pads slightly in the area.


The Essential Pulses

The Central Pulses

The Carotid Pulse

The carotid arteries run from the major blood vessels in your chest through the neck just next to the Adam’s apple [yes, women have them] and into the brain.  It is the major arterial supply for the brain and also houses important pressure receptors that help the body regulate blood pressure.

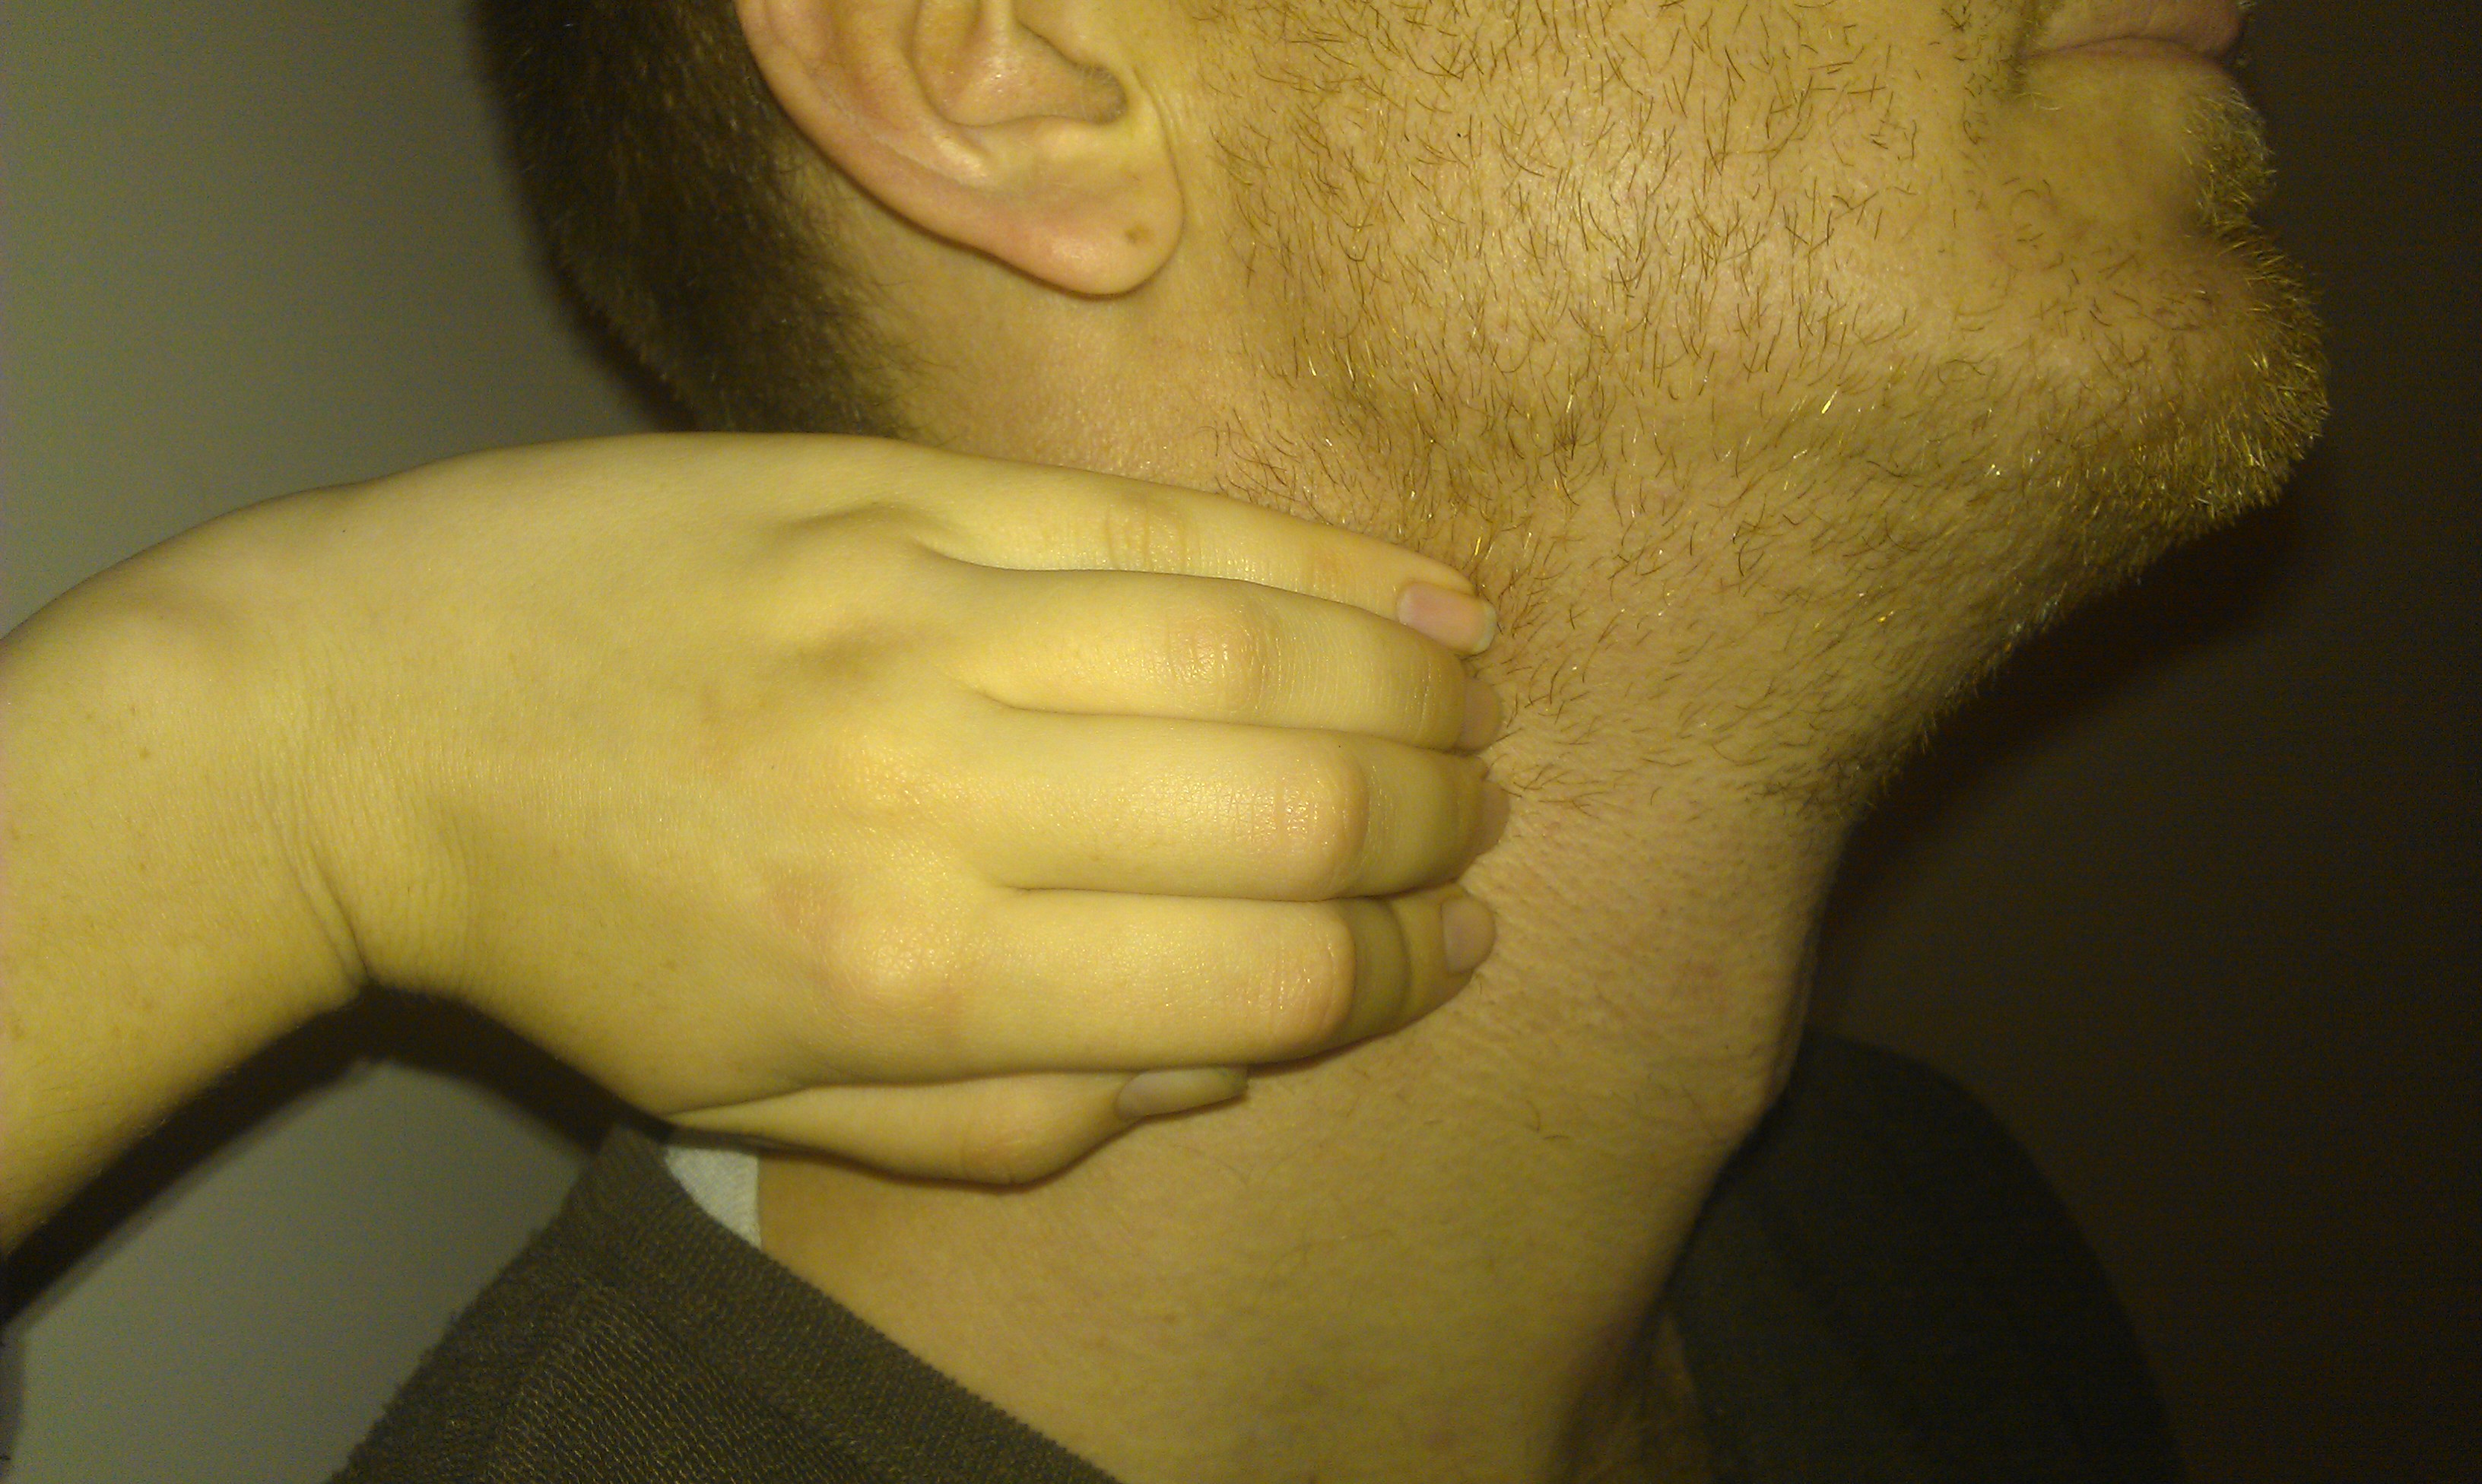
To find the carotid pulse first feel the front midline of the neck to locate the Adam’s apple.  Then place as many finger pads from one hand as you can fit next to and parallel to it.  Press gently straight into the neck.

Note:  Those pressure receptors are usually located in the bottom half of the carotid artery.  If you press hard enough on them they’ll send signals that tell the heart to lower blood pressure and the patient might faint.  For this reason look for the pulse in the upper half of the neck.

2013-06-12 23.21.22


The Femoral Pulse

The femoral arteries runs from the major artery in the pelvis and into the legs passing superficially in your groin.  They are the major arterial supply for your legs.

To find the femoral pulse you’ll first need to locate the pubic tubercle.  This tubercle is a corner on the pelvic bone that usually sits under the pubic hair.  Press in to the pubic hair region and you’ll feel a bone, follow that bone sideways until you find the end of it.  Now place your finger pads next to it as shown in the picture below.


The Peripheral Pulses

The Radial Pulse

The radial artery runs from the elbow to the hand along the inside surface of the forearm.  It supplies blood to the forearm and hand.

To find the radial pulse first locate the tendons in the center on the front of the wrist.  You should be able to find 2 or 3 of them.  Next place you finger pads next to the outer most tendon on the side thumb side of the wrist as shown below.
2013-06-12 23.13.06

The Dorsalis Pedis Pulse

The dorsalis pedis artery emerges from the major artery behind your shin bone at the front of the ankle joint and runs along the top of the foot next to the tendon that lifts the big toe.  It supplies the top of the foot with blood.

To find this pulse first locate the big tendon running from the big toe to the ankle.  Place your finger pads along this tendon on the little toe side.

The Posterior Tibial Pulse

This pulse is the hardest of the lot.

The posterior tibial artery emerges from the back of the knee and runs behind the calf until it take a sharp turn around the inner ankle bone from behind as it enters the bottom of your foot.  It supplies blood to the calf and bottom of the foot.

To find it first locate the inner ankle bone [proper name: medial malleolus] and place your finger pads behind it as shown.  The pulse will be found some where in the area between the bottom and rear edge of the ankle bone and the heel.

2013-06-12 23.16.06


Finally

Remember to practice as much as you can and seek out experienced medics to help you if your having trouble with it.


Further reading

A guide to lower limb examination, University of California

A guide to upper limb examination, University of California